You can share data on hard drive via File Explorer and reliable third-party software AOMEI Backupper. The second one enables you to auto-sync the changed part on your hard drive.

Many individuals wish to ensure their files and folders on the hard drive stay the same across multiple computers, either for teamwork or disaster recovery reasons. However, the question is, how can this be achieved?
Typically, people rely on the traditional approach of manually copying folders to a USB drive and then pasting them onto another computer. The drawback of this method is that when the source folder gets updated, you're left with no alternative but to repeat the process of copying the changed files.
To simplify this process, you might prefer directly share hard drive over a network, whether they're on the same network or not. In the following, I'll present 2 straightforward methods for achieving this. This eliminates the need for a removable device and ensures that any changes in the source folder are automatically synced to the destination.
Before you start, please connect your hard drive (internal and external) to your computer and make sure it can be detected.
When it comes to syncing folders on hard drive over a network on Windows PCs, the process involves creating a shared folder and granting permissions to other users within the same local area network (LAN) to read and write to it.
Process 1. Create a shared folder to sync files on hard drive
Step 1. Navigate to the hard drive you want to share and locate the file folder your want to share and right right-click on it, choose Properties.
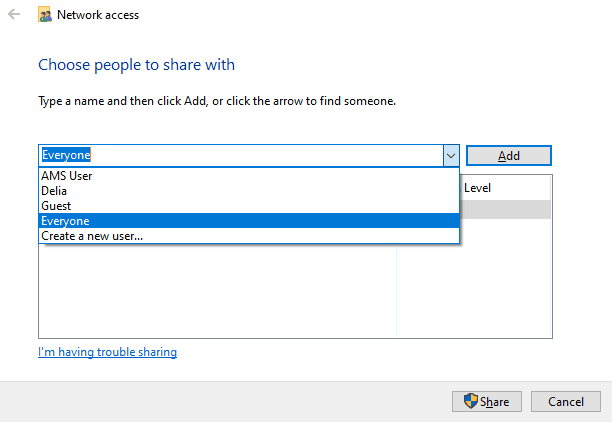
Step 2. Navigate to the Sharing tab, and there you'll find the option to click on Share... to grant network access to specific user groups of your choice. If you need to permit access to this folder for everyone on the network, simply select Everyone and then click Add >Share.

Step 3. Go to the Advanced Sharing section, click Advanced Sharing... and then tick Share this folder to enable the network sharing.
Step 4. Select Everyone and set permissions for it, like Full Control, Change or Read.
Process 2. Sync hard drive over network with shared folder
Step 1. On another computer with permission, press Win + R key to open the Run box.
Step 2. And then type \\ + computername or IP address of the source computer, \\192.168.0.55, for example and hit Enter to get access to it. You can also be able to find it in File Explorer Network.
►Note: If you encounter an error message such as "Network discovery is turned off..." in the Network section, you can resolve it by clicking on the "Network discovery is turned off" banner. From there, choose the option to Turn on network discovery and file sharing.
Step 3. Choose the files or folders you wish to synchronize, and then copy and paste them onto the second computer.
If you are seeking greater flexibility and safety in managing folder synchronization, such as automatically share hard drive over network Windows 10, you can achieve this by creating sync tasks using a professional file sync tool, like AOMEI Backupper Standard.
This approach is essentially an extension of Method 1, but it eliminates the need for extensive manual copy-and-paste tasks by automating the process. It enables automatic synchronization for multiple folders across different computers.
★ AOMEI Backupper Standard is a free software compatible with Windows 11/10/8.1/8/7/XP/Vista. ★ You could set up a sync schedule to run the sync task automatically, like Daily/Weekly/Monthly/event trigger and USB plug-in mode. ★ In addition to sync over network, you can also sync folders to OneDrive, Google Drive, Dropbox, external hard drive, USB flash drive, NAS, etc.
Download and install the Standard edition to enjoy the free file sync feature. For server users, please try Server edition.
Step 1. Launch the software on any of the computers within the same LAN, select Sync tab and choose Basic Sync.
You can upgrade to enjoy more advanced sync features:
•Real-Time Sync: Ensure that any modified files in the source directory are instantly synchronized with the destination directory in real-time. •Mirror Sync: Maintain a constant match between the files in the destination directory and those in the source directory, ensuring they are always identical. •Two-Way Sync: Any alterations made in either the source or destination directory will be synchronized with the other side in a mutually reciprocal manner.
Step 2. Click Add Folder to select folder on the local computer. You can add multiple folders as you like by clicking the + button.
Step 3. Then choose the destination path. Please select Add Share or NAS Device, type the network path (the IP address of the target computer and then select one shared folder on it).
►Note: Even if the two computers are not connected on the same local network, you have the option to share HDD over Internet. This includes syncing a local folder to cloud storage services like Google Drive, OneDrive, or Dropbox.
Step 4. Click Schedule Sync to set daily, weekly, or monthly automatic sync tasks, and choose Start Sync to prompt. It will auto-sync the changes to the target folder at the next scheduled sync after you modify these files.
Share hard drive over network can be performed via the advanced sharing feature in File Explorer and advanced third-party software AOMEI Backupper. This third-party software enables you to sync your files without much network limitations and have more sync freedoms. Its user-friendly interface and straightforward operation allow you to accomplish a synchronization task in just three easy steps.
Additionally, this software is a full-feature backup and restore software for Windows users. You can ghost clone your hard drive embedded with featured hot clone technology even when you are running your computer to eliminate time-consuming and troubles.