You still can create Windows 7 live USB without ISO as long as you have Windows 7 installation disc. And the best way is to use a professional disk cloning software.

A live USB is a portable external USB drive containing a full operating system and allows you to boot from it at any PC you want. It can be a USB flash drive, external disk, or solid-state drive, if you use the last two devices, it may be called a live HDD and live SSD respectively.
They are the next generation of live CDs that have added benefits, such as writable storage, allowing to customize the booted operating system. So you can use it in embedded systems for system administration, data recovery, test and persistently save settings and install software on this USB device.
Before January 14, 2020, you can easily download Windows 7 ISO file from the official download page, but now it shows the fixed lifecycle policy for Windows 7. You can see the mainstream end date is January 1, 2015, and the extended end date is January 14, 2020.
Since many users are still using Windows 7 or have not yet had time to upgrade to the new operating system, Microsoft offers extra extended security updates for 3 years. So the final time is January 10, 2023.
Fortunately, you are still able to download Windows 7 automated installation kit. If you also have the Windows 7 installation disc, you can create Windows 7 live USB without ISO file. If you have this need, please continue to read this article and learn the stepwise guide below.
Before starting to create Windows 7 live USB portable, please be sure you have a working Windows 7, installation kit & disc, and a USB drive with at least 16GB. Please note that the USB drive requires to be formatted with the NTFS file system.
If not, please open cmd as administrator and type the following commands to make it. Press Enter in order to execute these commands.
After preparing your USB drive well, follow the steps below to create a live USB in Windows 7.
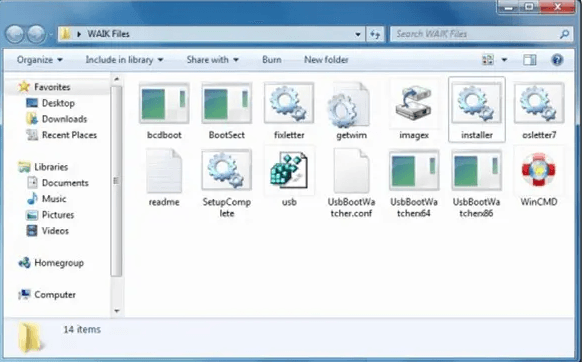
Step 1. Create two folders named WAIK Files and Windows Files on your desktop. It requires 5GB free space here.
Step 2. Download the Windows Automated Installation Kit for Windows 7, copy the Bcdboot.exe, Bootsect.exe, and Imagex.exe files in it to the WAIK Files folder. At the same time, copy everything in Windows 7 installation DVD to the Windows Files folder.

Step 3. Run the Installer.cmd file as administrator and press Enter to continue in the first papge.
Step 4. Press Enter to browse the Install.wim file in the Windows Files folder. And usually, it is in the following path: Windows Files/ Sources/ install.wim.
Step 5. Here you will see all the available image, type 1-5 to select the Windows 7 edition you want to install on USB drive and press Enter.
Step 6. Type the drive letter of your USB drive (here is L) and press Enter.
Step 7. Type the drive letter of your active partition (here is C: drive) and press Enter. If you are not sure, check it in the Disk Management.
Step 8. Finally, the Installer will ask you if the device to install Windows is a USB drive, type Y and press Enter twice. It will start to extract the Install.wim file, once done, you need to reboot your PC to continue the normal Windows 7 installation.
If you do not have the installation disc or feel the previous method is too complicated, you can also choose to create a portable Windows 7 USB edition easily with professional disk cloning software. AOMEI Backupper Professional is a great choice.
With it, you can directly clone Windows 7 to USB drive including the operating system, installed programs, personal data, etc with its Disk Clone feature. And you can boot from the cloned drive on any PC as long as it is the first boot option in BIOS.
Please download this software to have a try!
(PS: The Professional version of AOMEI Backupper only supports Windows 7, 8, 10, 11, XP and Vista. For server users, try AOMEI Backupper Server!)
Step 1. Run AOMEI Backupper Professional, and click Clone > Disk Clone in order.
Step 2. Select the Windows 7 system disk as the source disk. Then, click Next.
Step 3. Select the USB drive as the destination disk. Then, click Next.
Step 4. Confirm you select Windows 7 system disk and USB drive correctly, and click Start Clone to create Windows 7 live USB and boot from it.
Notes:
This article introduces you to two effective ways of creating Windows 7 live USB, you can choose to make it with an installation disc or professional disk cloning software. The most significant difference between them is if the live USB contains installed programs and your data. If you want to keep them, please choose the second method.
Indeed, this software not only helps to clone Windows 7 to USB, but also copy Windows installation from one hard drive, migrate operating system to SSD, clone Windows 10 to NVMe SSD, replace laptop HDD with SSD, and more. Please download it to explore yourself.