How to Create an ISO Image of My Hard Drive (5 Ways)
This article describes 5 useful methods on how to create an ISO image of my hard drive using AOMEI Backupper Standard, MediaCreationTool, DISM, etc. Scroll down to explore more.
By @Ivy Last Updated May 23, 2025
What is a hard drive ISO image?
ISO image, also called optical disc image, is initially based on a bootable CD/DVD or Blu-ray disc, from the ISO 9660 file system used with CD-ROM media.
It's a disk image that contains an exact sector-by-sector copy of an optical media, such as a CD/DVD or Blu-ray disc. Now it has evolved into new forms. So you can use it to:
capture Windows images under a recovery environment
create an ISO image (.wim) of a hard drive for deployment
install or upgrade Windows
create disk image for HDDs/SSDs
clone hard drive to ISO image
create a bootable USB drive in case of system or disk recovery.
How to create an ISO image of a hard drive
As mentioned above, there are 3 types of ISO images for a hard drive, namely using optical discs, HDDs/SSDs, and USB drives. Here are 5 methods, with at least one method for each type of disc image.
For optical disc, you need to use DISM (Deployment Image Servicing and Management) and Media Creation Tool. The first one requires a recovery media or installation disk
For HDDs/SSDs, try free disk imaging software - AOMEI Backupper Standard. It integrates cloning methods to make this process quick.
For USB drives, usually referred to as bootable media, you can use an installation disc, built-in Recovery Drive, or third-party media creator to make it.
Method 1: Create a disk image of HDDs or SSDs
To create a disk image, you need reliable disk imaging software, such as AOMEI Backupper Standard. It's FREE and integrates all the backup, restore, clone, sync features, and other useful tools.
To get started, please download it on a working computer.
AOMEI Backupper
Why Choose AOMEI Backupper?
Backup and clone HDDs/SSDs, MBR/GPT disks.
Set and forget backup settings - daily/weekly/monthly schedule backup.
Backup only changed files, greatly saving time and space.
Create bootable USB, CD or DVD, ISO files, 32-bit or 64-bit, legacy BIOS or UEFI.
P.S. Note this version only supports Windows 11/10/8/7/XP/Vista. For server users, try the AOMEI Backupper Server.
Step 1. Launch AOMEI Backupper Standard. At the main interface, select Disk Backup under the Backup tab.
Step 2. You can name it for the "Task Name" boxto help you distinguish it from other backups. Select the source disks that you want to back up and then the destination path to store the image file.
⚠️Note: You can add several disks to be backed up each time, but need to restore these disks one by one. Moreover, it is impossible to restore several disks included in an image file to one larger disk.
Step 3 (Optional). To make this task hassle-free, you can click Backup Options, Schedule Backup, or Backup Scheme to set your preferred settings.
By default, this software will compress images and use Microsoft VSS to backup the disk to a smaller image file without interrupting. You still need to enable Windows 10 backup notification, set the daily, weekly, or monthly schedule backup, etc. Note that incremental backup is the default option in scheduled tasks.
Step 4. Then, click the Start Backup button to create an ISO image of a hard drive.
✨Some features are only available on the professional version at least. If you upgrade, you can enjoy:
Differential backup: It backs up only changed files but it's based on the last full backup instead of the last one.
Automatic backup cleanup: It can delete old backup images automatically to free space for new backups, thus preventing the backup disk full issue from root.
Clone system disk: It will include the operating system and all necessary files required to start a Windows. The free edition only supports clone data disks. For details steps with screenshots, please refer to the disk clone in Windows 10.
Method 2: Create a disk image with enterprise-level backup software
You can also use the best enterprise backup software- AOMEI Cyber Backup if you want to backup hard drives on multiple computers.
It enables you to create system/disk/partition backup for a bunch of Windows PCs from one central console.
You are allowed to save backup images on a local disk, external hard drive, network share or NAS device, etc.
You can schedule a backup task to run every day/week/month using the full/incremental/differential backup method.
Download this powerful enterprise backup software now to have a try!
To backup hard drives on client computers, follow these steps:
Step 1. Install and run AOMEI Cyber Backup. The default username and password for AOMEI Cyber Backup are both "admin". Enter them and click Log in.
Step 2. Click Source Device > Windows > Add Windows Device to add the Windows device that you want to backup. You need to enter the IP address, username, and password of it.
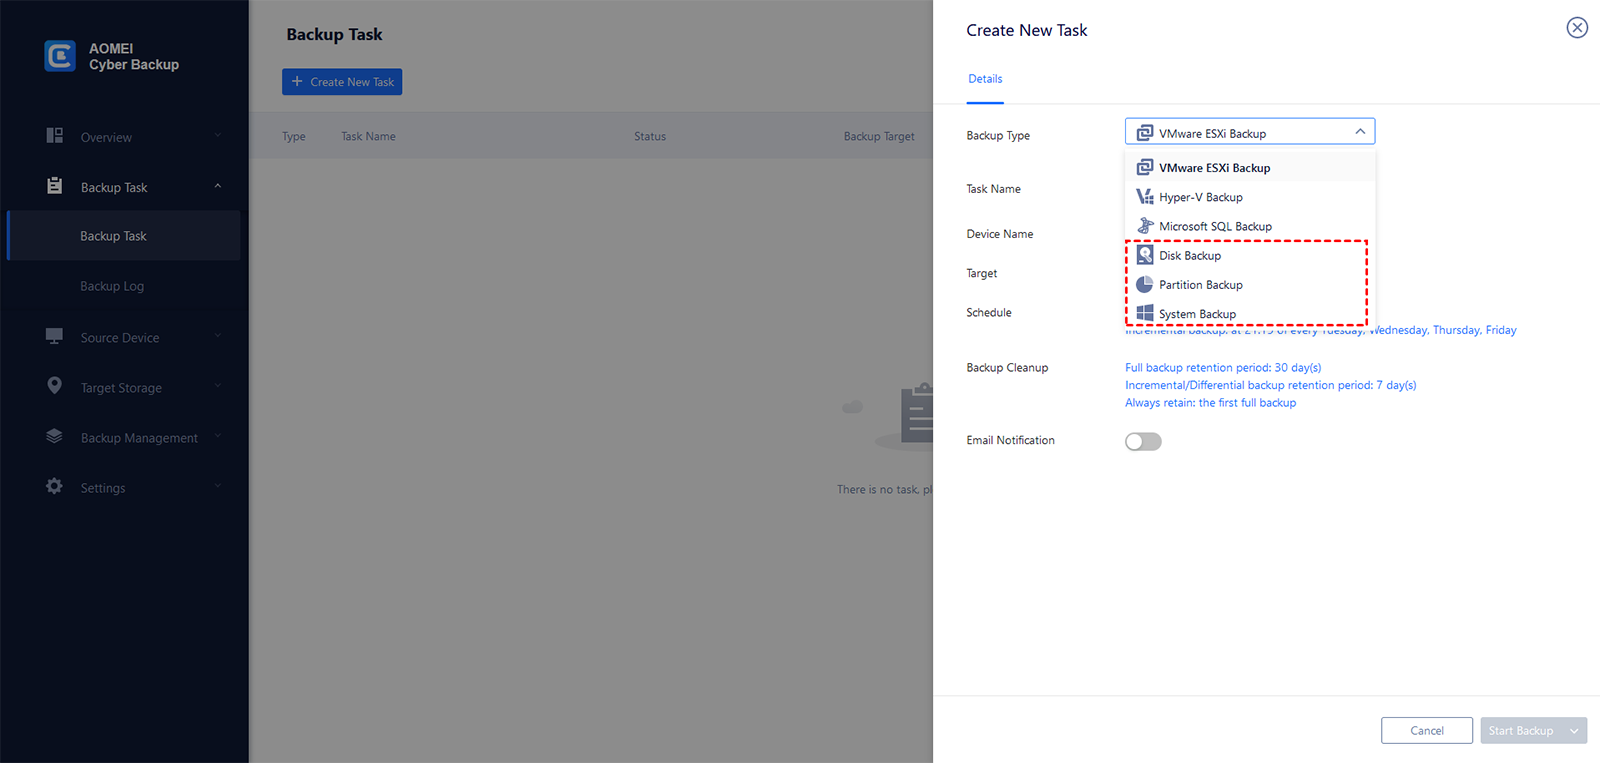
Step 3. Create a disk backup task.
Click Backup Task on the left menu bar and select Backup Task > Create New Task.
Choose Disk Backup as the Backup Type.
Edit Task Name based on your need.
In the Device Name field, click Select + to select the device you just added.
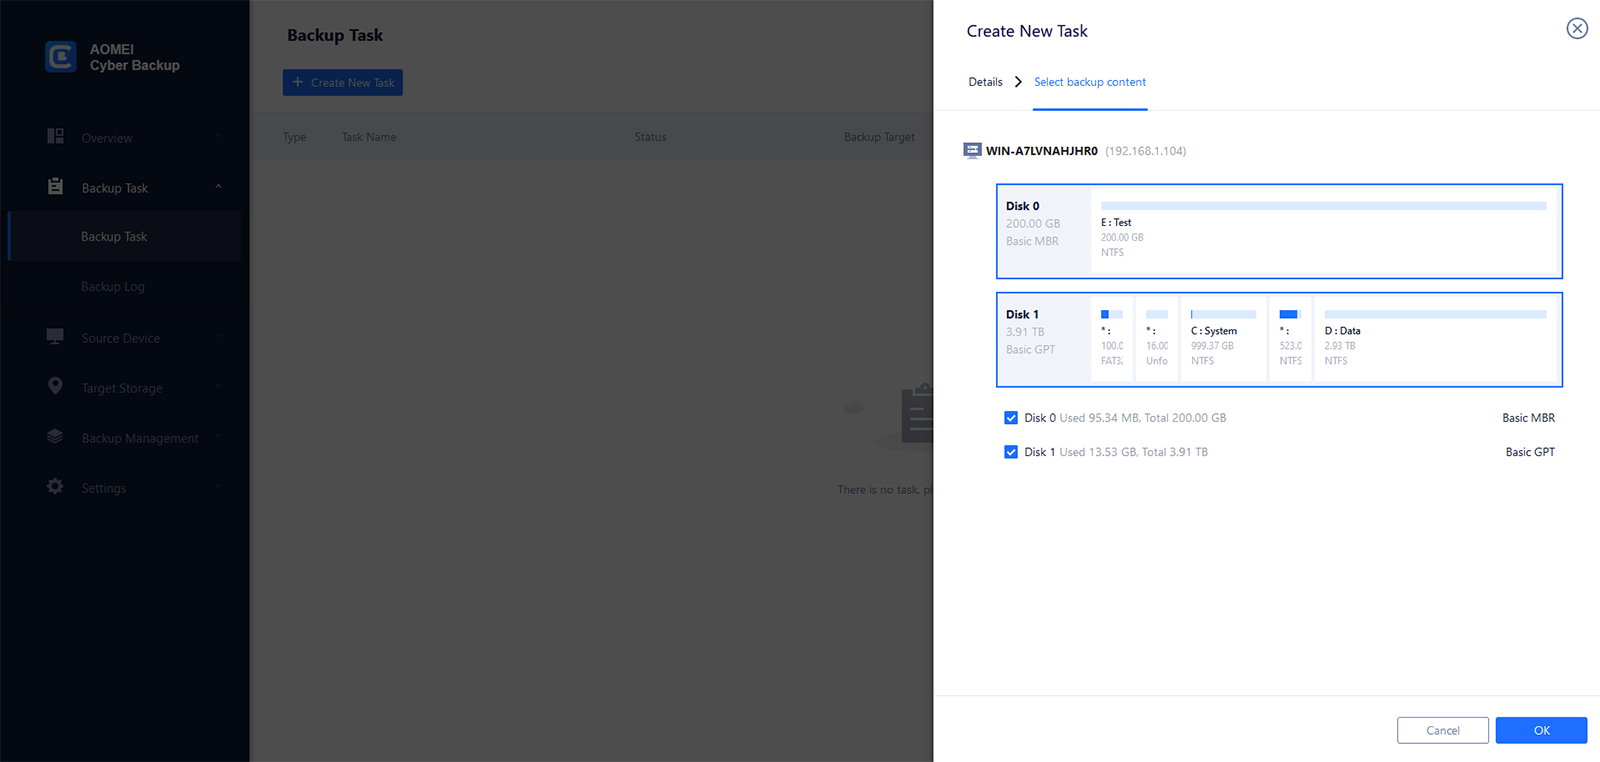
In the Backup content field, click Select + to select one or multiple disks for backup.
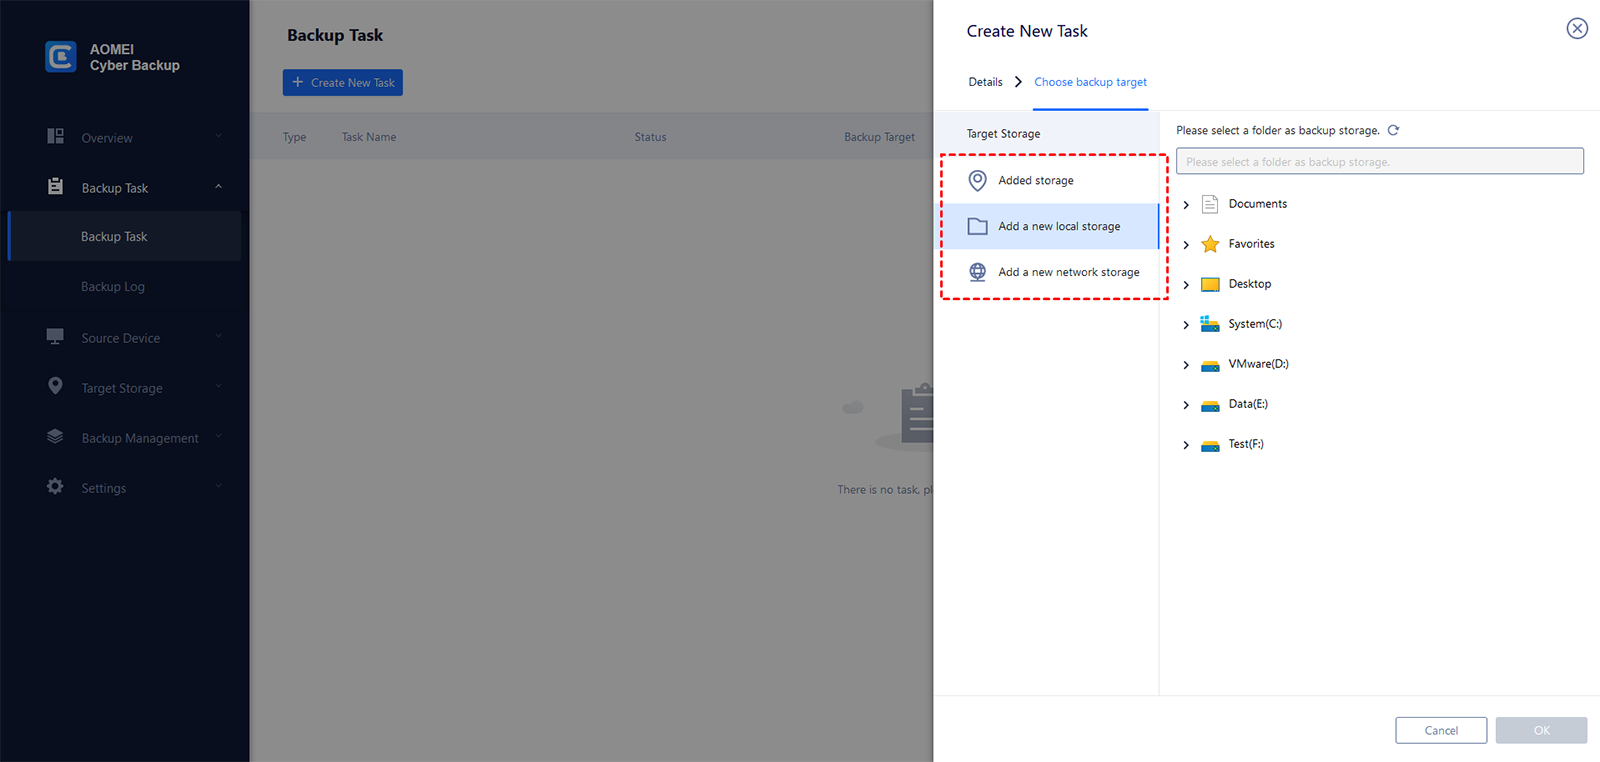
In the Target field, click Select + to add a local or network storage.
Change the default schedule settings in the Schedule field.
Click Start Backup > Add the schedule and start backup now to begin creating disk image.
Method 3: Create an ISO image of a bootable USB drive
AOMEI Backupper Standard also has a "Create Bootable Media" to help you create an ISO image of a bootable USB drive, 32-bit or 64-bit, legacy BIOS or UEFI.
Free download it to get started. Available on Windows 11/10/8/7/XP/Vista.
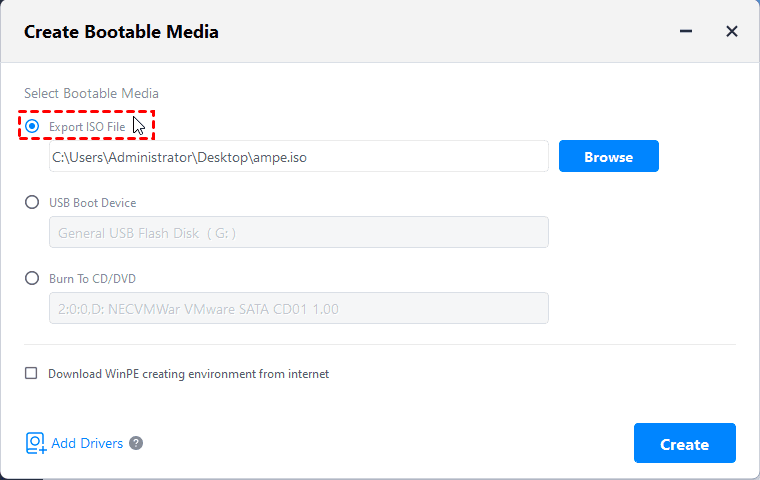
Step 1. Launch AOMEI Backupper Standard. Click Tools and then Create Bootable Media.
Step 2. Select the bootable disk type (Linux or WinPE). Here would take creating WinPE ISO for example.
⚠️Note: By default, this software is compatible with Legacy BIOS and UEFI boot mode. The created media may only support computers with Legacy BISO mode if it's too old. To boot a UEFI computer, please check the option "Download WinPE creating the environment from the Internet".
Step 3. Select bootable media: CD/DVD, USB drive,or ISO file. Then, click Next to start the process. Note if you use the ISO File option, you still need to burn it to CD/DVD or USB to boot a computer.
Method 4: Create an ISO image using the Media Creation Tool
In this part, you will how to create a Windows 10 ISO image using the Media Creation Tool. It's easy to use even for newbies.
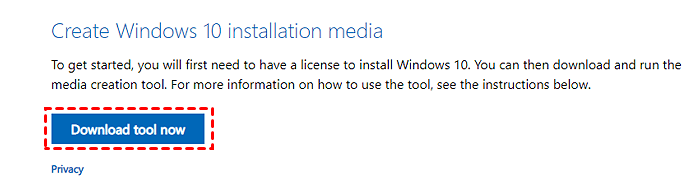
1. Go to the Windows 10 download page, and click Download tool now todownload the Media Creation Tool.
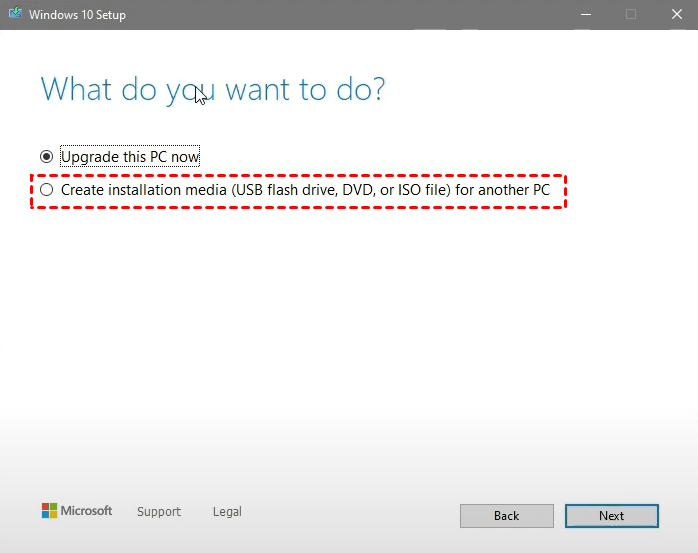
2. After downloading, open this tool and select Create installation media (USB flash drive, DVD, or ISO) for another PC. Click Next.
3. In the current window, select the language, architecture, and edition of Windows you want. Click Next.
4. Select ISO file > Next, and the tool will create your ISO file for you. To use the ISO file as a backup for your PC or on another PC, you can choose to burn it onto a CD/DVD or USB drive.
Method 5: Create an ISO image of my hard drive with DISM
Here you will use DISM to make HDD/SSD to ISO image in Windows 10/11 with DISM. It is more suitable for professionals or IT technicians.
Step 1. Determine which partitions to capture. Note you do not have to capture the Microsoft Reserved partition and extended partition because they are managed automatically.
Step 2. Then, assign a drive letter to this partition (if it doesn't have one).
1️⃣ Boot your computer from the recovery media or installation media.
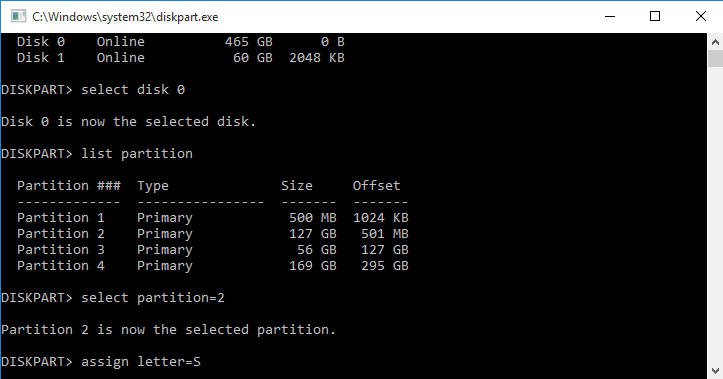
2️⃣ At the Windows PE command prompt, type “diskpart” to open the diskpart tool. Type the following commands in order and hit Enter after each command.
list disk
select disk 0 (0 is the disk number including partition you want to capture)
list partition
select partition=2 (the partition you want to capture is partition 2)
assign letter=S (assign the drive letter for partition to S)
exit
Step 3. Type the following command to capture the image officially. You need to boot into the WinPE environment.
Dism /Capture-Image /ImageFile:s:\my-system-partition.wim /CaptureDir:S:\ /Name:"My system partition"
🌟How to create an ISO image from your operating system
Open the Windows 10 installation disc in File Explorer. Copy its contents and paste to a folder on your external hard drive or Network drive.
Then, copy the image install.win create before to the source folder and replace the original one.
At last, download and install the latest Windows Assessment and Deployment Kit and install Deployment Tools to run the following command:
oscdimg.exe -m -o -u2 -udfver102 -bootdata:2#p0,e,b[path of the iso files]\boot\etfsboot.com#pE F,e,b[path of the iso-files]\efi\microsoft\boot\efisys.bin [path of the iso-files][new location to save the iso image of the current windows]
Conclusion
You can easily create an ISO image of my hard drive, namely for optical disc, hard drive (HDD or SSD), or USB drive, here are 5 useful methods to help you. You can choose one of them according to your purpose.
Among them, creating an ISO image of HDDs/SSDs is very popular and helps you protect your system or data well. For unlimited PCs or servers, try AOMEI Backupper Technician or TechPlus, or the enterprise-level backup software.
FAQs about ISO image of hard drive
How do I create a picture of my hard drive?
To create an image of your hard drive, you can use disk imaging software like Clonezilla or Macrium Reflect. These programs allow you to capture an exact copy of your hard drive, including all data and partitions. Simply install the software, select the drive you want to image, choose a destination to save the image file, and follow the on-screen instructions to create the image.
How do I make my hard drive bootable image?
To create a bootable image of your hard drive, you can use software like Rufus or Win32 Disk Imager. First, you'll need an ISO file of the operating system you want to make bootable. Then, open the imaging software, select your hard drive as the source, choose the ISO file as the destination, and start the imaging process. Once complete, you'll have a bootable image of your hard drive ready to use.
How do I convert a disk image to an ISO?
To convert a disk image to an ISO file, you can use software like ImgBurn or PowerISO. These programs allow you to easily convert various disk image formats, such as IMG, BIN, or DMG, to ISO. Simply open the software, choose the disk image file you want to convert, select ISO as the output format, and start the conversion process. Once finished, you'll have an ISO file that you can use for burning to a disc or mounting virtually.
How do I securely erase data from my hard drive?
To securely erase data from your hard drive, you can use specialized software like DBAN (Darik's Boot and Nuke) or Eraser. These tools overwrite the data on your hard drive multiple times with random patterns, making it virtually impossible to recover. Simply download and install the software, create a bootable media (if required), boot your computer from it, and follow the on-screen instructions to securely erase all data from your hard drive. Make sure to double-check the drives you want to erase, as this process is irreversible.