You will get 3 Windows 10 profile migration tools and stepwise guide to migrating user profile to new computers.
The user profile includes personal data, system files, desktop, download, documents, App data, etc, which are settings for desktop and other information related to a user account. And you can only access user profile data on the current computer.
It's very important for computer users, thus many users choose to backup user profiles in case of recovery needs. In some situations, you may want to migrate user profile:
#1: Configure the same user profile settings in the new computer.
#2: Transfer user profiles to new user accounts.
Next, I’d like to introduce you to how to migrate user profiles in Windows systems.
To migrate user profile to new computer, a user profile backup or migration tool is indispensable. Here I'll introduce you to 3 feasible options and step by step guide to migrate user profile in Windows 10.
1. Right-click on My Computer and select Properties, and then select “Advanced system settings”.
2. Click the Settings under User Profiles.
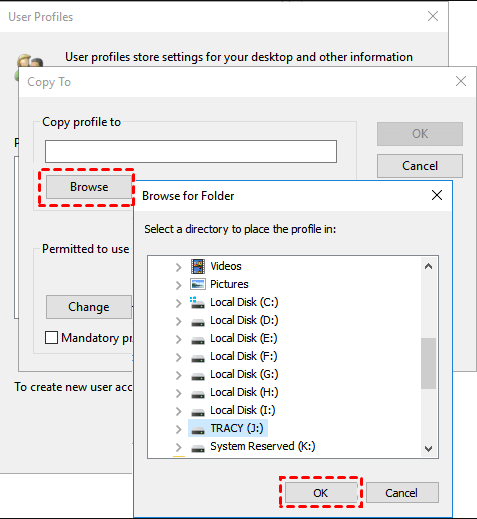
3. In a new prompt window, all user profiles will be listed. You can select the user profile you want to move and then copy to another location by clicking “Copy To”.

This way can be tricky sometimes. You may meet Windows 7 user profile copy to gray out issue, and in this case, you have to create a new account and change the default profile first.
Besides directly copy user profiles, you can choose to backup system with user profile and then restore to new computer. In this case, you will get a computer exactly the same as before, but larger capacity and higher performance.
1. Go to Backup and Restore (Windows 7). You have two ways in the following:
#1 Through backup settings: Type backup settings in the search box and select it. In the new window, scroll down to Looking for an older backup and click Go to Backup and Restore (Windows 7).
#2: Through control panel: Type control panel in the search box and select it. Then, select Backup and Restore (Windows 7) under the System and Security section.
2. In the Backup and Restore window, click “Set up backup” on the right. Then, select a destination location to store backup image and Let Windows Choose option to include all the user profiles. Afterward, confirm backup settings and click Save changes and run backup.
3. After creating a system image with all user profile, you could go to the new computer. Then, open Backup and Restore and click Restore my files if you want to migrate only user profiles.
4. Then, click Search, Browse for files or Browse for folders to choose the user profiles for recovery. Then click Next.
5. Choose a new location to restore your files and click Restore.
Also, you can choose to restore system image to new hard drive in the recovery environment if you want an effortless way to migrate system to new computer with the same hardware. And it is not able to restore to smaller drive.
If you want to migrate user files or system to new computer with different hardware, the Windows built-in backup software may not work. It does not matter, you could consider using professional backup software, AOMEI Backupper Professional, for example. It provides you with two ways below.
And either way, you need to create a backup first. You are capable of scheduling backup (daily, weekly, monthly) and presetting incremental or differential backup, automatic backup cleanup etc to resolve potential backup problems. Besides, you can choose to create a bootable media (USB or CD/DVD) or recovery environment in case of computer failure.
Please download it and migrate user profile with one of the above methods. Here I'll take the previous way as an example.
1. Open AOMEI Backupper and create a file backup with it.
On the main page, click File Backup under Backup tab. Then, click Add File or Add Folder to select all the files related to user account and select a destination path to store them. At last, confirm all the files you want to backup and click Start Backup to backup user profile in Windows 10.
2. Install this software on the new computer and open it. Go to the Restore tab and click Select Image File to locate backup image.
3. Select backup image you want to restore files from and files or folders in it. Then, click Next.
4. Select a new location to store the user profile and click Start Restore to execute this task.
Besides, you still can migrate user profile to new computer by Cloud Backup feature. It allows you to backup profile to AOMEI Cloud and then restore to new computer. And you can enjoy 1TB free storage in 15 days after registration.
Tip on selective file restore:
If you just want to restore specific files, you could try Explore image feature. It is especially useful when you don't have a file backup. It is to mount backup in a virtual drive and let you copy files from it.
You can easily migrate user profile to new computer with above methods. If you want an effortless way to migrate entire system, try to backup system with user profiles. After restoring it, you can directly use it with any extra configuration.
And it's suggested to install this software on your computer and backup system, disk, partition or files continuously with its schedule backup options. To prevent potential backup issues, you could choose to preset backup and cleanup methods, etc. All of them ensure you always have enough space to store new backup!