This article introduces the process of Acer Helios 300 hard drive upgrade. Discover step-by-step instructions and essential considerations for successfully performing an Acer disk upgrade.

Acer Predator Helios 300 is a high-performance gaming laptop that offers impressive specs for gamers and power users. However, if you're experiencing slow loading times, running out of storage, or simply want to boost your system's speed, an Acer Helios 300 hard drive upgrade is the perfect solution.
Upgrading your hard drive - whether replacing your HDD with SSD or adding a secondary storage drive - can drastically improve your gaming experience. In this guide, we’ll explore how to upgrade Acer Predator Helios 300 hard drive without data loss, some key SSD compatibility details, and step-by-step installation instructions.

Absolutely! The Acer Predator Helios 300 supports both HDD and SSD upgrades, meaning you can replace your existing hard drive with a faster SSD or add additional storage. Most models come with a 2.5-inch SATA drive bay and an M.2 NVMe slot, allowing for dual-drive configurations. Specifically, the upgradable components are:
✔ M.2 NVMe SSD slot: Supports PCIe 3.0 and 4.0 (depending on the model)
✔ 2.5-inch SATA drive bay: Supports HDDs and SATA SSDs
✔ RAM slots: Upgrade memory for better multitasking
If you want to let Helios 300 HDD upgrade to new SSD while keeping your data intact, the best approach is to clone your current drive to the new disk. But first, it’s important to check which drives are compatible with your Acer Predator Helios 300.
Compatible SSD types:
►M.2 NVMe SSDs - Best for speed; requires an available M.2 slot.
►2.5-inch SATA SSDs - Slower than NVMe but still much faster than HDDs.
►HDDs (for additional storage) - If you need more storage but don’t require speed, you can install a larger HDD.
Recommended SSDs for Acer Predator Helios 300:
Before proceeding with the Acer Predator Helios 300 hard drive upgrade, it is essential to follow best practices to avoid errors and data loss.
#1. Choose the right drive for your needs.
#2. Backup your files: Before initiating any hardware changes, backing up all essential data to prevent potential loss is necessary.
#3. Prepare necessary tools: a screwdriver set for opening the back panel, a USB-to-SATA adapter for external cloning, and anti-static wristbands to avoid hardware damage.
#4. Handle components carefully: SSD and HDD components are sensitive; handle them with care to prevent static discharge or physical damage.
Now let's get into the step-by-step guide for your Acer Predator Helios 300 hard drive upgrade. The process involves three main stages: cloning your current hard drive, physically replacing the drive, and installing a second drive(optional).
Before removing your existing drive, it is highly recommended to clone it to the new drive so you won't lose your OS, games, or personal files. AOMEI Backupper is a powerful disk cloning software that offers various advantages. You can check them below:

3 cloning options include Disk Clone, Partition Clone, and System Clone to clone an entire disk, only OS, or a specific partition for different needs.
Hot Clone allows you to run the cloning process in the background without interrupting the current task;
Intelligent Clone enables you to migrate from larger HDD to smaller SSD by cloning only used sectors.
One-click SSD optimization to improve the reading and writing speeds as well as prolong the service life of SSD.
To clone your disk before the Acer Predator Helios 300 hard drive replacement, you can follow the step-by-step guide below. Here we take cloning hard drive to SSD as an example:
Step 1. Use a USB-to-SATA adapter or an external enclosure to connect the new SSD to your laptop. Download and run AOMEI Backupper.
Step 2. Select Clone and then Disk Clone subsequently.
Step 3. Select your current hard drive as the source. And then choose the new SSD as the destination. Review your selections and click Start Clone to initiate the process for Acer Helios 300 hard drive upgrade.
Now that you've cloned your old drive, it's time to replace the new SSD or HDD with your Acer Predator Helios 300hard drive.
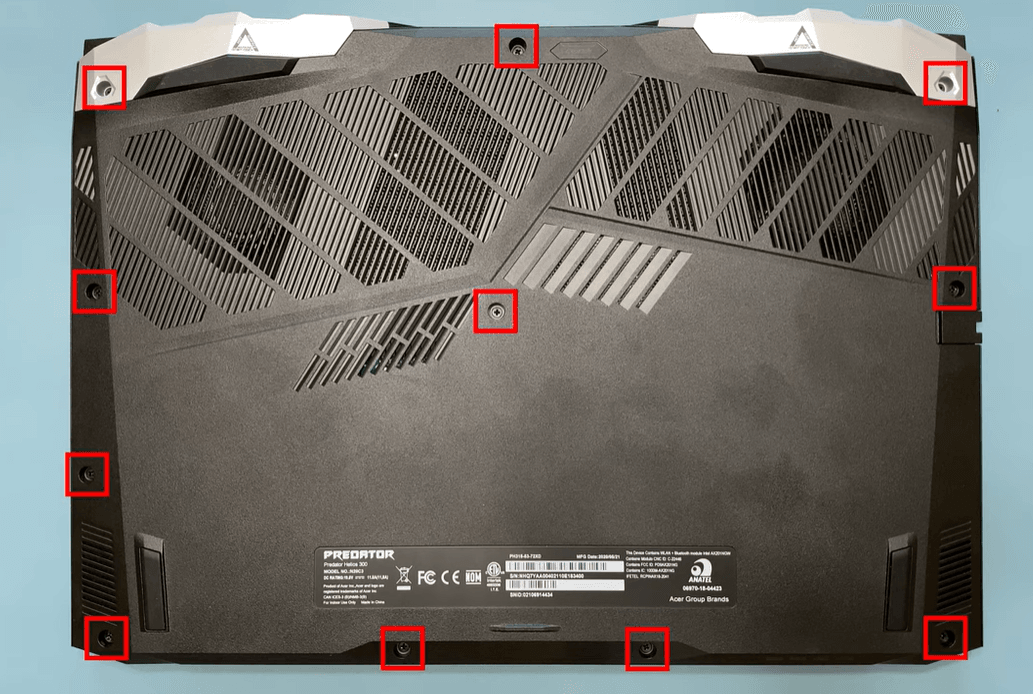
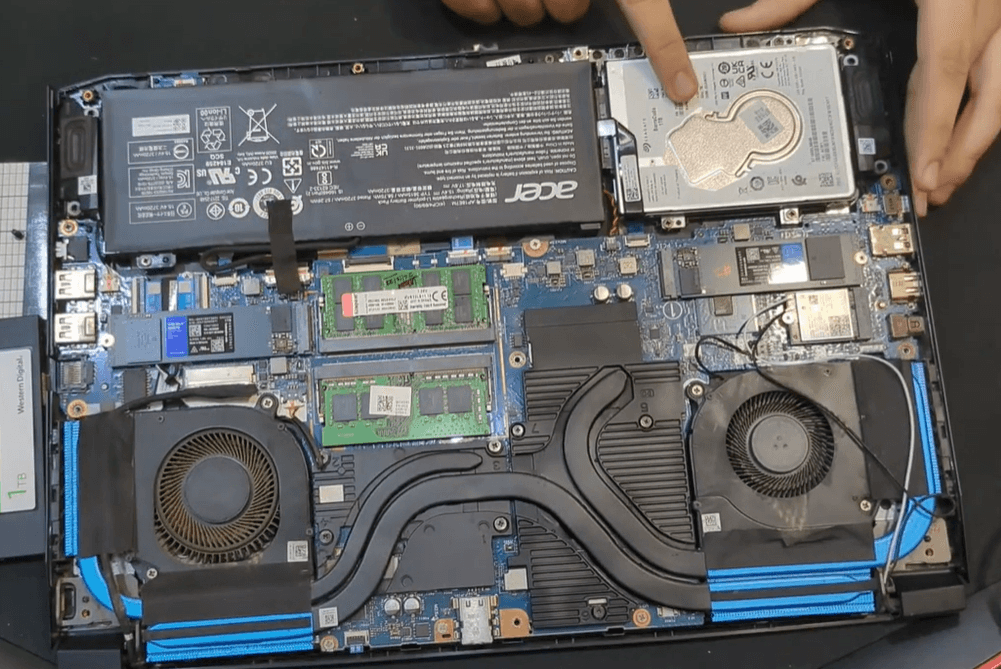
Step 1. Ensure the laptop is completely shut down and unplugged from any power source. Unscrew and carefully detach the back panel to access internal components.
Step 2. Identify the current Acer Predator Helios 300 hard drive, typically secured within a drive bay. Unscrew it and disconnect the existing drive from its connectors.
Step 3. Place the cloned SSD into the drive bay, ensuring a secure connection. Reattach the back cover and secure all screws.
Step 4. Boot up the laptop to ensure it's functioning correctly with the new SSD.
If you're planning to add a secondary hard drive for Acer Predator Helios 300 SSD upgrade:
Step 1. Confirm the presence of an additional M.2 slot or a 2.5-inch drive bay. Ensure the new SSD or HDD is compatible and ready for installation.
Step 2. Insert the new drive into the appropriate slot, securing it firmly.
Step 3. Upon booting, use the Disk Management tool to initialize and format the new drive with New Simple Volume and Format for use.
Performing an Acer Helios 300 hard drive upgradeis a practical approach to enhancing performance. By following the steps outlined in this guide, you can upgrade your SSD or HDD without reinstalling Windows by cloning your old drive to the new disk using AOMEI Backupper, ensuring a smooth transition.
Besides, this tool offers other powerful functions like backing up Acer laptop for Windows system, disks, peresonal files and folders, as well as partitions for disaster recovery.