Guide: How to Recover Deleted Files in Any Situation?
Learn how to recover deleted files in any situation via the corresponding ways on this page. Besides, there’re practical data loss prevention measures for you.
By Penny / Updated on April 3, 2024
Is it possible to recover deleted files in any situation?
If you find yourself in the distressing situation of accidental or intentional deletion, take a moment to compose yourself and lower your stress levels. In the majority of instances, it’s possible to recover deleted files from various storage devices such as computer hard drives, USB sticks, external hard drives, or iOS devices.

Part 1. How to recover deleted files Windows 10/11?
How to recover deleted files Windows 10 or 11 PCs? Please refer to the following ways.
Way 1. Undo Delete or recover deleted files from Recycle Bin
After accidental deletion, you can press “Ctrl + Z” to Undo Delete them immediately. Then these accidentally deleted files will be restored to their original locations.
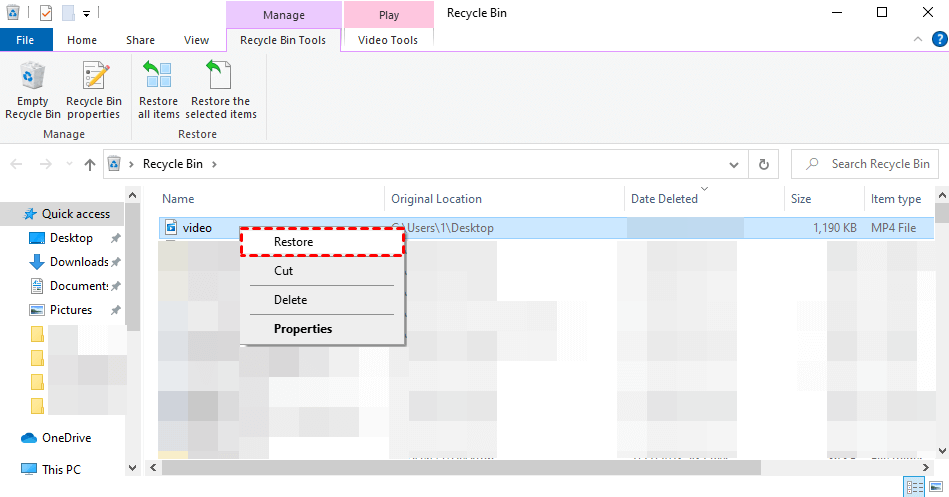
Besides, you can also recover deleted files from Recycle Bin before permanent deletion (emptying your desktop Recycle Bin or pressing Shift + Delete to remove certain files).
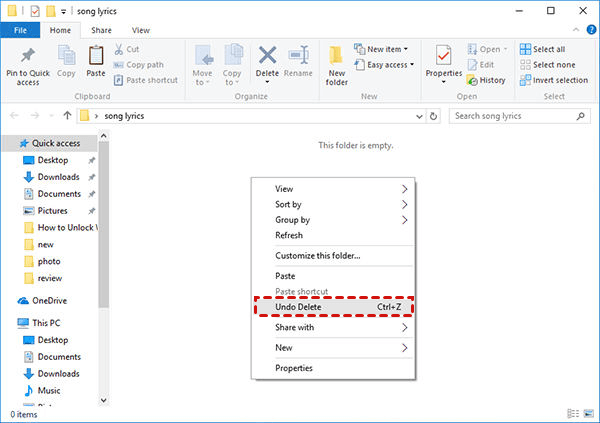
» Open your desktop Recycle Bin > locate the deleted file you intend to retrieve > right-click on it > Restore it to its previously saved path.
Way 2. Use the attrib command to show hidden files
Sometimes, your missing files might be hidden from you instead of deletion. So you can use the attrib command to make hidden files/folders visible to you because attrib is designed to change the file attribute of a file/folder. Please get an overview of common file attributes.
▶Read-only (R): No written permission to change or alter the read-only file.
▶Hidden (H): Besides Windows apps like File Explorer, MS-DOS commands like dir are not allowed to show hidden files/folders to users.
▶System (S): You can modify the priority of the file/folder.
▶Archive (A): If the hosting file has been changed since the last backup, the backup tool will inevitably erase it after a full/incremental backup.
Likewise, you can also employ the dir command to show hidden files.
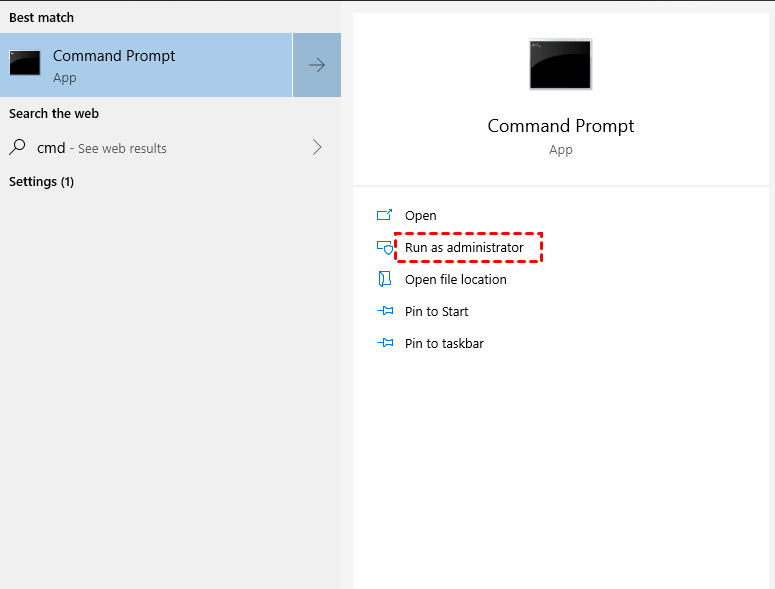
Step 1. Enter “cmd” in the search bar on your PC and “Run as administrator” to open it.
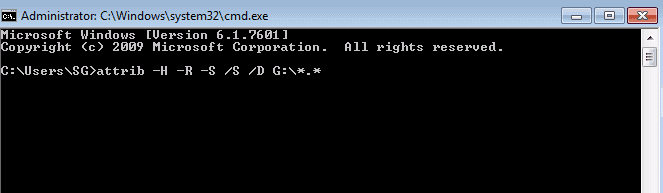
Step 2. Copy “attrib –h –r –s /s /d G:\*.*” in the command prompt window. In this case, G is the drive letter of your drive that saves your hidden files, you can replace this letter with the real drive letter.
Step 3. After the process, you’ll find a new folder with your desired files saved on your Windows PC. You can also change their formats and store them in another path.
If even the attrib command cannot work for you to show hidden files/folders, these files are probably deleted instead of hidden.
Way 3. Restore permanently deleted files via Backup and Restore
Backup and Restore first appeared in the Win7 operating system. As the name suggests, a backup is a necessity for the restoration process. Let’s show how to recover permanently deleted files via Backup and Restore.
- Notes:✎...
- Windows Backup and Restore contains file and folder backup, as well as System image backup.
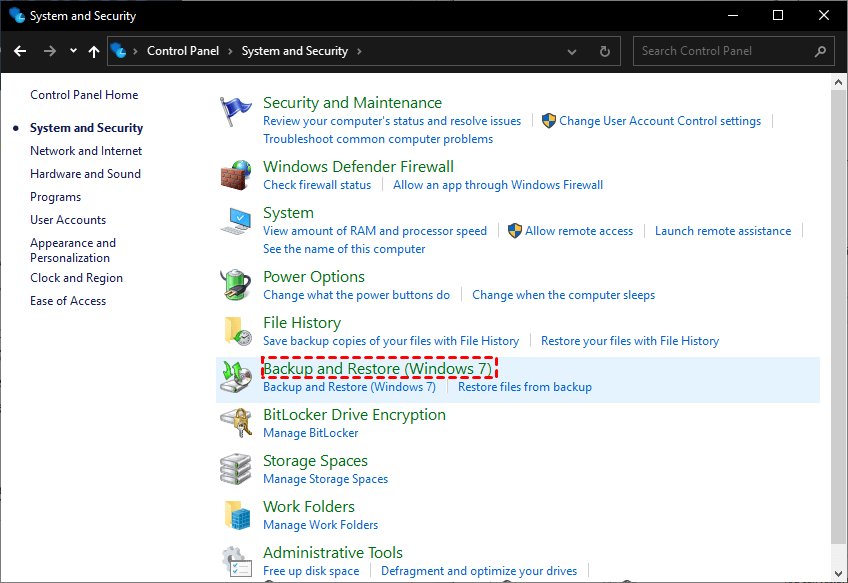
Step 1. Type “System and Security” in the search bar to open it. Then select “Restore files from backups” under the Backup and Restore (Windows 7) tab.
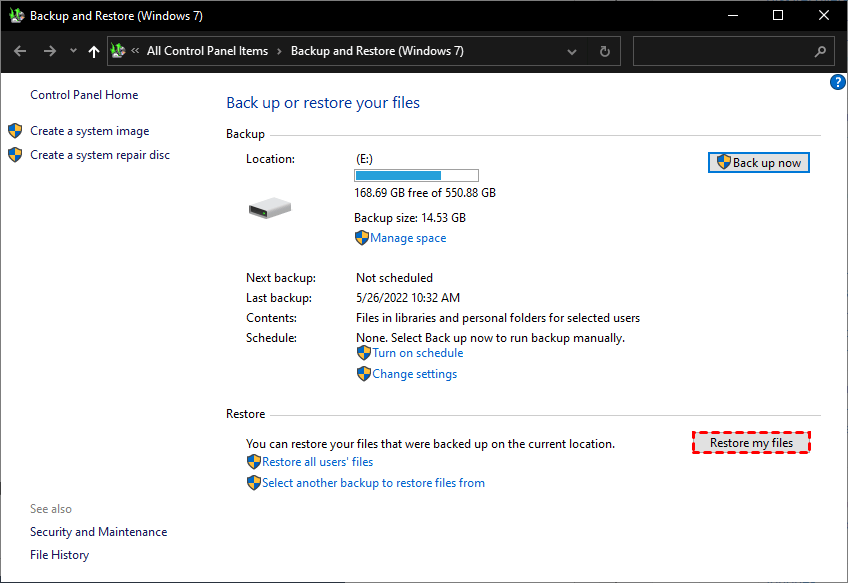
Step 2. Click the “Restore my files” button.
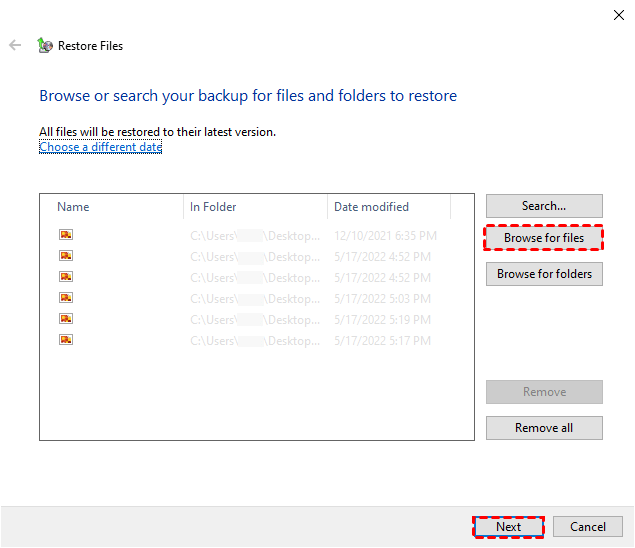
Step 3. Select “Browse for files” to locate your wanted files > click Next.
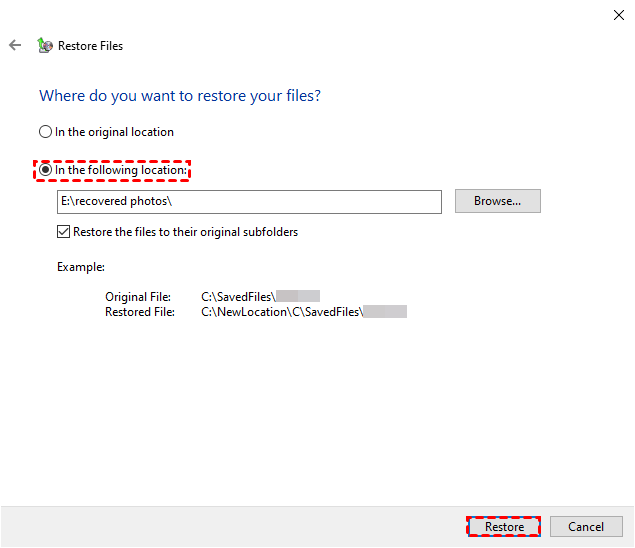
Step 4. To retrieve your selected TS videos to their original location or set a new saved path > click Restore.
Way 4. Recover permanently deleted files via data recovery software
But how to recover deleted files from Recycle Bin after emptying them? Especially for users without regular backups. At this point, using professional data recovery software remains the most effective way to recover permanently deleted files.
Perhaps MyRecover can fulfill your needs because it is designed to recover deleted and lost files from internal and external hard drives, USB flash drives, SD cards, etc.
Data Recovery Software for Windows:
- High-efficiency: Recover about 50 types of photos (JPG, PNG, BMP, ICO, DNG, TIFF, ORF, RAF, X3F, etc.), videos (MP4, MOV, AVI, MWV, FLA, MKV, ASF, TS, WebM, 3G2/3GP, etc.), MS Office files, WPS files, folders, compressed files (ZIP, RAR, etc.), audio, websites, etc.
- Advanced scanning method: MyRecover runs Quick Scan & Deep Scan automatically to search all the recoverable files. Specify the filename, saved path, date, or size to filter your needed files.
- Convenience: Retain the original filename, path, and format for the deleted files.
- Excellent compatibility: Support NTFS, FAT32, exFAT, and ReFS file systems and be compatible with Windows 11, 10, 8, 7, or Sever PC.
- Notes:✎...
- After data loss, you’re advised to stop loading new files to your storage device for a higher data recovery rate because data erasure definitely can decrease its recovery rate.
- Please remember to save your retrieved files in another drive instead of the original saved path.
- To recover more deleted/missing files from local hard drives, upgrading MyRecover is a better and more cost-effective choice.
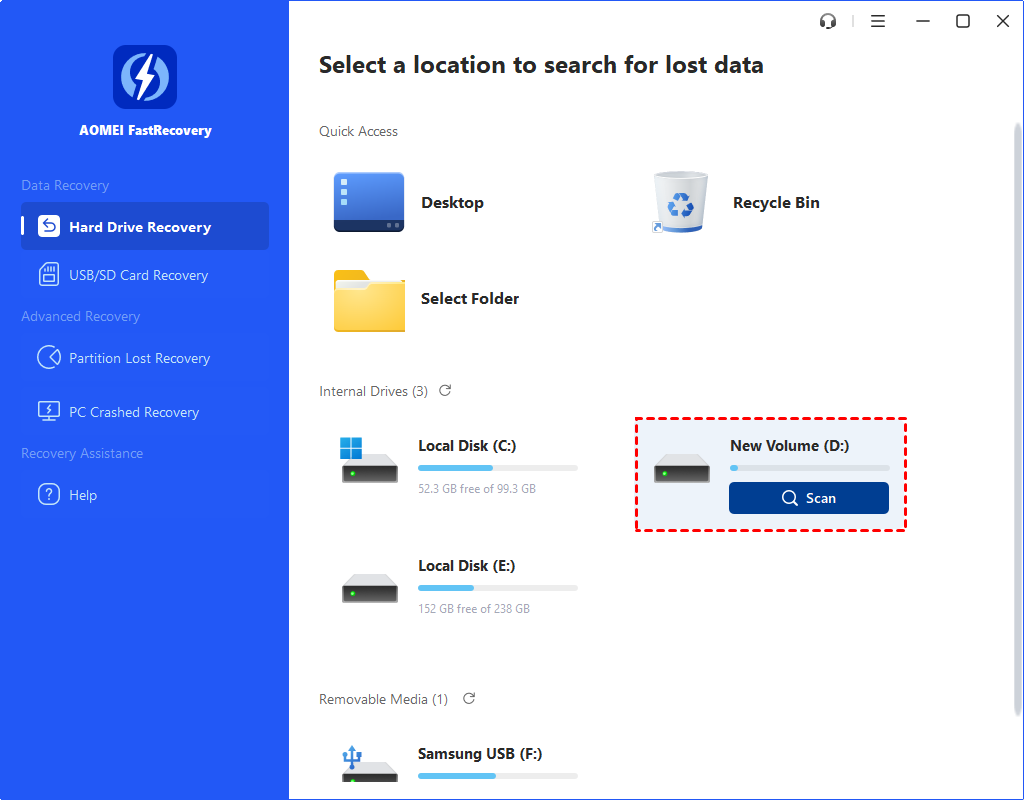
Step 1. After launching MyRecover on your Windows > hover the mouse over the D drive > click Scan.
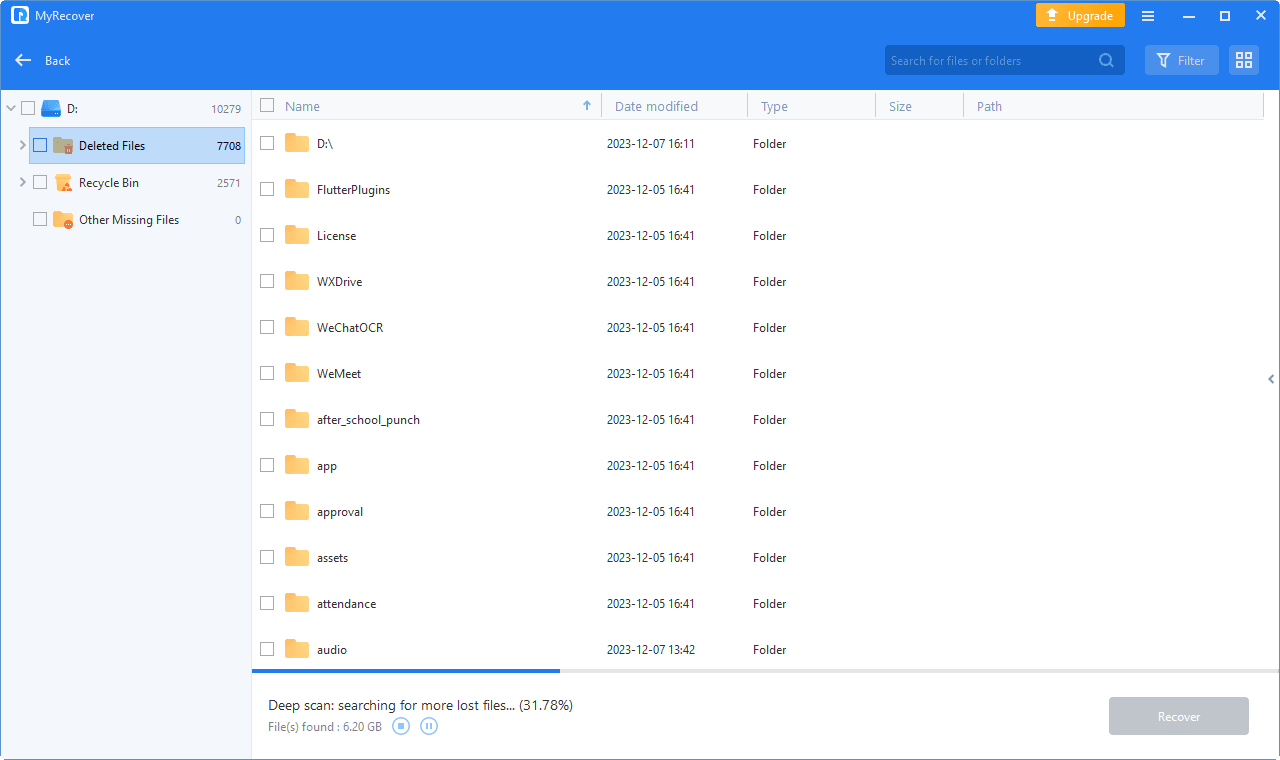
Step 2. MyRecover will automatically run Quick and Deep Scan to scan your selected D drive and display all the recoverable files.
To quickly find your wanted files, preview or filter them according to Filename, Type, Path, Size, Date, etc.
- Name: Type the filenames of your desired files to narrow the search area.
- Date modified: Set the date (today, yesterday, last 7/30 days, etc.)
- Size: Filter the file size (<128KB, 128KB~1MB, 1MB~ 512MB, etc.)
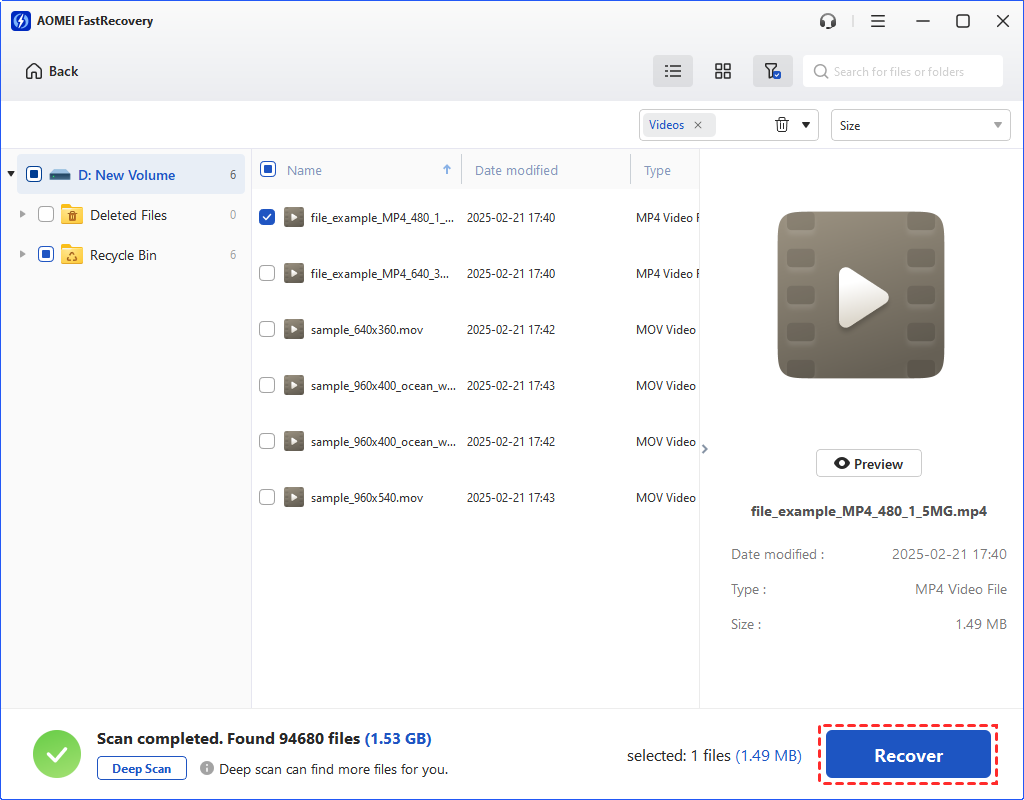
Step 3. Go to the Other Missing Files folder > select the files you intend to retrieve > click Recover x files to recover permanently deleted files.
Way 5. Recover permanently deleted files using Windows File Recovery
Those users who’re familiar with CMD can try to recover lost files using Windows File Recovery because this free file recovery software aims to recover deleted/lost files from local storage devices such as HDDs, SD cards, and USB drives.
- Please note that it does not support cloud storage recovery or network file shares.
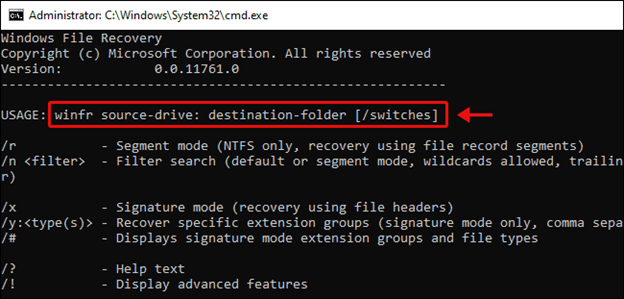
Moreover, you’re asked to replace your selected mode and switches with the following basic format command because this tool does not offer a graphical user interface (GUI).
▶winfr source-drive: destination-drive: [/mode] [/switches]
- Notes:✎...
- Designed to recover Word, Excel, PPT, PDF, ZIP, MP3, MP4, JPG, PNG, etc.
- Windows File Recovery only works with Windows 10 build 19041 or later.
- Please ensure the source drive (where to store your needed files before data loss) is different from the destination drive (where to store your recovered files).
- Two basic (Regular & Extensive) modes and two advanced (Segment & Signature) modes can support four (NTFS, FAT, exFAT, and ReFS) file systems in Windows.
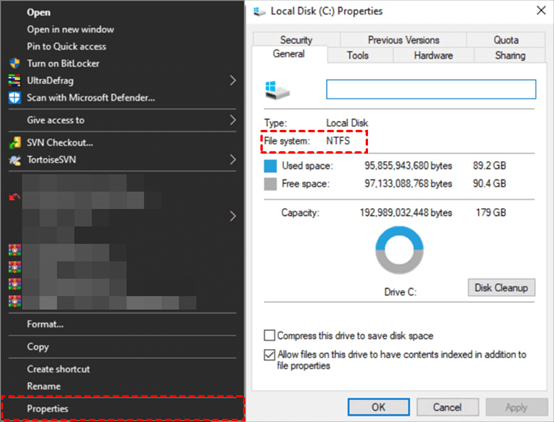
Step 1. Figure out the file system of your source drive: Open File Explorer by pressing the “Win + E” keys > click This PC > right-click on the source drive > click Properties.
Or the following form also can give you a hand.
|
File system |
Examples |
|
FAT and exFAT |
SD cards, flash or USB drives (< 4GB) |
|
NTFS |
Computers (HDD, SSD), external hard drives, flash or USB drives (> 4GB) |
Step 2. After checking the file system of your source drive, select the basic “Regular” or “Extensive” mode with the following form.
|
File system |
Scenarios |
mode |
|
NTFS |
Deleted recently |
Regular |
|
NTFS |
Deleted for a while |
Extensive |
|
NTFS |
Formatted disk |
Extensive |
|
NTFS |
corrupted disk |
Extensive |
|
FAT and exFAT |
Any |
Extensive |
Step 3. Select some common switches from the form below.
|
Switch |
Description |
Supported modes |
|
/y: |
Recover specific extension groups, comma-separated |
Signature |
|
/p: |
Saves a log file of the recovery operation in a different location than the default location on the recovery drive (for example, D:\logfile). |
All |
|
/a |
Overrides user prompts, which is useful in a script file. |
All |
|
/u |
Recovers undeleted files, for example, from the Recycle Bin. |
NTFS Segment |
|
/k |
Recovers system files. |
NTFS Segment |
|
/g |
Recovers files without primary data streams. |
NTFS Segment |
|
/e |
To keep your results manageable and focus on user files, some file types are filtered by default, but this switch removes that filter. |
NTFS Segment |
|
/e: |
Specifies which file types are filtered. |
NTFS Segment |
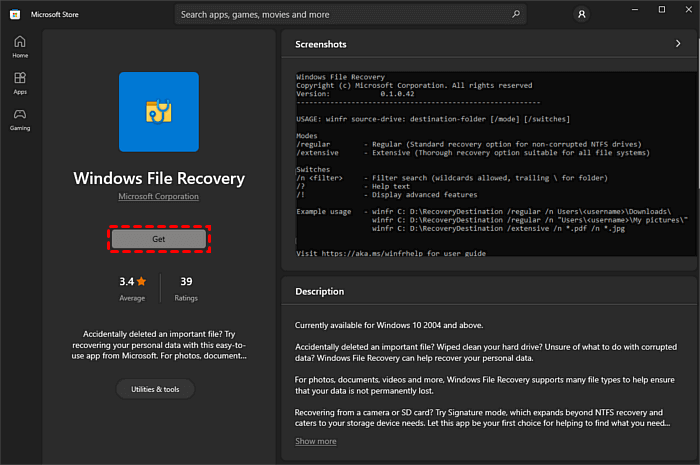
Step 4. Download Windows File Recovery from the Microsoft Store by clicking the “Get” button. After installation, “Open” it on your computer.
Step 5. For example, if you attempt to recover deleted MP4 videos from the original F drive and save them to the D drive, enter “winfr F: D: /extensive /n *.mp4” in your command prompt window.
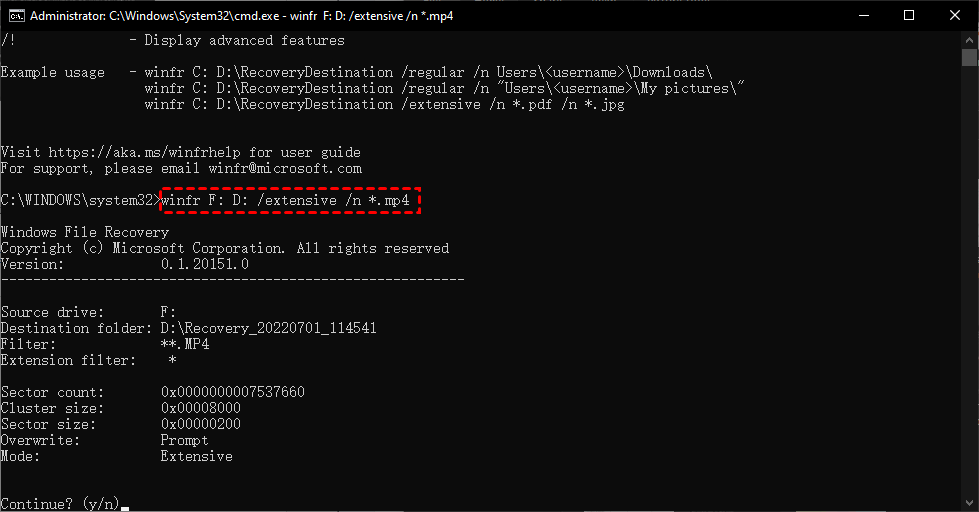
Step 6. Press “y” to go on. After the recovery process, you can go to the specified saved path to check your recovered MP4 files. If you want to stop the process, press the “Ctrl + C” keys.
Part 2. How to recover deleted files on Mac?
This part aims to help you recover recently or permanently deleted files on Mac.
Way 1. Restore accidentally/recently deleted files from Mac Trash
As the title implies, this method is designed to recover inadvertently or recently deleted files from the Mac Trash.
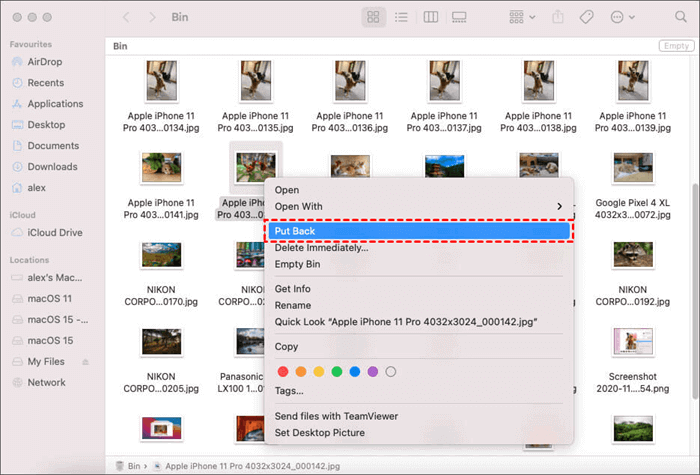
» Find the corresponding Trash Bin in the Dock > find the deleted files you want > right-click on it > select Put Back.
Way 2. Recover permanently deleted files via Time Machine
Time Machine, a backup feature provided by Apple, automatically creates backups at regular intervals, such as hourly, daily, and weekly, ensuring your files are safeguarded and recoverable in case of accidental deletion.
If you’ve enabled Time Machine before, you can easily restore files from backups. Let’s perform how to recover permanently deleted files via Mac Time Machine.
- Notes:✎...
- You don’t have to launch a window if your lost files were previously stored on the desktop.
- If you want to make your Time Machine show on the desktop, go to the Apple menu > click System Preferences > Time Machine > Show Time Machine in menu bar.
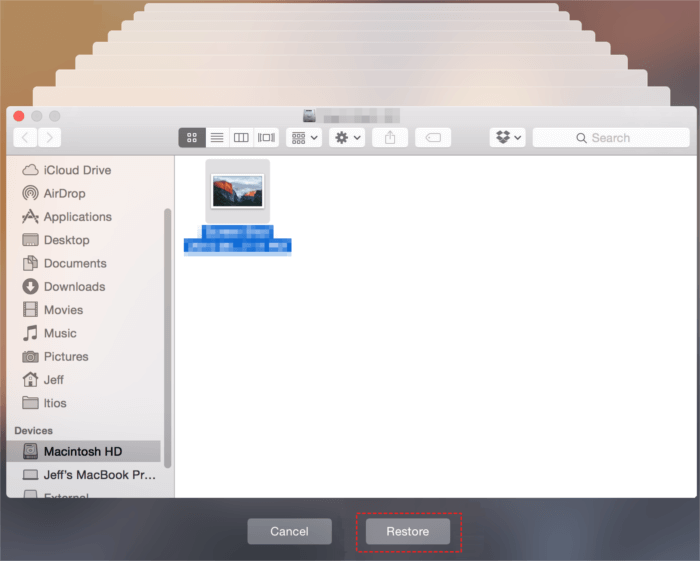
Step 1. Open the window where you lost files.
Step 2. Click the Launchpad icon in the Dock, find Time Machine, and click Enter Time Machine.

Step 3. Use the up and down arrows to locate the files you need to restore.

Step 4. “Restore” your selected files to their previous location.
Part 3. How to perform iPhone permanently deleted photo recovery?
Where do permanently deleted photos go on iPhone? Similar to Windows data recovery, permanently deleted photos might be still on your iOS device provided that they haven’t been overwritten by newly captured images.
Thus, you’re recommended not to take new pictures on your iPhone for a higher iPhone data recovery rate. But in practice, it’s unavoidable to save images in daily use.
In this scenario, you can seek assistance from powerful iOS data recovery software like MyRecover for iOS. Moreover, the sooner you begin iPhone permanently deleted photo recovery via MyRecover for iOS, the better chances you’ll get.
- ★Key features of MyRecover for iOS:
- You’re ready to begin iPhone data recovery with a bootable iPhone and another working Windows PC.
- Preview all the recoverable files and restore selected data to iPhones.
- Don’t have to restore your iPhone from iCloud/iTunes backups and erase all the existing data on your iPhone.
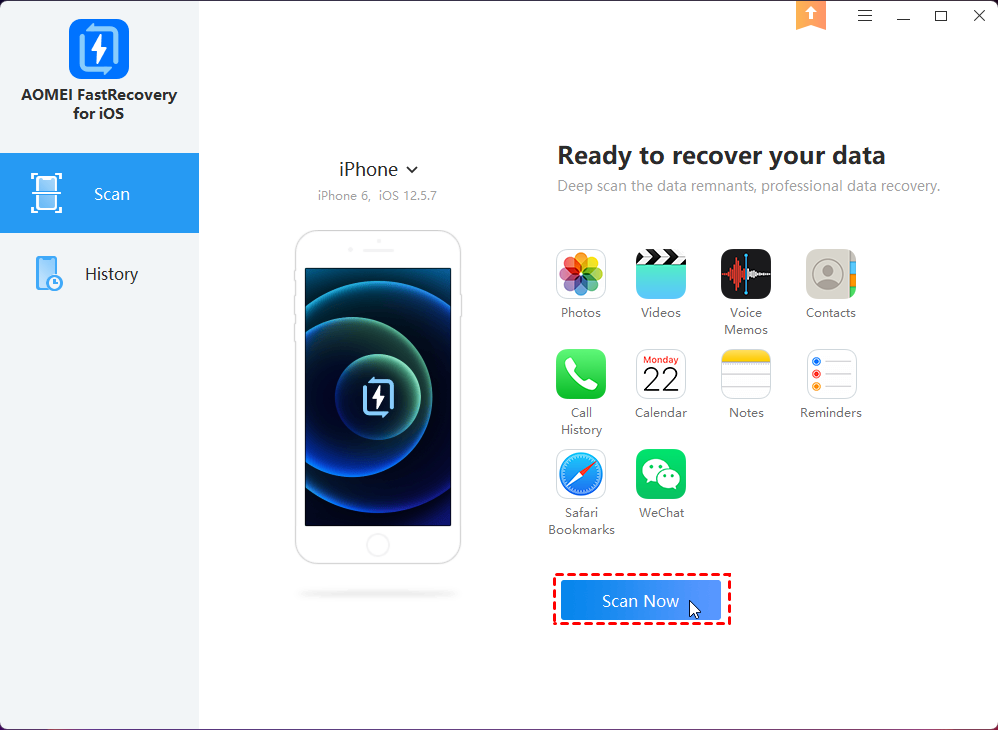
- Recover iPhone Photos, Videos, Contacts, Notes, Reminders, Calendars, Call History, Voice Memos, etc.
- Support iOS 15/16 and be compatible with various types of iOS devices such as iPhone 13, 14, or 15.
Step 1. After launching it on your PC, connect your iPhone to the computer.
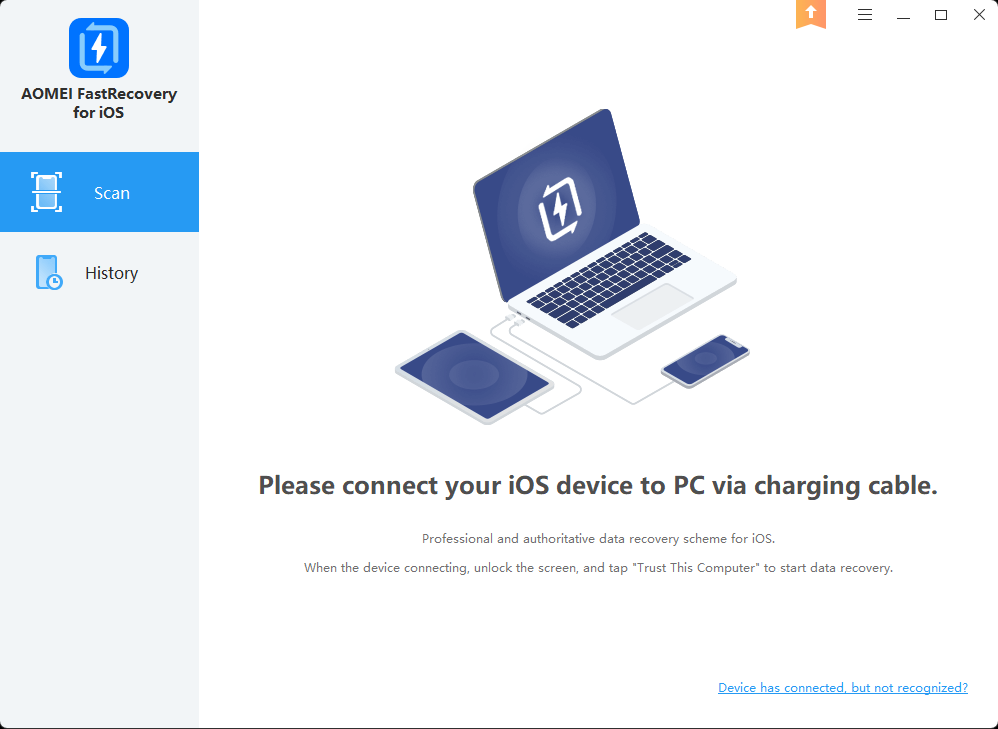
Step 2. Please “Trust This Computer” on your iPhone, then click “Scan Now” to start the scanning process.
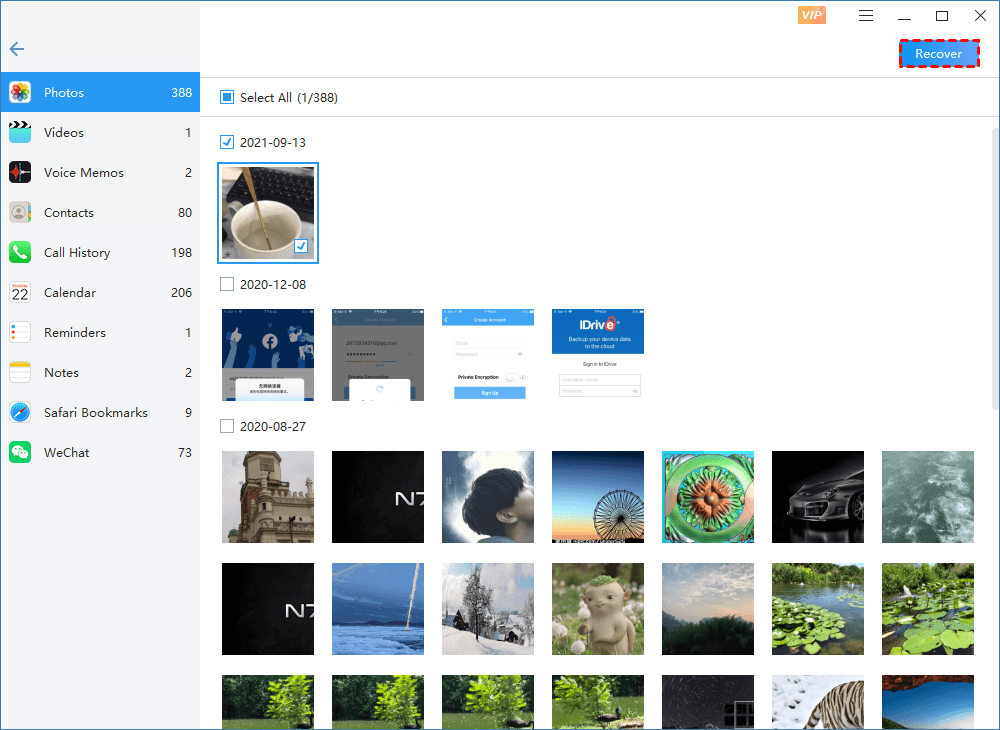
Step 3. You can see the recoverable images in the window after scanning. Please click the “Recover” button to get your selected photos back.
Related suggestions
How to recover deleted files in any situation? How to recover permanently deleted files from different storage devices such as computer OS or iPhone? Please get the respective way to solve these issues.
To safeguard against data loss from the source, it’s necessary to create regular file backups using built-in features or trustable third-party backup software.
- For example, Windows users can make good use of practical Windows backup features like Backup and Restore or use this free Windows backup software, AOMEI Backupper Standard to back up files, folders, disks, partitions, or systems.

- For iPhone users, you can make iCloud/iTunes backups or consider using this free iOS backup and transfer software, FoneTool to finish varied backup and transfer tasks.
This proactive approach ensures that your important data remains secure and retrievable in case of any unforeseen events.