This guide will tell you how to recover data from Dell laptop hard drive, including the method to recover data from a dead Dell laptop.

How to recover data from Dell laptop hard drive
I formatted my hard drive because I had problems with my laptop. Can I recover data from Dell laptop hard drive?
- Question from Dell Community
How do I recover data from a dead Dell laptop hard drive
My Dell laptop won’t boot up at all! Is it possible to recover data from the dead hard drive? Any help would be appreciated.
- Question from Dell Community
Dell laptop provides you with the most advanced devices and components, which makes your work and leisure enjoyable. However, like all other laptops, HP laptops are also prone to corruption.
In such situations, recovering data from the hard drive becomes essential. You definitely do not want to say goodbye to all the files. Well, don't panic, your missing files are still on your hard drive, although you can't see them - they are marked as deleted files, waiting to be overwritten by new data. You can let a data recovery tool help you scan the hard drive and find all deleted or hidden files.
Next, I’ll show you the detailed steps to recover data from Dell laptop hard drive.
As mentioned before, you need a data recovery tool to scan your hard drive so as to find the lost files. AOMEI FastRecovery is recommended here. It’s one professional data recovery software for laptop & PC developed by AOMEI, the benchmark of the data recovery industry.
Main Features of My Recover
● Supports Data Recovery in Various Situations. System crashes, accidental deletion, virus attacks, disk formatting, etc.
● Supports Any Kind of Disk-based Storage Media. SSD, HDD, USB flash drive, external hard drive, SD card, etc.
● Recover Any Types of Files in Original Format. Documents, texts, pictures, videos, audios, emails, compressed files, etc.
● Highly-Compatible. Supports NTFS, FAT32, exFAT, ReFS in Windows 11/10/8/7. (Compatible with 64-bit and 32-bit OS.)
● High-Speed. With an advanced scan engine and robust data recovery algorithm, AOMEI FastRecovery can find and recover deleted or lost data at a very high speed.
It’s only a matter of a few clicks to recover deleted and missing files from your Dell laptop. Below is the download button.
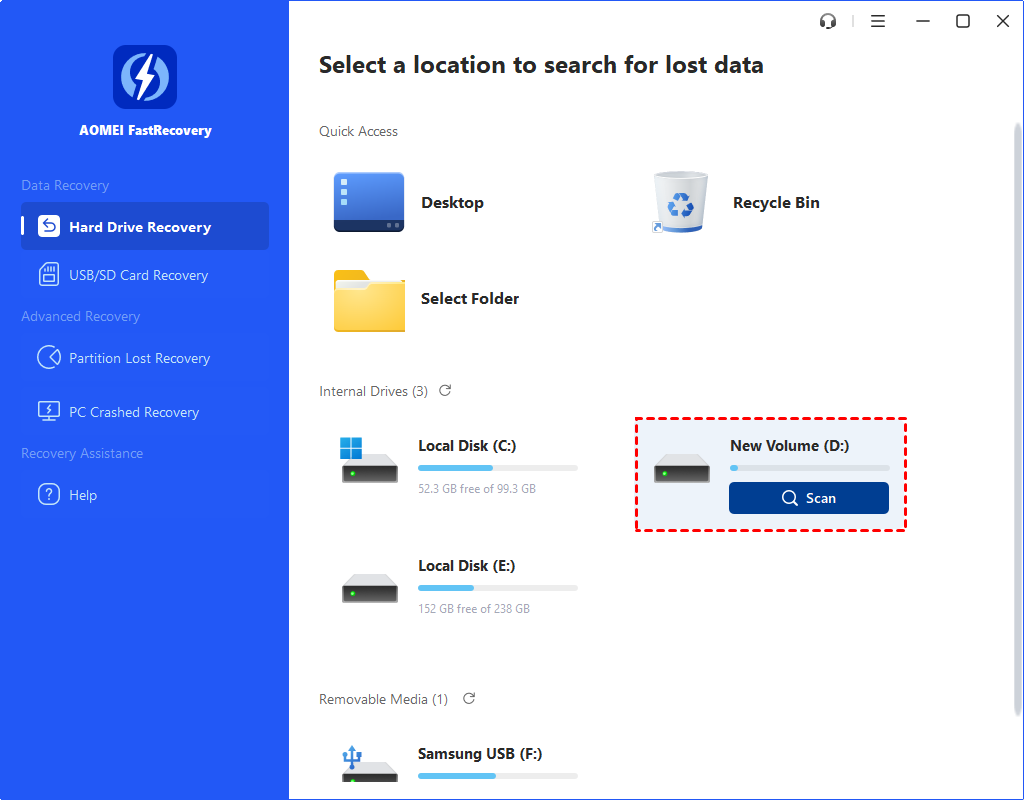
Step 1. Launch AOMEI FastRecovery > Hover the mouse over the drive saved deleted files before, and click Scan.

Step 2. Wait for the scanning. It will try to find Deleted files and Other missing files on your hard drive.

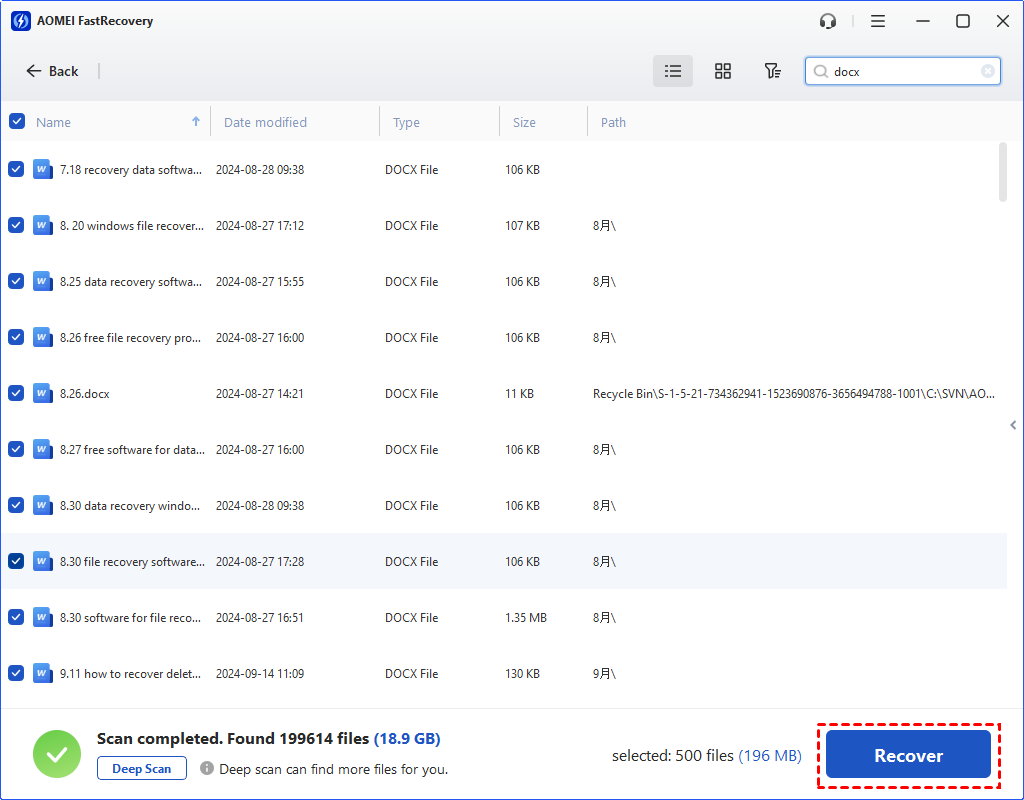
Step 3. Check the scanning result > Select the files you want to restore > Click the Recover button and select a destination to save them.
If your Dell laptop won’t turn on, there are two ways you can try to get the data out of the hard drive.
Process:
Step 1. Remove the hard drive
Unlock your dead laptop case with the screwdriver and take the hard drive out.
Step 2. Connect the hard drive to another computer
Step 3. Transfer data out of the hard drive
Transfer the files on the Dell laptop hard drive to another place. To ensure that no data is lost, you can scan the hard drive via AOMEI FastRecovery.
Process:
Step 1. Create bootable disk
A well-functioning computer is needed to create the bootable disk. Here are the steps to create a bootable disk via the USB stick.
Please note that all existing data on the USB disk will be erased. If it’s not empty, you can first transfer the data to another drive as backup.
Step 2. Boot your Dell laptop
Step 3. Recover data from dead Dell laptop hard drive
Check the computer for any data loss. You can install AOMEI FastRecovery and let it help you scan your laptop and find lost or hidden files.
That’s all about how to recover data from Dell laptop hard drive. Regardless of the reason for data loss, you can let AOMEI FastRecovery help you scan the hard drive and recover data before the overwritten happens.
Even with a data recovery tool, there is no 100% guarantee that you will get your data back every time. For data security, it’s recommended to backup important data regularly. To save time and energy, you can set Schedule Backup through AOMEI Backupper to backup data daily, weekly, monthly.