Accidentally formatted hard drive in Windows 10? Don't worry, you can easily recover files from the formatted hard drive for free with 4 effective methods.
I can't find any way to recover data from the formatted hard drive. I'm using WD Passport 2 TB external hard drive without facing any problems. But I pressed the quick format button by accident. Soon I realized that an important file was in it. What can I do?? How do I recover formatted HDD?"
- Question from Spiceworks Community
Formatting a hard drive that stores important files can be very frustrating, you can not access to it and want to recover files from formatted hard drives.
Can a hard drive be recovered after formatting? Here are 2 common ways to recover formatted hard drive, including professional data recovery software and restoring from backup.
1️⃣ You need to stop using this drive, for example, don’t add new items to the formatted hard disk, otherwise, your files will be overwritten.
2️⃣ The data recovery difficulty varies from disk types (HDDs and SSDs).
3️⃣ The data recovery difficulty varies from formatting types (Quick or Full format).
This part offers 2 methods to recover data from formatted drive without backup, including AOMEI FastRecovery and Windows File Recovery.
AOMEI FastRecovery is a professional data recovery software to recover deleted files without backup from formatted hard drives in Windows PC and Windows Server.
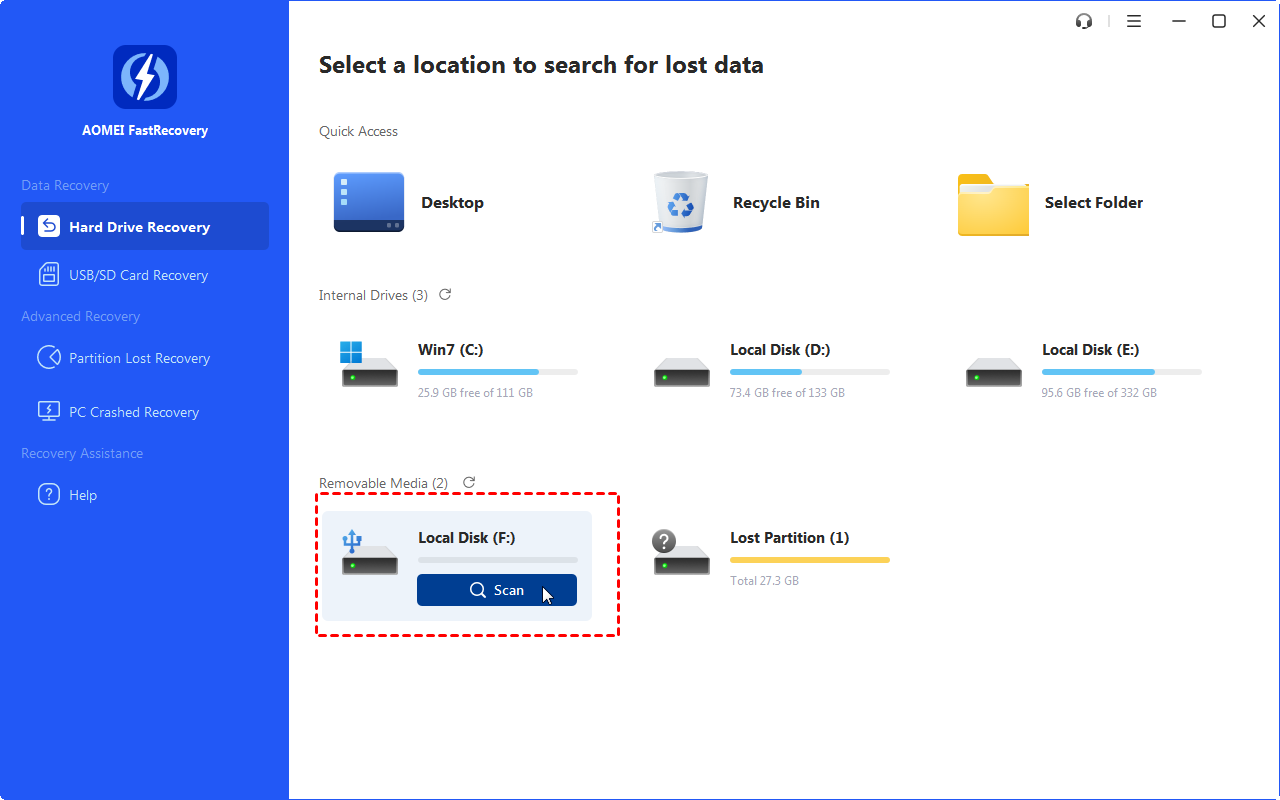
Install and run AOMEI FastRecovery first. Then, locate the target hard drive and click Scan.
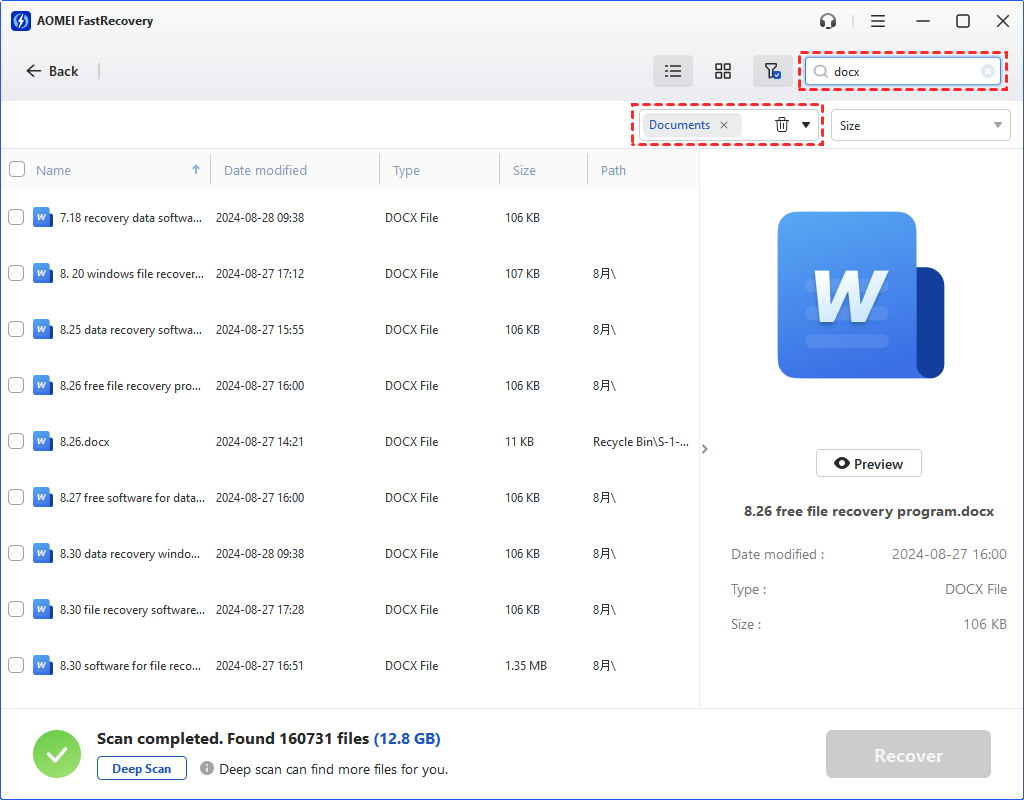
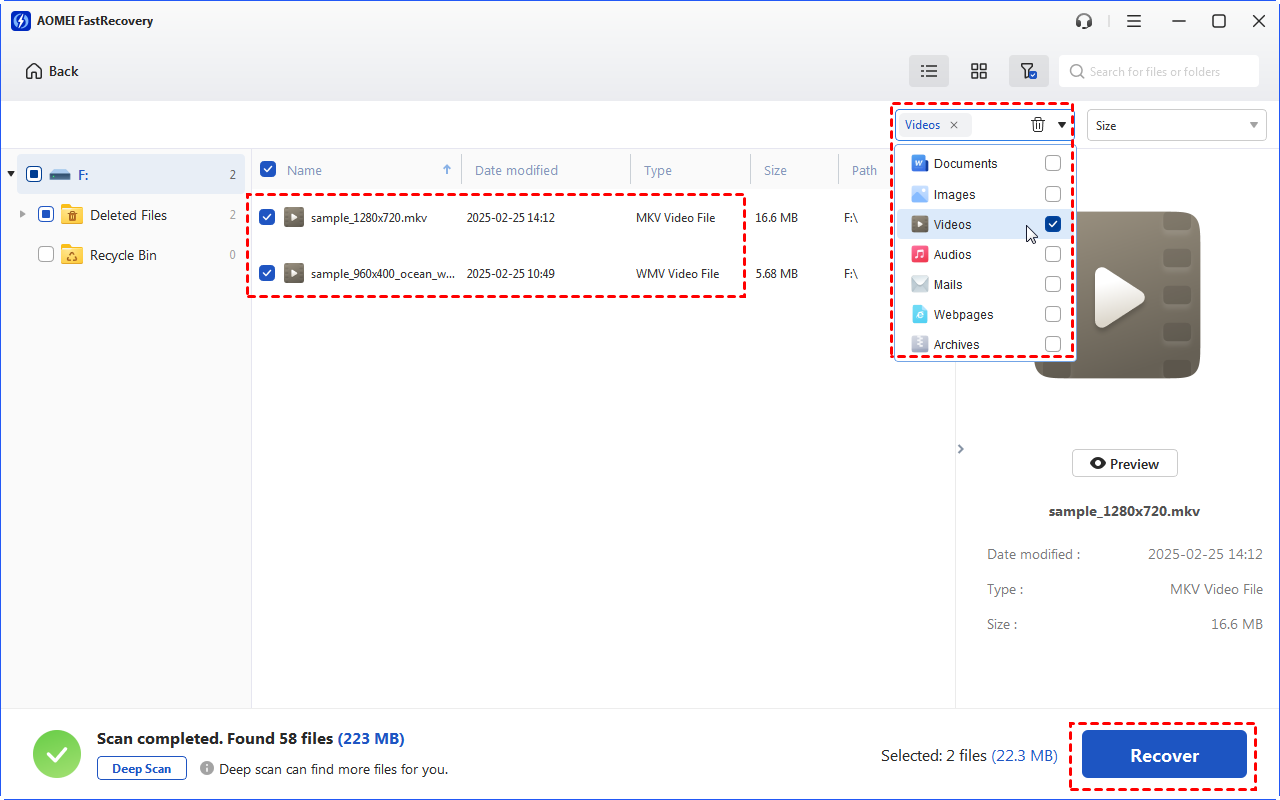
The program runs the scanning process automatically to find files on the formatted drive or you can try Filter to locate the files quickly.
Select the files or the folders you want to recover from the formatted hard disk and click "Recover files" to recover files from the formatted hard drive partition. It will display the number of files and the total file size.
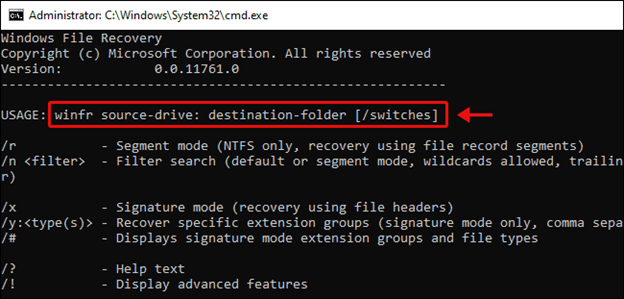
Windows File Recovery is a command-line app to help users recover files from local storage devices like hard drives, external hard drives, USB flash drives, and memory cards. It requires users to learn its syntax, recovery mode, and switches. For details, go to how to use Windows File Recovery.
The syntax:
winfr source-drive: destination-drive: [/mode] [/switches]
The recovery mode corresponding to different file system and scenarios:
|
File system |
Scenarios |
mode |
|
NTFS |
Deleted recently |
Regular |
|
NTFS |
Deleted for a while |
Extensive |
|
NTFS |
Formatted disk |
Extensive |
|
NTFS |
corrupted disk |
Extensive |
|
FATandexFAT |
Any |
Extensive |
The switches of winfr:
|
Switches |
Meaning |
Supported mode(s) |
|
/n |
Filter the scan range: scans for a specific file with its file name/path/type, etc. |
All |
|
/y: |
Recovers specific extension groups. |
Signature |
|
/k |
Recovers system files. |
NTFS Segment |
|
/segment |
Segment mode; recoversfiles under NTFS drives using file recordsegments. |
Segment |
|
/signature |
Signature mode; recoversfiles under all file system types using fileheaders. |
Signature |
|
/u |
Recovers undeleted files, for example, from the Recycle Bin. |
NTFS Segment |
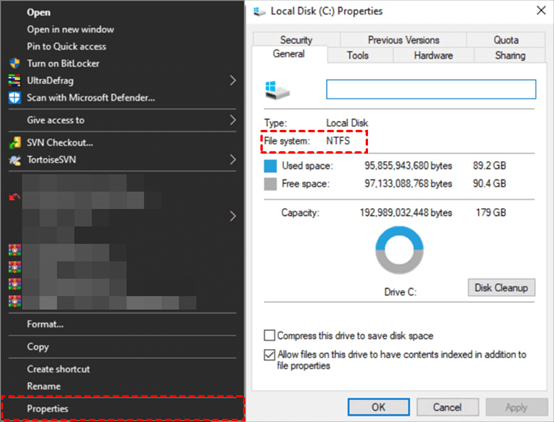
Besides, you still need to check the file system of the formatted hard drive. Because different file system has different modes to use. It’s advised to choose extensive for the NTFS file system after formatting the disk.
Right-click the hard drive and select “Properties”. Then, locate the file system option and confirm it is NTFS or FAT32.
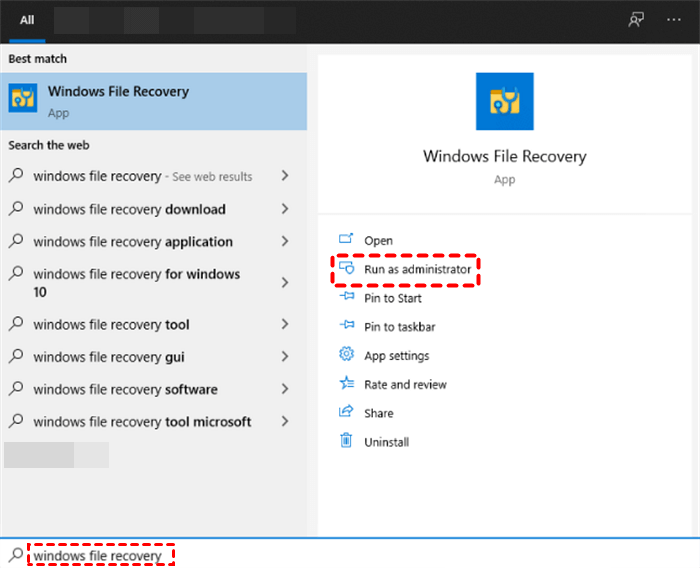
Step 1. Get Windows File Recovery from the Microsoft Store. Type “Windows File Recovery” in the Search box and select “Run as administrator”.
Step 2. Type a command based on the example and press “Enter” to recover files. To recover the folder “Test” from the formatted F: drive (NTFS) to E: drive, type:
winfr F: E: /extensive /n \Test\
Here's how to retrieve data using different backup methods on Mac and Windows.
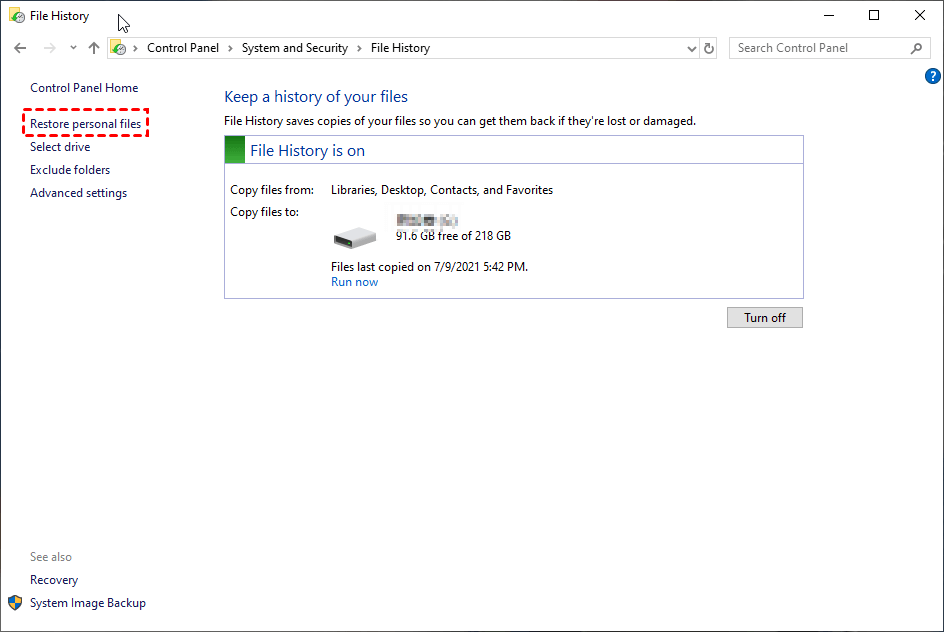
If you have enabled File History on your computer, then you can recover data from the backup package.
Time Machine will generate backups on an hourly, daily, and weekly basis. Such as a backup of the past 24 hours, daily backups for the preceding month, and weekly backups for all prior months.
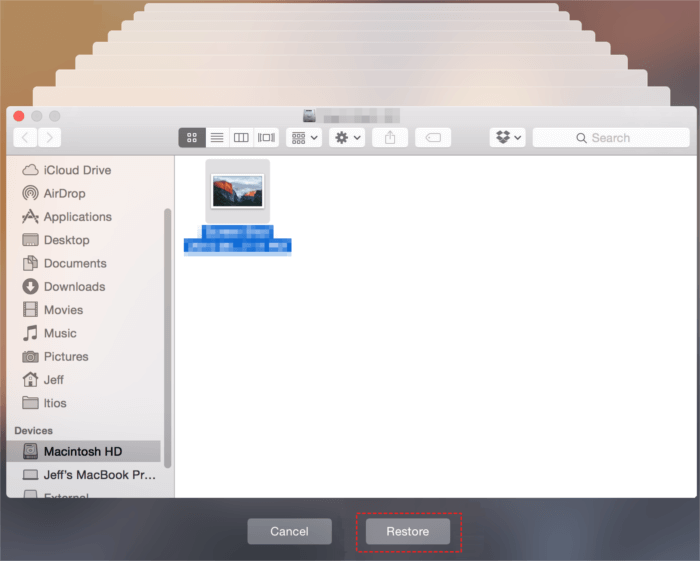
Step 1. Open the window where you lost files.
Step 2. Click the Launchpad icon in the Dock, find Time Machine, and click Enter Time Machine.
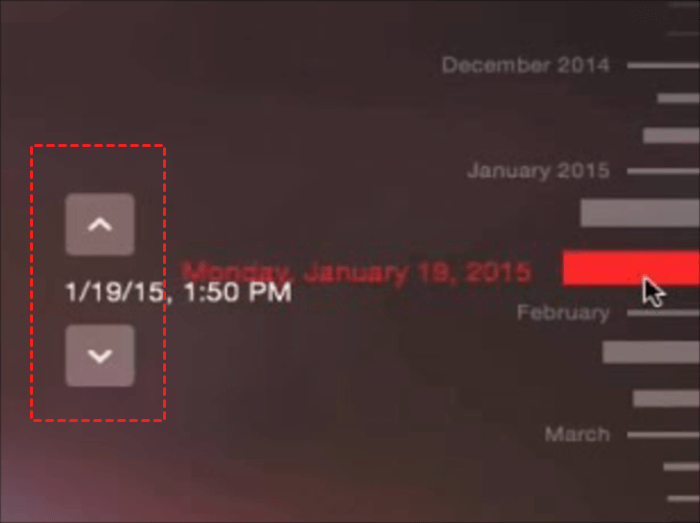
Step 3. Use the up and down arrows to locate the files.
Step 4. Click Restore to recover your needed files, then your lost data will come back to the previous location.
In general, formatting is divided into low-level and high-level formatting. To securely format disks, you need to know them and their usage.
Low-level formatting is to reset a drive to its factory settings, just like erase a disk, and create new sectors and tracks on it. You need to use it when your drive is badly damaged, or it’s infected by viruses, etc. Here are 3 ways to perform it:
High-level formatting is also called quick formatting in layman’s terms and is used to reset a used disk or set up a new hard drive, such as, initialize disk, change file system, partition size, formatting inaccessible drive, etc. It will remove data on the disk and mark bad sectors to fix them. Here are 3 ways to perform it:
Formatting is a process to delete the data currently on your hard drive, specify a file system compatible with your devices, assign drive letters, etc, and therefore readies it for storing new data. In most cases, it causes more harm than good, but that’s not really the case. Sometimes, you need to format your hard drive for reuse. Below are some common situations:
Formatting a hard disk without data loss is tricky, but not impossible. You might need to format it if you cannot access data on it because of the incorrect file system. Here are ways to securely format disk in Windows 10 or 11.
But first... You need to create a copy of your files on the disk to prevent data loss. The best way is to use file backup software like Backup and Restore (Windows 7), File History, or third-party software, such as AOMEI Backupper Standard. Usually, the last one is easier, more flexible, and has rich features.
Then, you could follow one of the methods below to format a disk without data loss.
★ File Explore
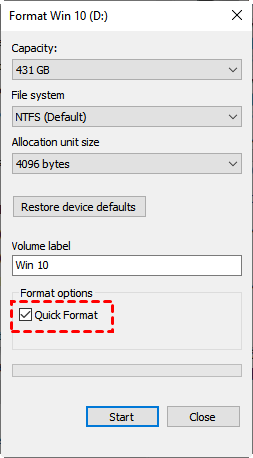
Step 1. Connect the disk you want to format. Go to “File Explore”, locate and right-click it, select “Format”.
Step 2. Check the capacity, file system and be sure the “Quick Format” option is checked. Click Start to format your disk.
★ Disk Management
Step 1. Connect the disk you want to format. Type “diskmgmt.msc” in the search box and press “Enter” to open Disk Management.
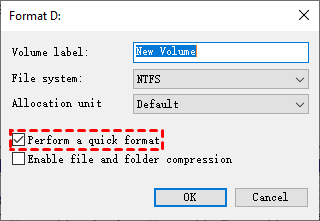
Step 2. Right-click the newly connected drive and select “Format”.
Step 3. Confirm the file system and be sure you check the “Perform a quick format” option. Click “OK”.
After formatting, if you find you delete important files on it, please stop using this drive and recover files with data recovery software or backup images immediately.
1️⃣ Take sufficient time before formatting to verify the disk types, format method, and level.
2️⃣ Create a copy of your files automatically. Note single backup only includes data currently on the disk, to include changes made later, you’d better create a scheduled backup task. AOMEI Backupper Standard is a great option.
3️⃣ Avoid browsing suspicious websites or downloading files on them.
4️⃣ After formatting, please stop using the drive to lose data and don’t add new items to it. These operations will make it difficult to recover files from formatted hard drives.
5️⃣ Monitor the status of your disk and move your files before it’s damaged.