How to Recover RAW Data from External Hard Drives
Learn to recover RAW data from external hard drives via data recovery tools or other efficient ways in this article. And there’s a free Windows backup tool for you.
By Penny / Updated on April 2, 2024
What is RAW data?
Data (such as statistics, instrument readings, figures, etc.) that have been acquired from a source are known as RAW data or primary data.

Several users are bothered by RAW drives because Windows OS cannot recognize their RAW external hard drives. Therefore, RAW data is unprocessed and inaccessible data. And you’re not allowed to access this collection of files saved on your computer’s hard drive.
I connected my 1TB WD external hard drive to my PC using SATA and booted up my Windows. But it wasn’t displayed on my computer. I’ve assigned a drive letter to it and initialized it, which makes it active, but it stayed in a RAW format. So how can I access RAW files on my external hard drive? Thanks.
-A user from Seven Forums
Please don’t worry because this article aims to help you access RAW files from external hard drives.
Why does my hard drive show up as RAW?
Are you wondering why is my hard drive showing RAW instead of NTFS? When your external hard drive turns RAW, which implies it hasn’t been formatted with a file system such as NTFS or FAT32.
Besides incompatible file systems, there’re other possible reasons for RAW partitions.
- Volume on the external hard drive might have been formatted inappropriately
- Outdated/corrupted device driver
- Bad sectors or corrupted file systems
- Partition table damage
- Your external hard drive access denied
- Exhausted reserve of read and write cycles
- Aging of your external hard drive
- Sudden power failure
- Incorrect disconnection
- Malware infection
Since you’ve figured out possible factors, please read further to recover RAW data from external hard drives.
How do I recover RAW files from an external hard drive without formatting?
Most users format their external hard drives immediately after receiving error messages as follows.
You need to format the disk in drive H before you can use it.
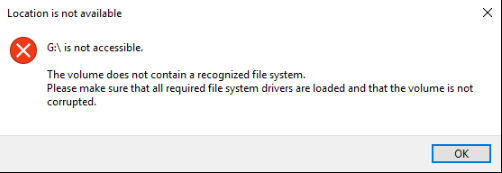
The volume does not contain a recognized file system.
Do you want to format it? G is not accessible.
But those users who’ve finished the disk formatting process find the data stored on their external hard drives has gone. Please don’t be surprised because this action could erase everything on your RAW partitions and prepare this disk for further use.
If you want to recover RAW data from external hard drives without formatting, there’re two feasible solutions.
1. Recover RAW data from external hard drives via data recovery software
Hard drive RAW data recovery is not easy. To prevent the second damage, you’d better recover lost files as soon as possible. After that, you can proceed with fixing RAW disks.
Trying to check & repair bad sectors of RAW partitions first may cause further damage and decrease the possibility of a successful external hard drive data recovery.

When it comes to problems about how to recover data from RAW drives, there’ll be no better way than using one of the best data recovery software for Windows, MyRecover to salvage your precious deleted & missing files from RAW drives.
- If your external hard drive becomes RAW, please avoid writing any new files to this drive.
- After recovery, please remember to save these retrieved files in a new saved path.
- To recover more and more deleted or missing files from your external hard drive with no effort, consider upgrading MyRecover to the Professional or Technician edition.
- ★Highlights of MyRecover:
- Powerful features: Recover deleted & lost Word, Excel, PPT, folders, compressed files, photos, songs, videos, audio, websites, and other 200+ file types from internal & external hard drives, USB, SSD, etc.
- Easy-to-find: Quick Scan and Deep Scan can find your deleted & missing files as many as possible. You can also quickly locate your desired files by Filename, Path, Date, Size, etc.
- Convenient: Get deleted files’ original Paths, Filenames, and Format after recovery.
- Excellent compatibility: Support NTFS, FAT32, exFAT, and ReFS file systems and be compatible with Windows 11, 10, 8, 7, or Windows Server.
Let’s perform how to recover deleted files from external hard drives via this tool!
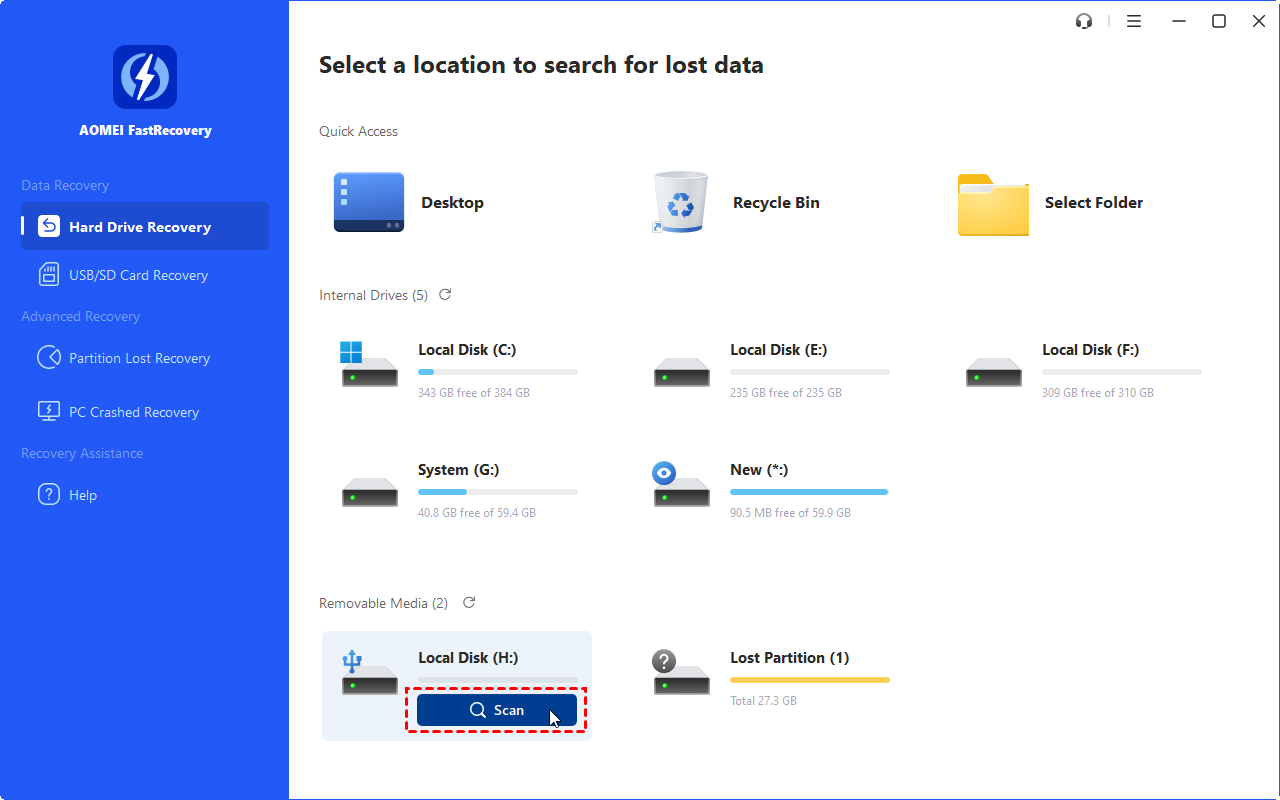
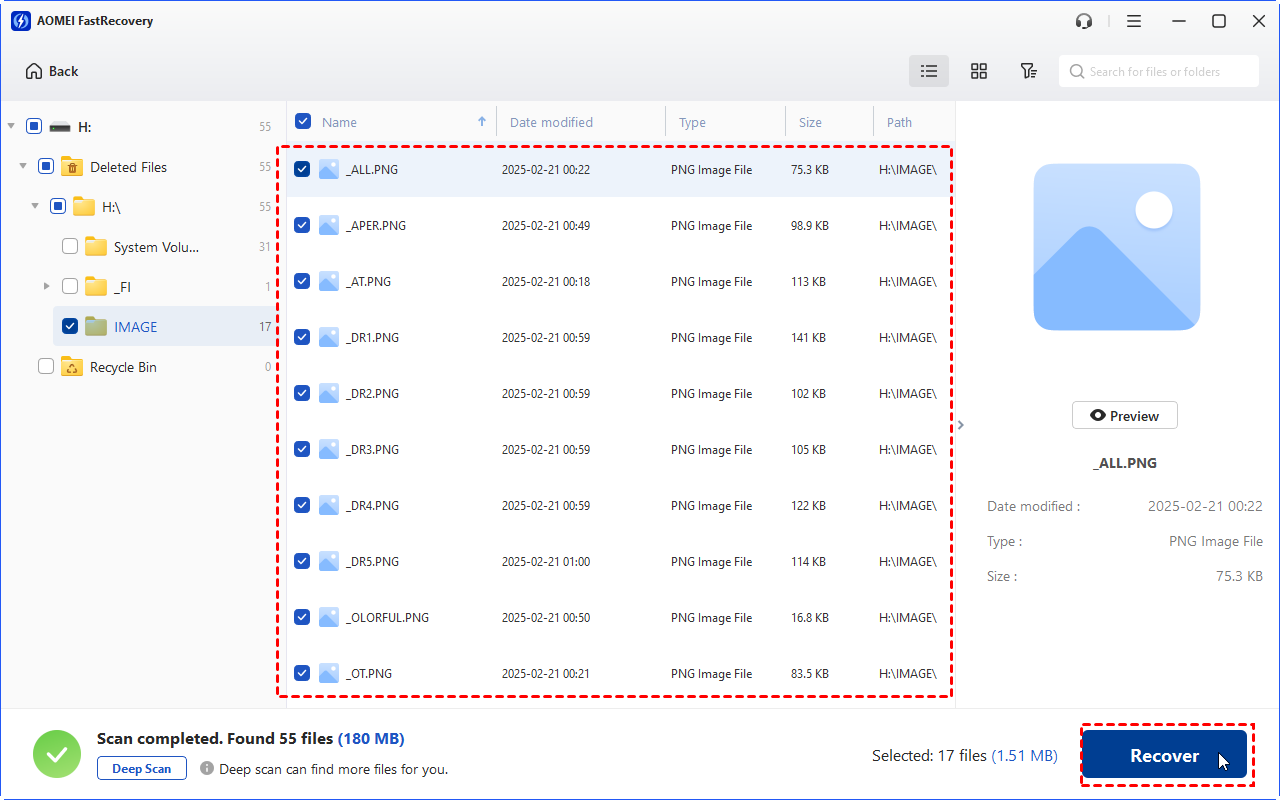
Step 1. Connect the external hard drive to your Windows PC. After running MyRecover, hover the mouse over your connected external hard drive and click Scan.
Step 2. It will automatically scan your external hard drive and display all the found files. You can filter specific file type and preview or recover files during this process without waiting for final result.
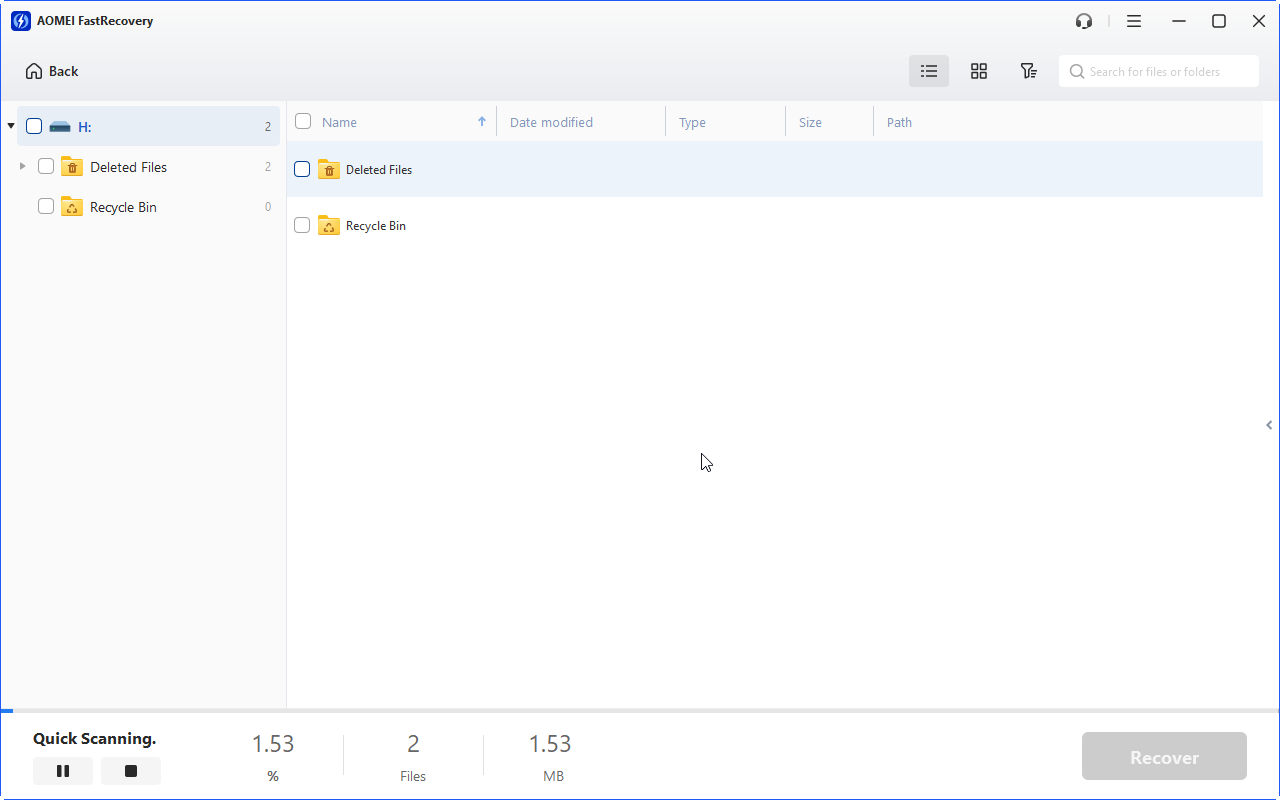
Step 3. Go to the Other Missing Files folder and select the data you want. Then click “Recover x files” to begin the hard drive RAW data recovery.
2. Update/reinstall external hard drive device driver via Device Manager
If you cannot open your external hard drive, its device driver may be outdated/corrupted because outdated or corrupted device drivers can discourage users from accessing saved files on it. Thus, you need to update or reinstall your external hard drive driver manually.
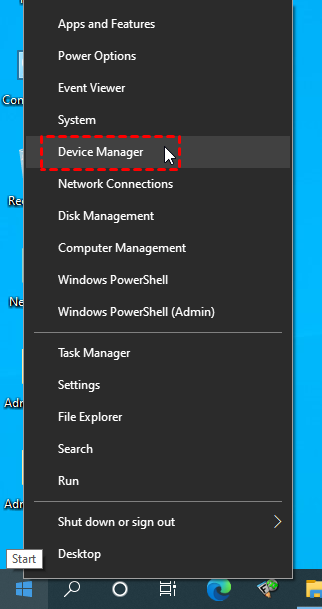
Step 1. Press “Win + X” and click “Device Manager” to open it.
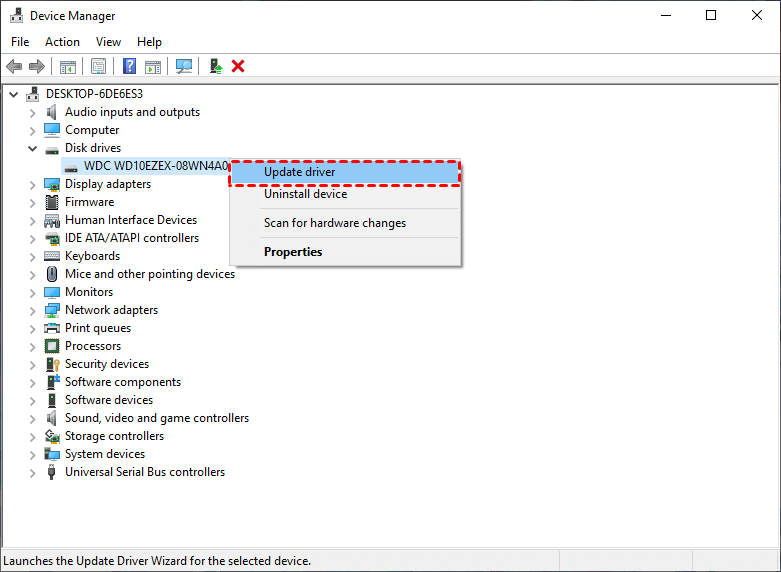
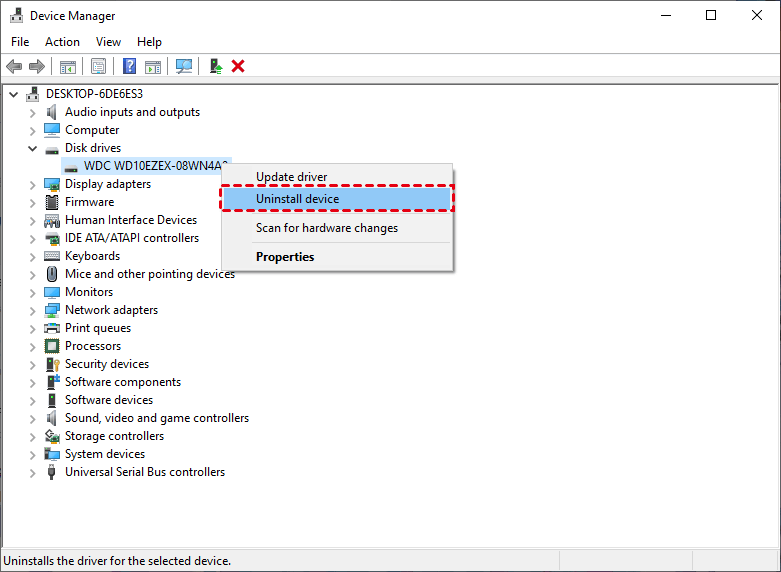
Step 2. Go to Disk Drives and expand it. Please right-click on your external hard drive and select “Update driver” or “Uninstall driver” as you prefer.
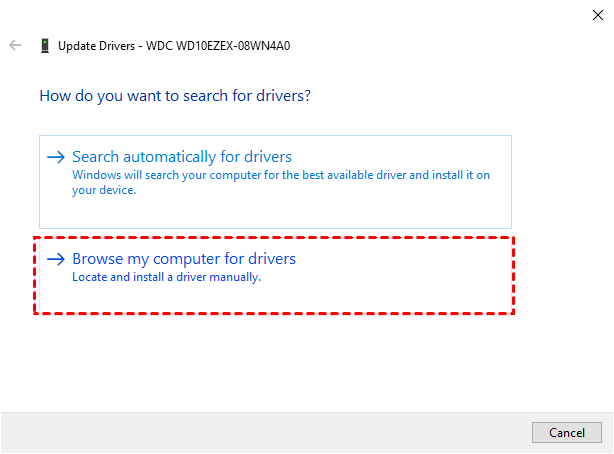
Step 3. After rebooting your computer, its operating system can automatically reinstall your external hard drive. Or you can click the “Browse my computers for drivers” button.
Try to access your external hard drive and get your desired data from it. If you also need to recover deleted or missing files, please seek help from MyRecover.
Other ways to perform hard drive RAW data recovery
As the title suggests, this part guides you to recover data from RAW drives via other fixes. But these methods definitely could reduce the chances of your external hard drive data recovery rate.
Fix 1. CHKDSK RAW drive to check & repair bad sectors
As stated earlier, bad sectors and damaged file systems are blamed for data loss. In this scenario, the CHKDSK command might be right for you because this utility to designed to fix detected errors on your partition. Please refer to the following steps.
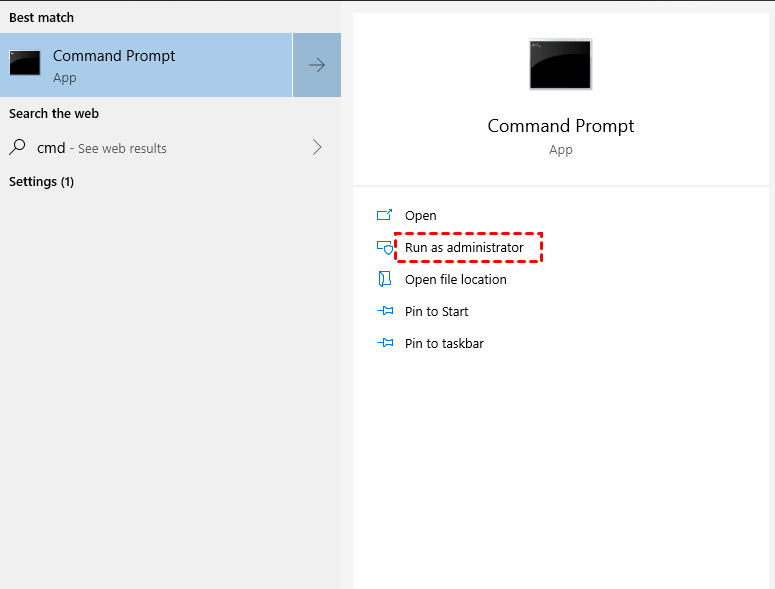
Step 1. Connect the external hard drive to your Windows and enter “cmd” in the search bar. Then click “Run as administrator” to open the command prompt window.
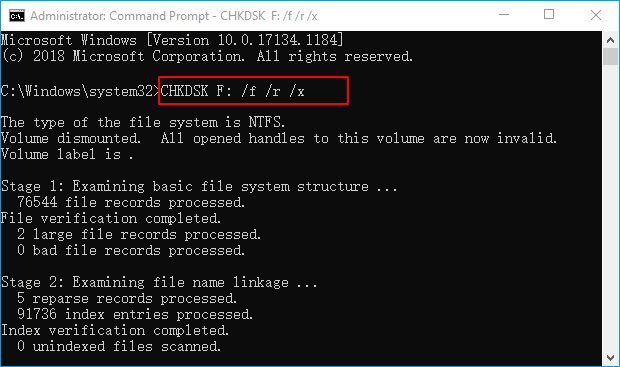
Step 2. Type “chkdsk F:/f” in the window. You can replace F with your external hard drive letter. Then wait to see this notice: Windows has made corrections to the file system.
Fix 2. Convert RAW to NTFS without losing data via Disk Management
Since you’re not permitted to access your data from RAW file systems, you can consider converting RAW to NTFS. Once detected by your Windows OS, accessing your desired files with NTFS file systems is relatively easy.
But before changing file systems, you need to format your RAW partition first. After that, this external hard drive is ready to make new changes or other modifications.
Otherwise, it’s impossible for you to convert RAW to NTFS without losing data.
Step 1. Type “Disk Management” in the search bar on your PC and open it.
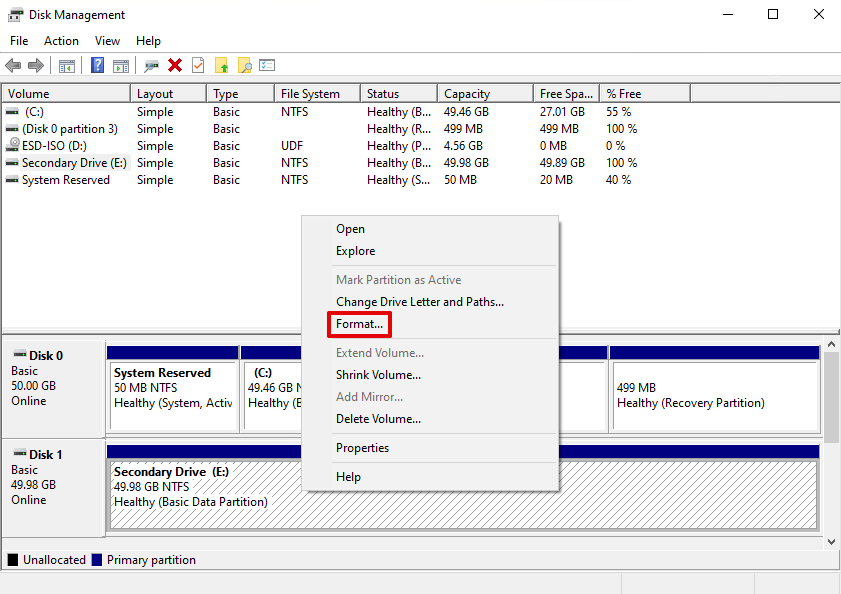
Step 2. Right-click on your RAW external hard drive and select the “Format” option.
Step 3. Select the NTFS file system that works with your current Windows OS. Then click “OK” to save these changes.

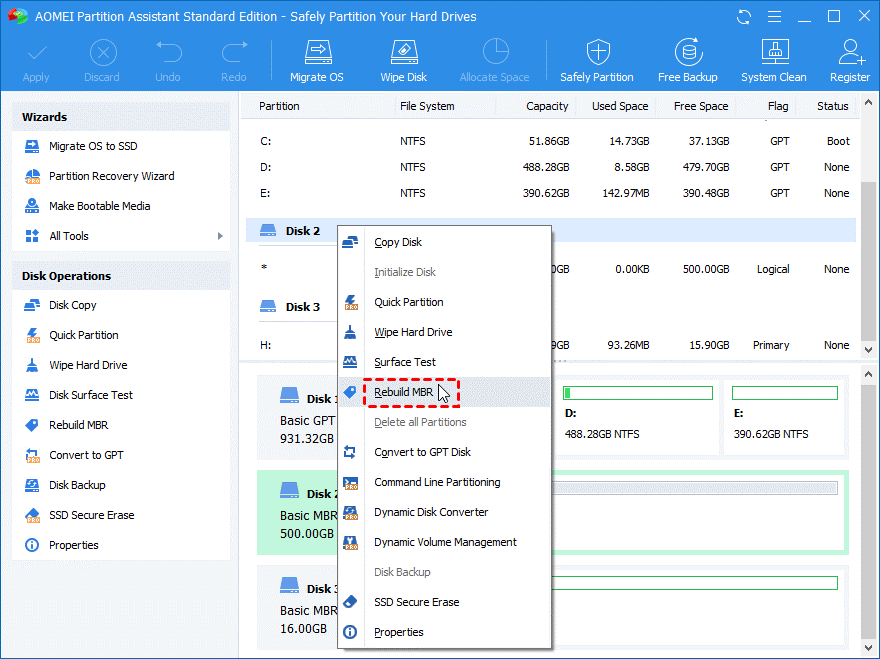
Fix 3. Rebuild partition table via AOMEI Partition Assistant
Undeniably, a corrupted or damaged partition table is also responsible for RAW external hard drives. If it happens to be your case, try to rebuild MBR with this free AOMEI Partition Assistant Standard to fix this issue.
- ★Other highlights of AOMEI Partition Assistant:
- Recover deleted & missing NTFS, FAT, EX2, EX3, or Ex4 partitions.
- Deal with fixing errors using CHKDSK.exe, disk formatting, improper partition size, partition creation, partition resize, etc.
- Perform disk conversion between MBR and GPT, OS migration, etc.
- Support Windows 11, 10, 8.1, 8, 7, Vista, and XP (32/64-bit) computers.
Step 1. After running AOMEI Partition Assistant Standard on your Windows PC, right-click on your connected external hard drive and choose the “Rebuild MBR” option.
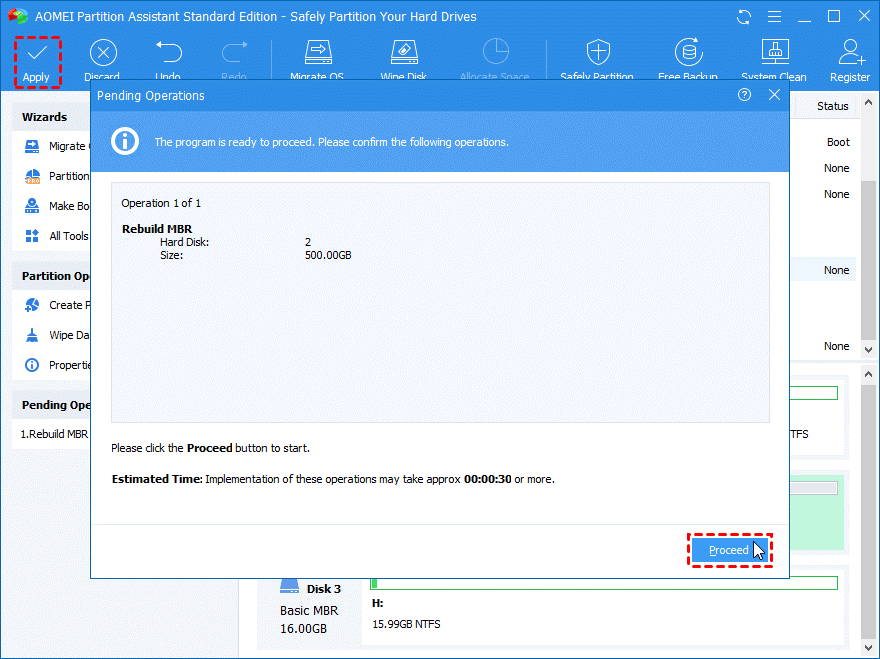
Step 2. Choose the operating system you’re using and click the “OK” button.

Step 3. On the main interface, click Apply > Proceed.
Bonus tips: How do I prevent data loss on my external hard drive?
Please take the following pertinent suggestions into consideration if you’re seeking data loss prevention tips.
- Keep your external hard drive away from high temperatures or liquid
- Avoid interruption as your external hard drive reads, writes, or transfers data
- Reconfirm the files you’re going to delete from your external hard drive
- Develop a good habit of making regular backups
- Run the latest antivirus software to protect your computer
All in all, only regular backups are the best hedge against data loss. If you’re unwilling to be restricted by Windows features, why not give this free AOMEI Backupper a shot?
Compared with Windows features, this free Windows backup software provides more flexible features and a better user experience.
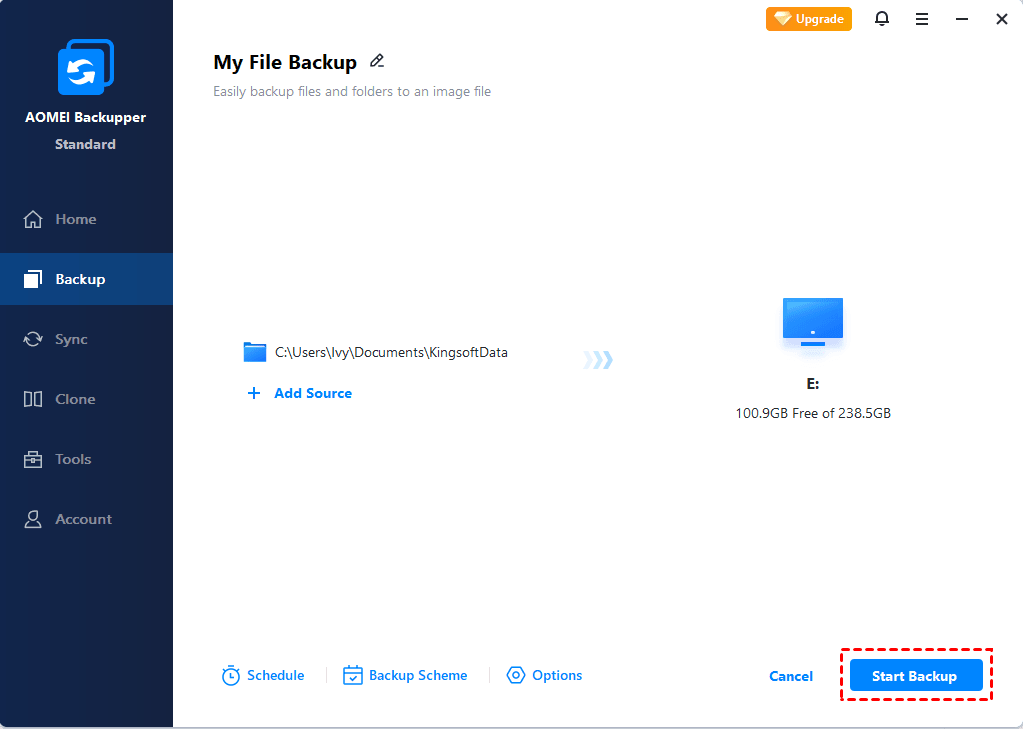
Phase 1. Make a file backup
Step 1. After launching AOMEI Backupper on your Windows PC, select “File Backup” under the Backup tab.

Step 2. Click “Add Folder/Add File” to add the files/folders you want to back up.

Step 3. Locate a saved path to store your backup files/folders. Then click the “Start Backup” button.
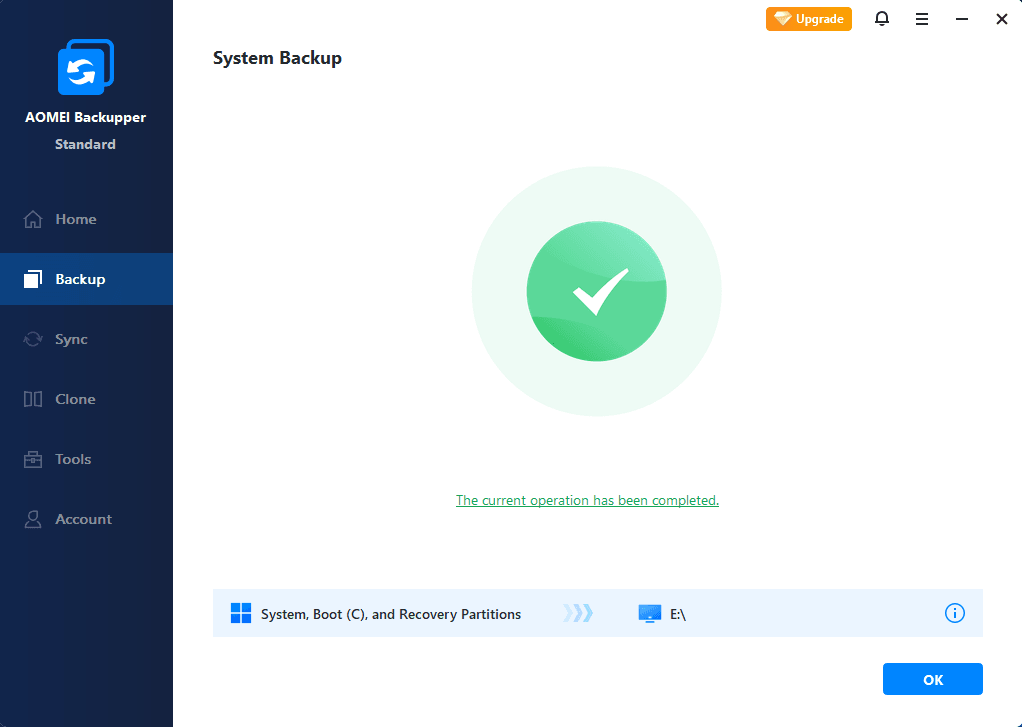
Step 4. After the backup process, click “Finish” to exit the window.
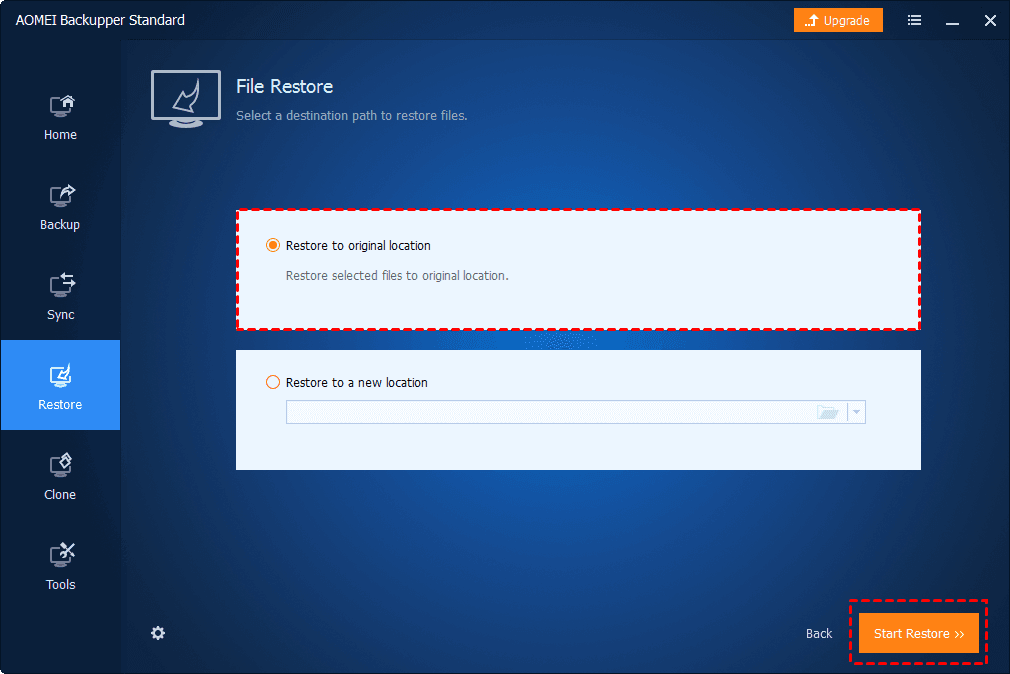
Phase 2. Restore files from backups
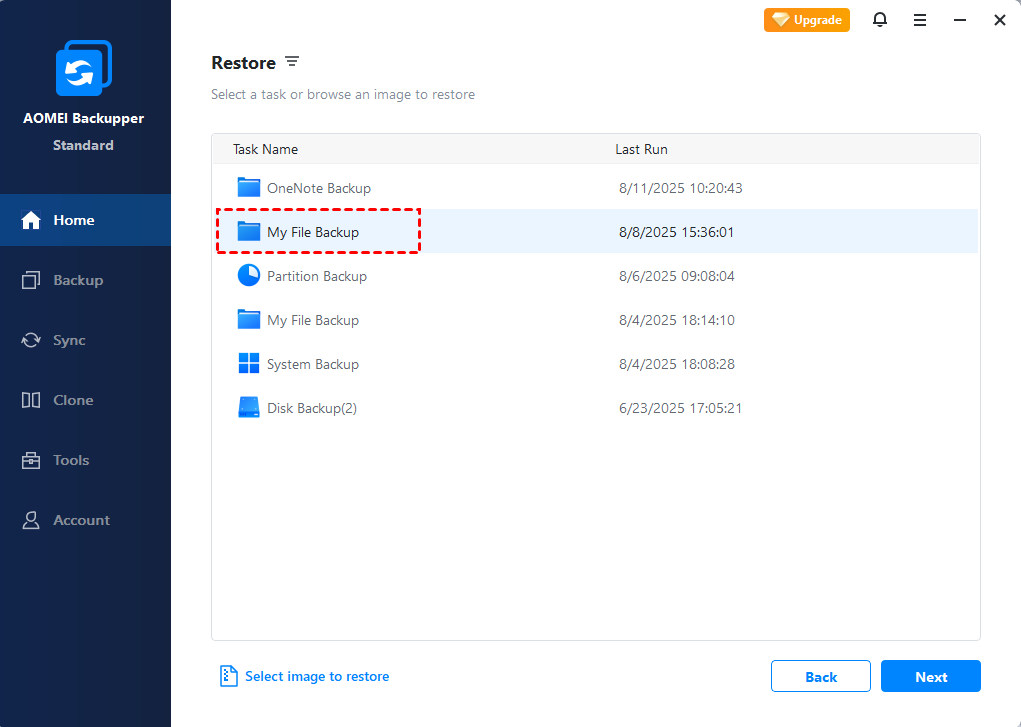
Step 1. Under the Restore tab, click the “Select Task” button.

Step 2. Select your File Backup and click the “Next” button.
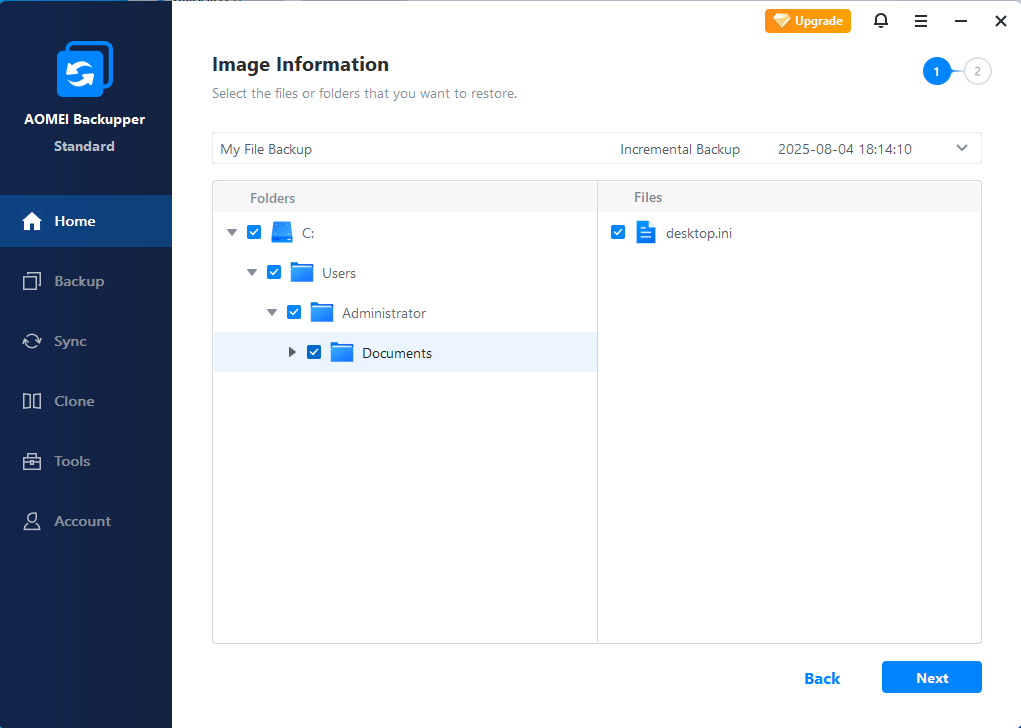
Step 3. Select the specific files/folders you want to restore. Then click the “Next” button.
Step 4. Select “Restore to original location” or “Restore to a new location” as you need. Then click “Start Restore” to begin the restoration process.