
How to Set Up RAID in Windows: A Comprehensive Guide
Learn how to set up RAID in Windows step-by-step in this article.
By Zoey / Updated on February 5, 2024
In the realm of data storage, efficiency, reliability, and performance are paramount. For Windows users, setting up RAID (Redundant Array of Independent Disks) offers a powerful solution to enhance these aspects of storage management. Whether you're a seasoned IT professional or a casual user looking to optimize your system, understanding how to set up RAID in Windows can be immensely beneficial.
Understanding RAID
Before delving into the nitty-gritty of setting up RAID in Windows, it's essential to grasp the concept of RAID itself. RAID is a technology that combines multiple physical disk drives into a single logical unit for improved performance, data redundancy, or both. By distributing or replicating data across the array of disks, RAID can enhance storage reliability and speed.
There are several RAID levels, each offering different benefits:
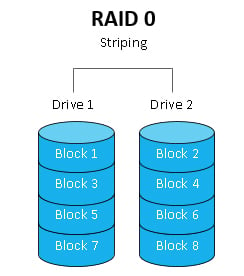
RAID 0: Also known as disk striping, RAID 0 splits data evenly across two or more disks without redundancy. This configuration enhances performance by allowing data to be read from and written to multiple disks simultaneously. However, RAID 0 offers no fault tolerance, meaning that the failure of a single disk will result in data loss for the entire array.
RAID 1: RAID 1, or disk mirroring, duplicates data across two or more disks to provide redundancy. In this configuration, each disk contains an identical copy of the data, ensuring that if one disk fails, the data remains intact on the other disk(s). While RAID 1 offers excellent fault tolerance, it does not provide the same performance benefits as RAID 0.
RAID 5: RAID 5 combines disk striping with parity data distributed across all disks in the array. This configuration offers both performance enhancement and fault tolerance, allowing the array to continue functioning even if one disk fails. RAID 5 requires a minimum of three disks and can withstand the failure of any single disk in the array.
RAID 10: Also known as RAID 1+0 or RAID 0+1, RAID 10 combines the features of RAID 1 and RAID 0. In this configuration, data is mirrored across multiple disk pairs, and then those pairs are striped together. RAID 10 offers both high performance and fault tolerance, making it a popular choice for mission-critical applications. However, it requires a minimum of four disks.
Preparing for RAID Setup
Before embarking on the RAID setup process, it's essential to ensure that you have the necessary hardware and software. Here's what you'll need:
- Multiple Disks: RAID requires two or more physical disk drives. The number of disks you'll need depends on the RAID level you choose and your specific storage requirements.
- RAID Controller: Depending on your motherboard or system configuration, you may need a RAID controller. This can be either hardware-based (a dedicated RAID controller card) or software-based (utilizing RAID functionality built into the operating system).
- Backup Solution: Setting up RAID involves manipulating your disk configuration, which carries the risk of data loss if something goes wrong. Therefore, it's crucial to have a backup solution in place to protect your data.
Step-by-Step Guide to Setting Up RAID in Windows
Now that you have everything you need, let's walk through the process of setting up RAID in Windows:
1. Check Hardware Compatibility: Before you begin, ensure that your system's hardware supports RAID. Check your motherboard specifications or consult the manufacturer's documentation to confirm compatibility.
2. Backup Data: As a precautionary measure, back up any important data on your disks. While setting up RAID shouldn't result in data loss, it's always better to be safe than sorry.
3. Access Disk Management: Open Disk Management by right-clicking on the Start button and selecting "Disk Management" from the context menu.
4. Initialize Disks: If your disks are new and haven't been initialized yet, you'll need to do so before setting up RAID. Right-click on each disk in Disk Management and select "Initialize Disk." Choose the partition style (usually GPT for newer disks) and click "OK."
5. Create RAID Array: Once your disks are initialized, right-click on one of them and select "New Spanned Volume," "New Striped Volume," or "New Mirrored Volume," depending on the RAID level you want to create. Follow the prompts to select the disks you want to include in the array and configure the volume settings.
6. Configure RAID Settings: After creating the RAID array, you may have the option to configure additional settings such as stripe size, disk order, and caching options. These settings can affect the performance and reliability of your RAID array, so choose them carefully based on your specific needs.
7. Format RAID Volume: Once your RAID array is created and configured, you'll need to format it with a file system (such as NTFS or exFAT) so that Windows can recognize it as a usable storage volume. Right-click on the RAID volume in Disk Management and select "Format." Follow the prompts to choose the file system, allocation unit size, and volume label, then click "OK" to format the volume.
8. Verify RAID Configuration: After formatting the RAID volume, double-check that everything is set up correctly. Ensure that the RAID volume appears in File Explorer and that you can read from and write to it without any issues.
Congratulations! You've successfully set up RAID in Windows, enhancing your system's storage performance and reliability in the process.
Troubleshooting and Tips
While setting up RAID in Windows is relatively straightforward, you may encounter some challenges along the way. Here are some common issues and tips for troubleshooting them:
- Disk Compatibility: Ensure that all disks you're using in your RAID array are compatible with each other and with your RAID controller. Using mismatched or incompatible disks can lead to compatibility issues and degraded performance.
- Driver Conflicts: If you're using a hardware RAID controller, make sure you have the latest drivers installed for it. Driver conflicts can cause issues with RAID functionality, so keeping your drivers up to date is essential.
- Configuration Errors: Double-check your RAID configuration settings to ensure that everything is set up correctly. Misconfigurations can result in data loss or degraded performance, so it's crucial to get them right from the start.
In addition to troubleshooting, here are some tips for optimizing the performance and reliability of your RAID array:
- Regular Maintenance: Perform regular maintenance tasks such as disk checks, firmware updates, and system optimizations to keep your RAID array running smoothly.
- Monitor Disk Health: Keep an eye on the health and status of your disks using tools like SMART (Self-Monitoring, Analysis, and Reporting Technology) diagnostics. Monitoring disk health can help you identify potential issues before they become serious problems.
- Backup Regularly: While RAID provides redundancy and fault tolerance, it's not a substitute for regular backups. Make sure you have a robust backup solution in place to protect your data in case of hardware failure or other disasters.
Introduction to MyRecover
In addition to the built-in RAID management tools provided by Windows, there are also third-party software solutions available to simplify the process of setting up and managing RAID arrays. One such solution is MyRecover, a user-friendly software tool designed to streamline RAID configuration and management tasks.
MyRecover offers a range of features to make RAID setup and management easier:
Automatic RAID Configuration: MyRecover can automatically detect and configure RAID arrays, saving you time and effort during the setup process.
Disk Health Monitoring: MyRecover monitors the health and status of your disks in real-time, alerting you to any issues that may arise.
Data Recovery Options: In the event of disk failure or data loss, MyRecover offers data recovery options to help you recover lost or corrupted data quickly and easily.
By leveraging the features of MyRecover, you can simplify the process of setting up and managing RAID arrays in Windows, ensuring optimal performance and reliability for your storage system.
Conclusion
Setting up RAID in Windows is a powerful way to enhance your system's storage performance and reliability. By understanding the different RAID levels, preparing your hardware and software, and following a step-by-step guide, you can create a RAID array that meets your specific needs.
In addition to the built-in tools provided by Windows, third-party software solutions like MyRecover offer additional features and functionality to simplify RAID setup and management tasks. By taking advantage of these tools and following best practices for RAID configuration and maintenance, you can ensure that your RAID array operates smoothly and reliably for years to come.
Remember, RAID is not a substitute for regular backups, so it's essential to maintain a robust backup strategy to protect your data against potential disasters. With the right knowledge and tools at your disposal, you can set up RAID in Windows with confidence, knowing that your data is safe and secure.
FAQs
1. Is RAID suitable for all types of storage setups?
RAID can be beneficial for various applications, but it's essential to assess your specific needs and workload to determine the most suitable RAID level.
2. Can I add additional disks to an existing RAID array?
Yes, many RAID configurations support adding disks to expand storage capacity or enhance performance. However, it's crucial to follow proper procedures to avoid data loss.
3. Does RAID eliminate the need for backups?
While RAID provides redundancy and fault tolerance, it's not a substitute for regular backups. Data loss can still occur due to various factors, so maintaining backups is essential for safeguarding your data.

