Are you looking for a way to create a bootable WinPE USB drive? Here in this article, we offer 2 proven methods and walk you through the process step by step using Deployment and Imaging Tools and a third-party tool.
Windows Preinstallation Environment (WinPE) is a lightweight version of the Windows operating system containing a variety of system recovery and diagnostic tools for deploying PCs, workstations, and servers, and troubleshooting an operating system while it's offline. With Windows PE, you can:
Also, there are many customized WinPE with third-party packages for different uses, for example, recover data from hard disk without OS, perform a disk clone task, etc. Anyway, you need to create a WinPE USB drive, CD/DVD, or ISO files. Of these, the USB drive is the easiest to create.
One of the most efficient ways to create a bootable Windows PE USB flash drive is through the Deployment and Imaging Tools. This method is favored by many IT professionals due to its robustness and reliability. Here’s a step-by-step guide to get you started:
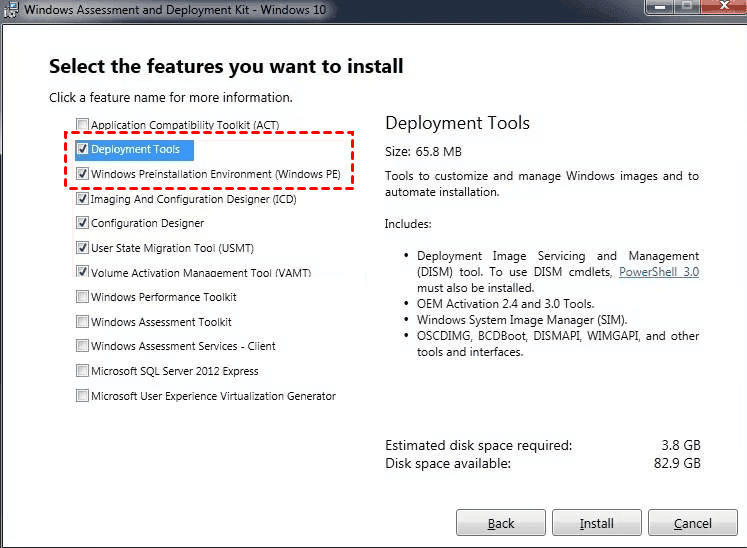
Step 1. First, download and install the Windows Assessment and Deployment Kit (ADK). Make sure to include the Deployment Tools and Windows Preinstallation Environment features.

Step 2. Then, click Start > W> Windows Kits and select More > Run as administrator to open Windows ADK.
Step 3. Type these commands to create a WinPE working directory.

Replace the path D:\WinPEx64 with your preferred drive and folder name.
The amd64 is to boot a 64-bit system. To boot a 32-bit system, replace it with amdx86, it should be like this: copype x86 D:\WinPEx86.
Step 4. Type the following command to mount the WinPE image.
Dism /Mount-Image /ImageFile: C:\WinPEx64\media\sources\boot.wim /Index:1 /MountDir: D:\WinPEx64\mount
Step 5. Copy any necessary drivers or applications into the mounted WinPE image.
Step 6. Type the following command to unmount the WinPE image and commit changes.
Dism /Unmount-Image /MountDir: D:\WinPEx64\mount /Commit
Step 7. Connect a USB drive and remember its drive letter (I:). Replace the path C:\WinPEx64 with the actual folder where you create the PE files.
MakeWinPEMedia /UFD D:\WinPEx64 I:
Step 8. You will be prompted that the disk needs to be formatted, type Y to confirm it.
Step 9. Restart your computer and type a prompted key (e.g. F2, ESC, F10, etc.) to access the BIOS. Go to the Boot menu and select the USB drive as the boot drive. Save the changes and let it boot automatically.
This method ensures you have a custom, bootable WinPE USB drive tailored to your specific needs, ready to tackle any deployment or recovery task.
Nowadays, there are many derivatives of the WinPE USB drive, for example, to recover data from hard disk without OS, AOMEI FastRecovery is a user-friendly choice. It simplifies the process and makes it easy for even the non-tech savvy to get started.
Now FREE download WinPE bootable media - AOMEI FastRecovery and start the creation process.
Step 1. Prepare your USB drive by connecting it to a working computer. Also, you need to ensure it has enough space and is formatted for use.
Step 2. Open the AOMEI FastRecovery, You’ll be greeted with an easy-to-navigate interface. Click PC Crashed Recovery at the left panel.
Step 3. Select the USB Boot Device and your drive from the drop-down menu. Click Create to start the creation of the WinPE USB drive.
Step 4. Click Yes to format this USB and continue to this process. It may take a few minutes, just wait patiently and exit this software when finished.
Step 5. Once created, you can boot your computer from this USB drive, After loading, you will see AOMEI FastRecovery and start data recovery without booting into Windows.
By using AOMEI FastRecovery, creating a WinPE USB drive becomes a straightforward task, even for those who might find the Deployment and Imaging Tools a bit daunting. Plus, AOMEI FastRecovery's powerful recovery feature makes it a great tool for retrieving deleted files in Windows 11, 10, 8, 7, and Windows Server.
Creating a WinPE USB drive is a crucial skill for IT professionals and tech enthusiasts. Also, it’s an urgent need if you have problems with your computer. Try to create one with the Deployment and Imaging Tools Environment, or 3rd party tool - AOMEI FastRecovery, depending on whether you are dealing with system deployments and system repair issues, or perform a customized task, such as data recovery.
1. What is a WinPE USB drive used for?
A WinPE USB drive is used for deploying Windows operating systems, troubleshooting issues, recovering data, and running diagnostic tools in a minimalistic Windows environment.
2. Can I create a WinPE USB drive on any computer?
Yes, you can create a WinPE USB drive as long as the computer has the necessary tools such as the Windows ADK or 3rd party tool and a compatible USB drive.
3. Do I need special software to create a WinPE USB drive?
While you can use the Deployment and Imaging Tools included in the Windows ADK, or third-party tools to perform customized tasks.
4. Can a WinPE USB drive recover deleted files?
Yes, especially if you use AOMEI FastRecovery, which includes powerful data recovery features designed to retrieve deleted or lost files.
5. What should I do if my WinPE USB drive isn't booting?