Amazon S3 Transfer Acceleration provides a fast, reliable and scalable solution that reduces data transfer times. In order to put this feature to use, the first thing you need to do is know how to enable Amazon S3 Transfer Acceleration. This article provides you 4 ways to enable Amazon S3 Transfer Acceleration, and also lists the key benefits of it.

Amazon S3 Transfer Acceleration is a feature designed to expedite data transfers to and from Amazon S3 by utilizing Amazon CloudFront's global edge locations. When activated, this feature enables users to efficiently upload and download data over substantial distances between clients and S3 buckets.
Amazon S3 Transfer Acceleration allows for speedy and secure file transfers over long distances between clients and S3 storage buckets. It can be effortlessly enabled and utilized in various ways. Here are the details on enabling and using this feature.
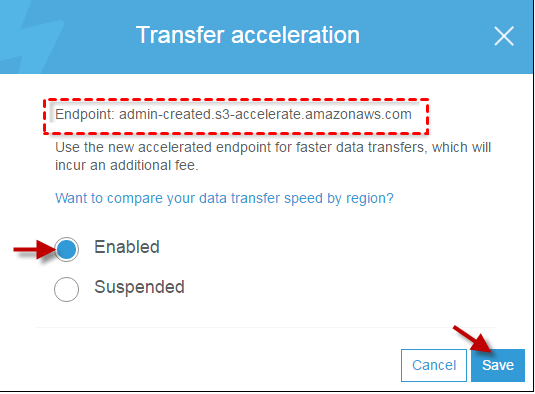
The simplest way is via the AWS Management Console, following are detailed steps to enable Amazon S3 Transfer Acceleration through S3 Console.
1. Sign in to the AWS Management Console, and select the bucket you want to accelerate.
2. Go to the Properties tab, under Transfer Acceleration, and click Edit.
3. Choose Enable, and then save the settings.

4. After enabling, the S3 bucket will be accessible via the new endpoint format:
You can also enable Transfer Acceleration by using AWS CLI, the following are examples command used for S3 Transfer Acceleration.
1. Run the following command to enable Transfer Acceleration on S3 bucket:
2. To verify if Transfer Acceleration is enabled for a specific bucket:
3. All requests are sent using the virtual style of bucket addressing:
🎈Note: ListBuckets, CreateBucket, and DeleteBucket requests are not sent to the accelerate endpoint as the endpoint doesn't support those operations.
If you prefer to enable S3 Transfer Acceleration programmatically, you can utilize the AWS SDK in your application. Here's an example in Python using the boto3 SDK:
You can also enable Transfer Acceleration using the S3 REST API. To enable Transfer Acceleration, send a PUT request to the following endpoint:
After knowing how to enable Transfer Acceleration, there arise another question why we use Amazon S3 Transfer Acceleration? Amazon S3 Transfer Acceleration is particularly useful for applications where users are globally distributed or need to upload large amounts of data. Transport Acceleration improves performance by using optimized network paths, leveraging Amazon's global network infrastructure, and reducing the impact of network latency. And following are key benefits of Amazon S3 Transfer Acceleration:
→ 1. Faster Data Transfer for Long Distances
By leveraging Amazon CloudFront’s worldwide edge locations, S3 Transfer Acceleration speeds up the transfer of large files to and from Amazon S3. This reduces the latency associated with long-distance transfers, resulting in significantly faster uploads and downloads.
→ 2. Improved performance for global users
This is especially beneficial for users who are geographically distributed. Since data is directed through the closest CloudFront edge location, individuals across the globe encounter reduced latency and quicker transfer speeds, no matter where they are located.
→ 3. Easy to Enable
Enabling transfer acceleration is easy. You can turn it on through the S3 bucket settings in the AWS Management Console. There are no changes required for your application other than using the acceleration endpoint (`s3-accelerate.amazonaws.com`).
The benefits of S3 Transfer Acceleration make it an ideal option for enterprises handling large datasets, global user bases, or applications requiring faster transfer times, such as backups, media delivery, and data synchronization. During this process, we need to pay attention to our data security in case of data loss.
Here it’s a recommendation to AOMEI Cyber Backup, it’s a professional data backup and recovery solution designed to protect data from loss and corruption. It provides robust solutions for data backup and recovery, suitable for both individual users and businesses.
✨Flexible Backup: This software supports full, incremental, and differential backups. ✨Automated Scheduling: You can schedule backups to run automatically at specified intervals. ✨Comprehensive Windows Backup: You can flexibly back up disks, partitions, systems, and files on Windows PCs and Servers. ✨Instant Reports: You will receive email notifications for successful backups as well as errors or abnormalities.
1. Navigate Target Storage and select Amazon S3 to Add Target. After open the add target page, enter Username, Password, and Bucket, then click Confirm.
2. Click Backup Task to Create New Task and start archive your data to Amazon S3. For example, you can select File Backup and choose files or folders for backup.
3. Select Archiving backup versions to Amazon S3 and click Select to choose the added Amazon S3.
4. Schedule backup tasks to run daily, weekly, or monthly, and choose backup retention policies to automatically delete old backups.
5. Select Start Backup to begin backup process. It will first create a local or NAS backup and then upload it to Amazon S3.
Amazon S3 Transfer Acceleration is a valuable feature designed to increase the speed of data transfers to and from Amazon S3 over long distances by leveraging the edge location of Amazon CloudFront. This feature can be enabled directly through the AWS Management Console, CLI, SDK, or API, so you can accelerate data transfer without making major changes to your application.