Learn how to perform Azure Backup Instant Restore to a different server and ensure seamless data recovery with this step-by-step guide.

Microsoft Azure Recovery Services (MARS) Agent provides a flexible and reliable way to back up and restore data to and from the cloud. It supports various restore options for recovering files, folders, applications, or even entire systems including:
This article explains how to restore data from a backup vault.
To recover data from Azure Backup to a different server, please note the requirements and then follow these steps.
Prerequisites for Restoring Data Using Instant Restore
✍ Note: Backups can't be restored to a target machine that's running an earlier version of the operating system.
1. Open the Microsoft Azure Backup snap-in on the target machine.
2. Ensure that the target machine and the source machine are registered to the same Recovery Services vault.
3. Select Recover Data to open the Recover Data Wizard.

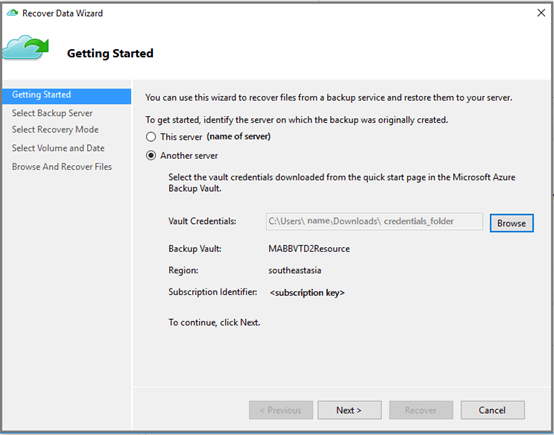
4. On the Getting Started page, select Another server.

5. Provide the vault credential file that corresponds to the sample vault. Click Next.
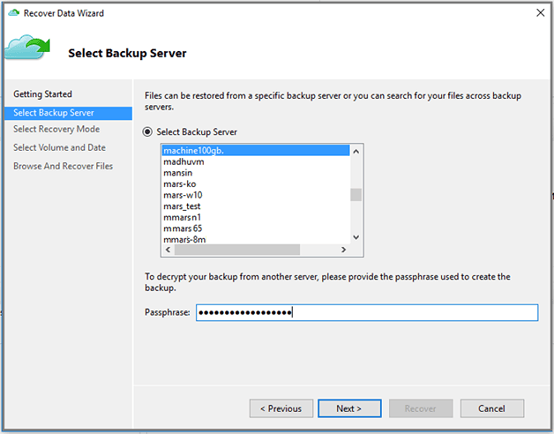
6. On the Select Backup Server page, select the source machine from the list of displayed machines, and provide the passphrase. Then select Next.

7. On the Select Recovery Mode page, select Individual files and folders > Next.
8. On the Select Volume and Date page, select the volume that contains the files and folders you want to restore.
On the calendar, select a recovery point. Dates in bold indicate the availability of at least one recovery point. If multiple recovery points are available within a single date, choose the specific recovery point from the Time drop-down menu.
9. Select Mount to locally mount the recovery point as a recovery volume on your target machine.
10. On the Browse And Recover Files page, select Browse to open Windows Explorer, and find the files and folders you want.
11. In Windows Explorer, copy the files and folders from the recovery volume, and paste them to your target machine location. You can open or stream the files directly from the recovery volume, and verify that the correct versions are recovered.
12. When you're finished, on the Browse and Recover Files page, select Unmount. Then select Yesto confirm that you want to unmount the volume.
By following these steps, you can ensure seamless recovery for business-critical operations, enabling robust disaster recovery and operational flexibility.
While Azure Backup handles cloud-based data restoration, AOMEI Cyber Backup complements it as a specialized instant recovery software, ensuring businesses achieve the shortest downtime and enhanced data availability.
Azure Backup Instant Restore simplifies and accelerates the recovery process, allowing you to restore data to a different server with minimal downtime.