Backup storage full and want to change SQL database backup location? Refer to this post, it will guide you on how to change the SQL database in details,

SQL users will often perform SQL database backup to avoid data loss. If you don't specify a location, SQL backup will be saved to C:\Program Files\Microsoft SQL Server\MSSQL\BACKUP.
But sometimes, you will want to change the default SQL database backup location. There are several compelling reasons why you might consider changing your backup location:

It is a fundamental task to change SQL backup location to ensure data security and efficient storage management. Here are the guides on how SQL Server change default database backup location:
Step 1. Navigate to the Microsoft SQL Server program on the Windows Server by clicking on Start >> Programs.
Step 2. Launch SQL Server Management Studio and log in with either SQL authentication or Windows authentication, provided you are logged into Windows as an Administrator.
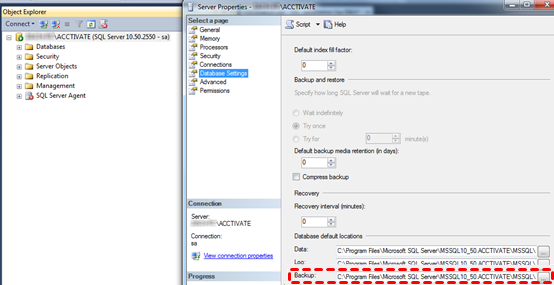
Step 3. Right-click the SQL Server instance and select Properties to set property devices SQL backup.
Step 4. Within the Database Settings section, locate the Backup default location at the bottom of the window. Make your selection for the new location.

Step 1. While in the registry editor, navigate to the registry keys associated with your specific named database instance of SQL Server. For instance, if you have an instance named 'ACCTIVATE' in SQL Server 2008, you would locate a key similar to the following:
HKEY_LOCAL_MACHINE\SOFTWARE\Microsoft\Microsoft SQL Server\MSSQL10_50.ACCTIVATE\MSSQLServer
Step 2. Look for a key labeled 'BackupDirectory.' If you can't immediately locate the 'BackupDirectory' key, you may consider conducting a search within the HKEY_LOCAL_MACHINE registry for 'BackupDirectory.'
Step 3. Right-click the BackupDirectory key and select to edit SQL backup job.
Step 4. Input the desired Backup Directory into the respective field.

An alternative method for modifying the registry involves utilizing the extended stored procedures XP_REGREAD and XP_REGWRITE.
Step 1. To extract data from the registry, you can execute the following command (ensuring the key value aligns with the correct SQL Server installation path):
DECLARE @BackupDirectory VARCHAR(100) EXEC master..xp_regread @rootkey='HKEY_LOCAL_MACHINE', @key='SOFTWARE\Microsoft\Microsoft SQL Server\MSSQL.2\MSSQLServer', @value_name='BackupDirectory', @BackupDirectory=@BackupDirectory OUTPUT SELECT @BackupDirectory
Step 2. This command provides the following output, given your prior alteration in the registry.
Step 3. If the intention is to revert the folder location to its default setting, you can utilize this command and specify the path to change SQL database backup location within the value parameter:
EXEC master..xp_regwrite @rootkey='HKEY_LOCAL_MACHINE', @key='SOFTWARE\Microsoft\Microsoft SQL Server\MSSQL.2\MSSQLServer', @value_name='BackupDirectory', @type='REG_SZ', @value='C:\Program Files\Microsoft SQL Server\MSSQL.2\MSSQL\Backup'
Step 4. Executing this command again will display the updated status:
DECLARE @BackupDirectory VARCHAR(100) EXEC master..xp_regread @rootkey='HKEY_LOCAL_MACHINE', @key='SOFTWARE\Microsoft\Microsoft SQL Server\MSSQL.2\MSSQLServer', @value_name='BackupDirectory', @BackupDirectory=@BackupDirectory OUTPUT SELECT @BackupDirectory
Step 5. To ascertain the installation location of SQL Server, you can right-click on the Server name, choose Properties. The root directory, as highlighted below, will indicate the corresponding installation name for the instance, like 'MSSQL2', helping you identify the relevant registry entry requiring modification."
Regularly creating and safeguarding backups is essential for data security, disaster recovery, and overall business continuity. While the process of changing the backup location in SQL databases is a fundamental task, the right software – AOMEI Cyber Backup can make it more convenient and efficient.
AOMEI Cyber Backup is a powerful and user-friendly backup solution that empowers you to have full control over your SQL database backup location. With this software, you can enjoy the following benefits:
✤Easy-to-use: SQL backups may be configured without writing any code thanks to the user-friendly interface. ✤Operation Within LAN: Assist you in doing numerous backups of SQL database, including SQL Express within LAN. ✤Backup Schedule: Schedule an automatic backup task to back up the database at predetermined periods. ✤Auto & Centralized Backup: Schedule SQL backups and run them automatically.
AOMEI Cyber Backup supports Microsoft SQL (2005-2022), VMware ESXi (6.0 and above), and Hyper-V (in Windows 8/8.1/10/11, Windows Server/Microsoft Hyper-V Server 2012 R2 and later versions) from a centralized console and here’s a 30-day free trial for you to enjoy this professional software:
✍ Before you perform a database backup, please make sure: 1. Your computer with both AOMEI Cyber Backup Agent and Microsoft SQL Server installed. 2. The local disk or network shared to store backup files.
Step 1. Access to Source Device >> Add Microsoft SQL. If the database exists and the version is supported, it will appear automatically. Otherwise, you can click Add Microsoft SQL >> Download proxy program, and install the program on the device with SQL Server installed. Then click Already installed proxy and select the proxies you want to add.
Step 2. Click … >> Authentication to validate the database instance. You can choose Windows Authentication or SQL Authentication. Enter the credentials and click Verify.
Step 3. Create Backup Task: Click Backup Task >> Create New Task, and select Microsoft SQL Backup as your backup type. Then set the Device Name, Backup Target, Schedule, Backup Cleanup and Email Notification according to your need.
Step 4. Start Backup: You can choose to Add the schedule and start backup now or Add the schedule only and click Start Backup to execute automatic SQL server backup.
The task you create for backups will be individually listed and tracked, allowing you to verify their advancement, modify their timing, and initiate their restoration.
Step 1. Click Backup Task on the left menu bar, locate the task you want to restore, and click … >> Restore.
Step 2. Specify the target location by choosing Restore to original location or Restore to new location.
This is how to change SQL database backup location in different ways - SSMS, Windows registry, and extended stored procedure. Hope this post can help you when the database backup storage is running out of space.
Additionally, you can use AOMEI Cyber Backup. This is a powerful centralized enterprise data backup software, which enables you to easily backup SQL database and other business data. And it offers easy backup management, you can change your backup location anytime.