When creating a virtual machine and choosing the disk type, you can choose between fixed size, dynamically expanding and differential disks. Most people understand the first two, so today we'll introduce what a differential disk is and how to create one in Hyper-V.

Hyper-V differencing disk also named as the child disk is associated with the parent disk and stores the changed data of it. When creating Hyper-V disks, you have 3 choice including Fixed disk, Dynamically Expanding disk and Differencing disk. Among them, differencing disk has these characteristics.
In the following section, I will introduce how to create differencing disks using Hyper-V Manager and PowerShell, which contributes to rapid deployment of virtual machines.
Hyper-V differencing disk is related to the parent disk, so you need to create a parent disk first.
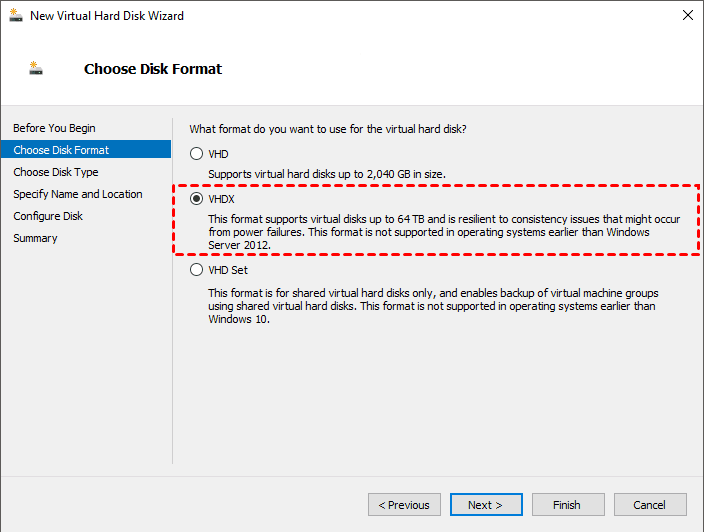
1. The parent disk and the child disk must have the same VHD format (VHD or VHDX). VHD differential disks may have consistency issues due to power failure. To avoid this, you can use .vhdx format. But VHDX is only available in Windows Server 2022/2019/2016. Windows releases earlier than Windows Server 2012 do not support the VHDX format.

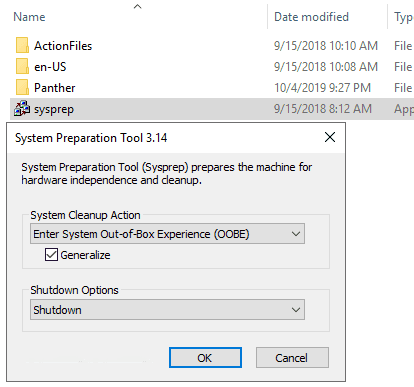
2. After creating a new Hyper-V virtual machine, use Sysprep to remove all of the security and identification information from the computer.
Run %WINDIR%\system32\sysprep\sysprep.exe
Check the Generalize box.
In the Shutdown Options, select Shutdown instead of Restart.

3. Locate the parent virtual disk and set it to be read-only so as to avoid any changes being written to it.
1. Access to Hyper-V Manager, select Action >> New >> Hard Disk, then you will open the new virtual hard disk wizard.
2. In the Choose Disk Format window, select VHDX. The format of differencing disk should be the same as the parent disk.
3. In the Choose Disk Type window, select Differencing.
4. Enter a disk name and specify a location to store the virtual hard disk.
5. In the Configure Disk window, click Browse to select which virtual disk you want to use as the parent disk.
6. Review the information of the new differencing disk, then click Finish.
If you are familiar with the commands, you can easily create Hyper-V differencing disk using this cmdlet.
New-VHD -ParentPath c:\Base.vhdx -Path c:\Diff.vhdx -Differencing
The differencing disk always refers to the data of parent disk in Hyper-V. It is faster to create virtual machines using differential disks than using image files because differential disks are much smaller than iso files, which benefits to the rapid deployment of a large number of virtual machines.
1. Open Hyper-V Manager and following the wizard to create a new virtual machine.
2. In the Connect Virtual Hard Disk window, select Use an Existing virtual hard disk, and choose the new created differencing disk.
Once a differencing disk has been created from a parent disk, you should not make any changes to the parent disk. Any changes will corrupt all the differencing disks, which will lead to serious data loss and financial damage.
In order to avoid data loss due to human errors or accidents such as sudden power failure, Hyper-V backup should be an essential part of working to protect data security. So this part will describe how to auto backup multiple virtual machines in a free and simple way.
Free Hyper-V backup tool - AOMEI Cyber Backup is designed to offer secure backup and recovery solution for multiple virtual machines. With this professional backup software, you can get a lot of benefits for free.
✦ Perpetual Free: no time limit for AOMEI Cyber Backup Free Edition. ✦ Automatically Backup VMs: It schedules backup task for multiple virtual machines automatically, thus protecting VM data continuously. ✦ Reduce financial and reputational losses: It performs hot backup to protect the entire virtual machine without any interruption. ✦ Instant Recovery: Revert the virtual machine to its previous state quickly when the VM crashed. ✦ Easy-to-use: backup and restore multiple virtual machines via central console without complicated configuration and reinstallation.
Please hit the button below to download and use AOMEI Cyber Backup for free:
*You can choose to install this VM backup software on either Windows or Linux system.
1. Launch AOMEI Cyber Backup and click Backup Task >> Create New Task.
2. In the opened wizard, configure the Hyper-V backup task.
✦ Select virtual machines you want to backup.
✦ Specify a local or network location to store the virtual machine backups.
✦ Schedule the backup task with full / incremental backup methods and set the backup frequency as daily / weekly / monthly.
✦ Click Start Backup.
3. Restore: You are able to recover the entire Hyper-V virtual machine to its normal status with a few clicks, and it doesn't require complicated settings and installation.
✍ While the Free Edition covers most of the VM backup needs, you can also upgrade to Premium Edition to enjoy: ✦ Batch VM backup: batch backup large numbers of VMs managed by vCenter Server or on standalone ESXi hosts. ✦ Backup Cleanup: Specify retention policy to delete unwanted VM backups automatically, thus saving storage space and cost. ✦ Restore to new location: Easily make a clone of a virtual machine in the same or another datastore/host, without reinstalling or configuring a new VM.
After creating a differencing disk in Hyper-V, you are not allowed to make any changes to the parent disk. In addition, when you create multiple Hyper-V differencing disks all of which are reading from the parent disk, the performance will be impacted due to I/O limitations.
Using differencing disks benefits to deploying Hyper-V virtual machines quickly since it saves time and storage space to create and boot a virtual machine.