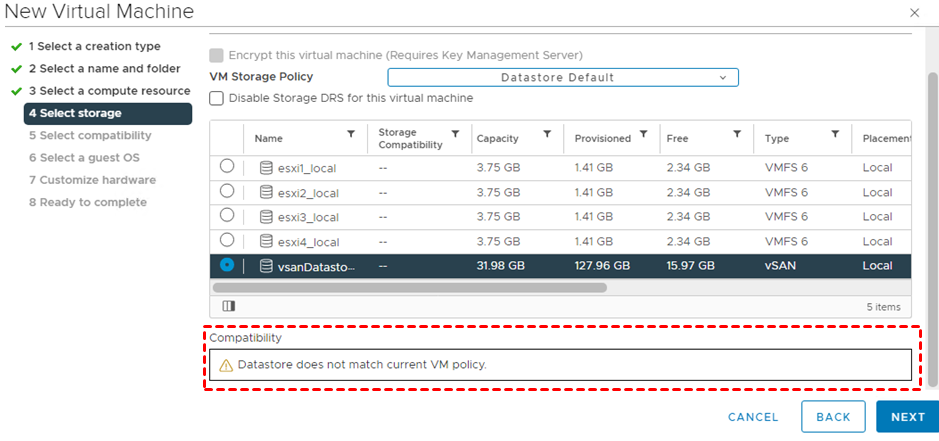
Why there is a compatibility issue that datastore does not match current VM policy? This indicates you have an incompatible datastore or have a cluster and vSAN configuration issue. If you want to have a smooth migration process, you need to solve this urgently.

Storage Policy: Datastore does not match current policy: Storage fault has occurred
I have the VMUG vSAN licensing on a 4 node ESXi cluster, and I recieved a warning that some of my storage is showing no activity so I was trying to create a new storage policy that does a higher level of redundancy and whenever I try to create a new policy that includes anything over a single failure, I get the "storage fault has ocurred" that makes the existing vsan drive incompatible. Is there some setting i'm missing? Or is it just not allowed with my curren licensing?
- Question from Reddit
When the datastore does not match current VM policy appears it means that the datastore does not meet the requirements of the VM storage policy. This error usually occurs during the migration of VMs from a local datastore to a vSAN datastore and changing the policy to the default VSAN policy.

Understanding the root cause is critical to effective problem solving. Typical causes include:
When datastore does not match current VM policy occurs, it means the datastore is not compatible with the virtual machine, and you need to resolve the issue in a timely manner or else it can lead to other issues related to the VM. Here is how to resolve this error.
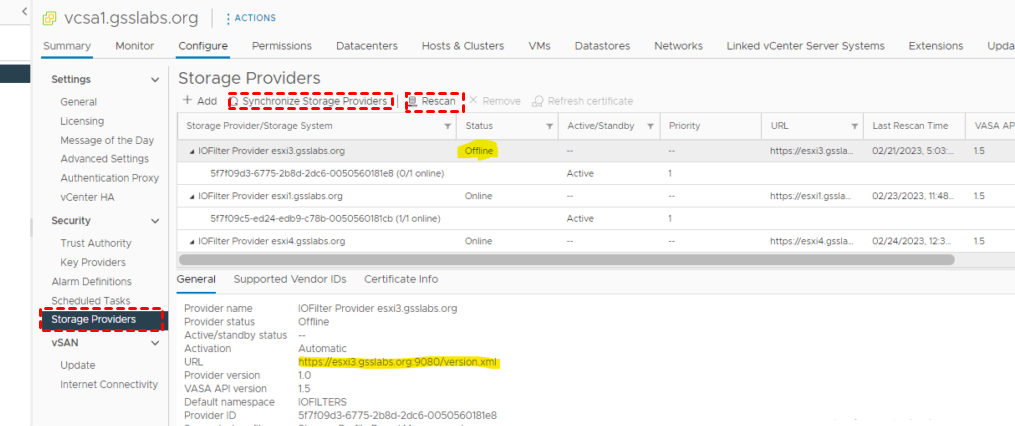
Step 1. Synchronize vSAN VASA Providers
In the vSphere Web Client, navigate to vCenter > Manage > Storage Providers, click Synchronize Storage Providers to synchronize all vSAN providers, then click Rescan to rescan the storage providers for new storage systems and capabilities.

Step 2. Check and Restart the VMware vSphere Profile-Driven Storage Service
Navigate to vCenter Server > Administration > Deployment > System Configuration to check the status of the VMware vSphere Profile-Driven Storage Service. If it’s running, restart it by running the following commands via SSH:
Step 3. Check if the vSAN Datastore is Visible
In the vSphere Web Client, navigate to vCenter Server > Manage > Storage Providers to ensure the vSAN datastore is in the list of available storage systems.
Step 4. Migrate the VM to the vSAN Datastore
In the vSphere Web Client, select the VM you want to migrate, right-click the VM and choose Migrate. Then select the migrate type, compute resource, storage, networks, and vMotion priority, after completing, click Finish.
Step 5. Check VM Compliance with vSAN Storage Policy
In vCenter, navigate to Configure > Policies > Check Compliance to ensure the VM is marked as Compliant.
The datastore does not match current VM policy issues can cause policy violation risk, redundancy, and fault tolerance issues which can further cause data loss. AOMEI Cyber Backup is a professional VMware VM Backup software that can well prevent data loss.
With AOMEI Cyber Backup, you can enjoy the following advantages and features:
✍Agentless VM Backup: It can create complete and independent image-level backups for VMware ESXi and Hyper-V VMs in a central console.
✍Multiple Storage Destination: It supports saving VM backups to local and external drives, NAS drives, or network share, and Amazon S3 bucket.
✍Restore Entire VM: It allows immediate restoration of a usable virtual machine from any selected restore point.
✍Quick Recovery: It facilitates rapid recovery of virtual machines, minimizing downtime and ensuring business continuity.
✍Archiving VMs: It supports cloud archiving, which allows you to free up local storage space while ensuring your VM data remains accessible to enforce the 3-2-1 backup rule.
Step 1. Bind Devices
Access to AOMEI Cyber Backup web client, navigate to Source Device > VMware > +Add VMware Device to add vCenter or Standalone ESXi. Then enter Device Information and User Information, and click Confirm.
Step 2. Create Backup Task
Navigate to Backup Task > + Create New Task, then select VMware ESXi Backup as Backup Type. Then set the Task Name, Device, Target, Archive, Schedule, and Cleanup.
✤Device: Since multiple VMs on the host are covered in a single backup task, you need to select the VMs that need to be backed up.
✤Target: You can select to backup to a local path, or a network path. Used paths are saved in favorites for easy selection.
✤Archive: AOMEI Cyber Backup allows you to add an Amazon S3 storage and archive VMware Backup versions to this S3 storage.
✤Schedule: You can choose to perform full, differential, or incremental backups and have them automatically execute daily, weekly, or monthly basis at a frequency you specify.
✤Cleanup: You can configure a retention policy to auto-delete backup files and save storage space.
✤Email Notification: You can choose to turn on the email notification, and then it will notify you that the task is completed or abnormal.
Step 3. Start Backup
Click Start Backup, and select Add the schedule and start backup now, or Add the schedule only.
Step 4. Restore
Navigate to Backup Task, and click … > Restore to start restoring VM from the backup. Then choose to Restore to new location or Restore to original location.
📌Note: AOMEI Cyber Backup also enables you to perform file-based backup that you can backup VMs like the physical machine.
When an error occurs that the datastore does not match the current VM policy, it is important to note that there may be a mismatch between the storage in the virtual environment and the target to be migrated, which can cause data loss. However, once the issue is resolved, you can ensure that the correct storage resources are allocated to the VM amount, and then using AOMEI Cyber Backup to perform VM backups can better ensure data security.