Learn how to troubleshoot and resolve the issue of Docker Desktop failing to detect a Hypervisor. Follow our step-by-step guide to overcome common obstacles and ensure smooth containerization with Docker.

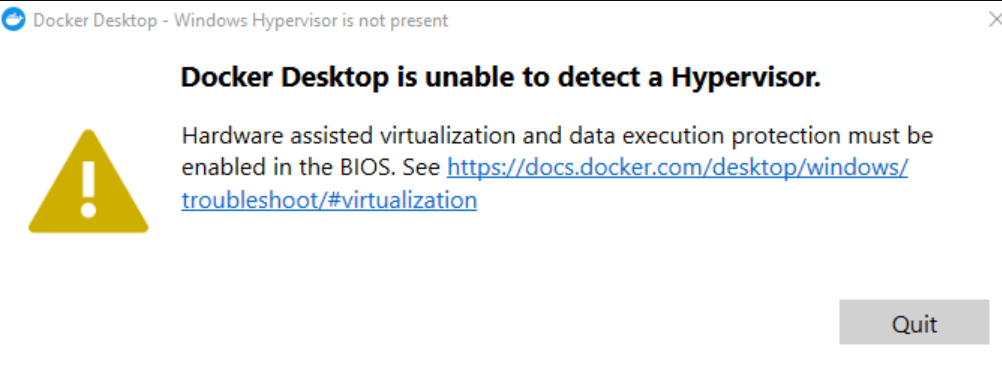
Docker Desktop offers a variety of features for managing virtualized environments. However, when you install or use Docker Desktop you may get and error saying "Docker Desktop is unable to detect a Hypervisor: Hardware-assisted virtualization and data execution protection must be enabled in the BOIS".

Don't worry, you can keep on reading, we will explain why this issue occurs and help you solve this problem.
The error can happen for several reasons:
► Hyper-V is not enabled in Windows: On Windows, Docker Desktop requires Hyper-V or WSL 2 (Windows Subsystem for Linux 2) to run containers. If Hyper-V is not enabled, Docker Desktop cannot create the necessary virtual machine.
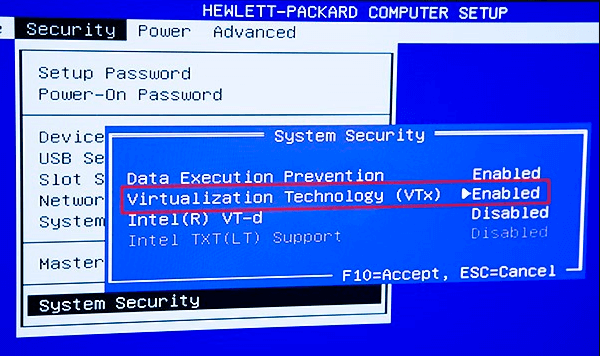
►Virutalization disabled in BIOS: Virtualization technology (VT-x/AMD-V) may be disabled in your system's BIOS/UEFI settings, which prevents Docker Desktop from accessing the hypervisor.
► Incompatible or corrupted Hypervisor software: If there is an issue with the Hyper-V or any other hypervisor software installed on your system, Docker Desktop may be unable to detect the hypervisor.
► Virtualization software conflicts: Other virtualization software may conflict with Docker Desktop’s use of Hyper-V or other virtualization.
Here are some solutions you can try to resolve the "hypervisor not detect" problem. Before getting started, you can backup your VMs in case of any data loss.


Step 1. Restart your computer. When you see the logo, press the boot key (The boot key depends on the computer brand. Usually boot key is "F2", "Delete", or "ESC")
Step 2. Find the Virtualization setting in the Security tab. Usually, the virtualization setting is labeled as "Intel VT-X" or "AMD-V".
Step 3. Save the changes and exit the BIOS, restart your computer.

If your Windows hypervisor is not present and can be detected by desktop, you can check if the Hyper-V is enabled in Windows. Follow the steps below to enable Hyper-V in Windows.
Step 1. Click the Windows icon on the left-down corner and open Control Panel. Or just type the control panel on the search box and open the search outcome.
Step 2. Choose "Programs and Features" on the Control Panel. Click "Turn Windows features on or off" on the left side of the window.
Step 3. Make sure the Hyper-V option is selected. And click "ok" to apply the changes. Then restart your system.
Identify other virtualization software running on your system. you can temporarily disable or uninstall the software. Then restart the system and check if docker desktop can detect the hypervisor.
A corrupted or incompatible hypervisor software can cause Docker Desktop can't detect the hypervisor.
So you can reinstall your Hyper-V or WSL 2. And ensure other virtualization software such as VMware or Virtual Box is either compatible or not conflicting with Docker Desktop.
If the current Hypervisor is causing compatibility problems, consider switching to a different one
If all the above solutions can help you, you can try the following ways.
1. Using Docker Toolbox instead of Docker Desktop:
2. Running Docker Desktop in a virtual machine:
Docker Desktop is unable to detect a hypervisor usually indicates a problem with your system's ability to provide the necessary virtualized environment that Docker Desktop relies on.
There could be several reasons behind it, such as insufficient virtualization support in the BIOS, incompatibility with certain Hypervisors, and conflicts with other virtualization software. We provided troubleshooting steps to help you resolve the issue, including checking BIOS settings, enabling Hyper-V (for Windows users), verifying compatibility with supported Hypervisors and disabling conflicting virtualization software.
Remember to backup your virtual machines in case of data loss due to any misoperation. AOMEI Cyber Backup is a great backup solution for protecting VMware and Hyper-V VMs from data loss. It can enable users to easily backup all VMs from a single console and quickly restore.