ESXi No space left on device is a common issue that can cause performance problems and system crashes. This article explores the reasons behind the error and provides steps for troubleshooting.

Error 28 No space left on device ESXi can occur due to various factors that lead to storage constraints on the ESXi host. Here are the main causes:

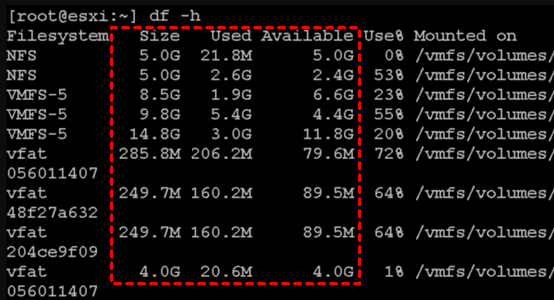
While updating or removing ESXi host with command line, you may encounter No space left on device ESXi update while updating VMware ESXi servers by using the "esxcli software vib update" command. Sometimes, the issue persists despite the fact that the df -h command confirms that the discs are functioning properly and have sufficient free space.
See below for a screenshot of the output including the reported error:

In response, df -h output disputes this assertion, stating that there is sufficient space in these volumes.

✧ A lack of inodes file objects
The file system structures are called inodes, and a single VMFS volume can have up to 640 000 of them. How many files are retained in the file system at any given time determines how many inodes are being used.
1. Check the number of available inodes with stat -f / command:

2. Check the number of available inodes by executing the df -I command:
$ df –i Filesystem Inodes IUsed IFree IUse% Mounted on /dev/sda1 942080 507361 11 100% /
As you can see, it is extremely unlikely that you would exceed this number, but if you do, simply delete some files from the ESXi host.
✧ Excessive files on ESXi
ESXi may contain log files that are more than 50 MB in size as well as additional files that are not stored on VMFS volumes. The following command will help you locate these files while avoiding failing to expand VMFS datastore:
find / -path "/vmfs" -prune -o -type f -size +50000k -exec ls -l '{}' \;
Following the execution of the command, a list of local files, including ISO images, large log files, etc., will be generated. If you no longer require any of that information, you can delete it or send it to storage for future reference.
✧ A lack of RAM on ESXi host
In essence, the host is unable to allocate adequate RAM for upgrading. Enabling the ESXi system swap on a different datastore, where RAM will be flashed during updates if the problem arises, will fix this issue.
1. Navigate to Manage >> Settings >> System Swap to turn on the ESXi system swap. Then click Edit.
2. Specify the datastore and click OK. In Edit Host Profiles, you can additionally specify the datastore for memory paging:
3. After choosing the datastore for the system swap, update and restart the ESXi host.
To ensure the protection and recovery of your ESXi virtual machines and data, it is essential to perform batch backups regularly. AOMEI Cyber Backup is a powerful VMware backup software that can help you manage your ESXi virtual machines and data seamlessly.
To perform batch backups, you can use AOMEI Cyber Backup to create backup tasks for multiple VMs simultaneously. This feature is particularly useful for businesses with a large number of virtual machines to manage. Of course, it also offers some other benefits as follows:
◈ Agentless Backup: Create complete and independent image-level backup for VMware ESXi VMs. ◈ Schedule Backup: Auto backup virtual machines on regular basis to protect VMware workloads continuously. ◈ Instant Recovery: Once the VMware crashes, quickly restore VMware to normal state and reduce business-critical downtime. ◈ Role Assignment: Allows one administrator to create sub-accounts with limited privileges.
Please get and set up the agentless backup program - AOMEI Cyber Backup and you can use the following free trial for 30 days:
*You can choose to install this VM backup software on either Windows or Linux system.
1. Access to AOMEI Cyber Backup web client, and add vCenter or Standalone ESXi hosts as the source device. Then click Backup Task >> Create New Task.
2. In the task wizard, enter a name and select the virtual machines for backup.
3. After that, set the Task Name, Device, Target, Schedule and Cleanup according to your need.
4. Click Start Backup and choose Add the schedule and start backup now or Add the schedule only.
5. Once the backup is complete, the restore process is also very simple. Navigate to Start Restore, you can change restore location here to create a new VM or another datastore/host.
In conclusion, maintaining sufficient storage virtualization space and regularly performing backups are critical measures for protecting data and ensuring the stability of your ESXi host. The ESXi No space left on device error highlights the importance of monitoring disk space and taking proactive steps to prevent data loss.
Additionally, securing data through measures like encryption and access controls can further protect against data breaches and other security threats. By implementing these best practices, you can safeguard your valuable data and maintain the integrity and reliability of your ESXi host.