Are you curious about the art of exporting data from SQL to Excel and wonder how to keep your data safe and accessible? Don’t worry, this article will introduce effective methods for exporting SQL data to safeguard your data security.

In today's data-driven world, the ability to efficiently export data from SQL databases to Microsoft Excel spreadsheets is a critical skill for data professionals and business analysts alike. SQL databases are widely used for storing and managing data, while Excel is a versatile tool for data analysis, visualization, and reporting.
SQL and Excel are a popular combination in the world of data management and analysis for several compelling reasons:

It is a common practice to export from SQL to Excel for data professionals and analysts. While it offers great flexibility and convenience, it's essential to take precautions to ensure data accuracy, security, and integrity. Here are some precautions to consider when exporting data from SQL to Excel:
Exporting data from SQL to Excel is a common task that allows you to work with your SQL data in a familiar spreadsheet format. There are several methods to accomplish this, depending on your specific needs and the database management system you're using. Here's a general guide on how to export from SQL to Excel:
☞ Prerequisite for exporting: Install an Open Database Connectivity driver
Step 1. Add a new data source: First, after installing the ODBC driver, click the Windows Start button and search for ODBC Data Sources.

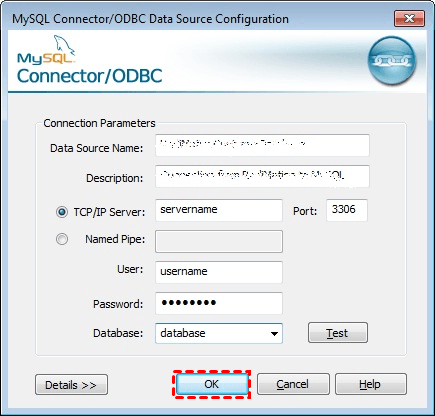
Step 2. Here you can establish a new Data Source Name (DSN) either for the current user or the entire system. Click the Add button, provide the DSN name, server IP or hostname, and your database credentials. Afterward, verify the connection by testing it and then click OK.
Step 3. Import data using Power Query: Once you've added the data source, open Excel, navigate to Data-Get & Transform Data pane to initiate the import process. Click on Get Data - From Other Sources - From ODBC. From there, select the previously created data source, click OK, and proceed to the Navigator, where you can choose the specific SQL table you want to import.
Step 4. Click Load to import the selected table into a new Excel sheet.
Step 1. To export from SQL Server Management Studio to Excel, launch SQL Server Management Studio and establish a connection to your database.
Step 2. In Object Explorer, locate the server database you wish to export to Excel. Right-click on it, then select Tasks >> Export Data to initiate the process of exporting SQL table data to Excel. Then, the SQL Server Import and Export Wizard welcome window pop up.
Step 3. Click on the Data source to choose the data source you intend to copy. In the Server name, pick a specific SQL Server instance. In the Authentication section, configure the authentication method for connecting to the data source, and from the Database, choose the database from which data will be extracted. Once you've made these selections, click the Next button to proceed.
Step 4. On the Choose a Destination window, within the Destination field, select Microsoft Excel as the destination to export data from SQL Server to Excel. Specify the path and version of the Excel file you desire. Then, click the Next button to advance.
Step 5. On the Specify Table Copy or Query screen, you can choose Copy data from one or more tables or views. Then, click Next to continue.
Step 6. In the Select Source Table and Views window, you can choose one or more tables and views from which you want to export SQL Server data to Excel. Click the Preview button to preview the data that will be included in the Excel file. Click the Next to proceed.
Step 7. On the Save and Run Package window, check the Run immediately and click the Next.
Step 8. On the Complete Wizard window, review all the settings you've configured during the export process. If everything appears to be correct, click Finish to commence the export of your SQL database to Excel.
Step 9. Monitor the export process at this stage. Once it's completed, click on the Report dropdown button. You can choose Save Report to File... and choose the file format, with Excel being an option, to save the report.
While the methods mentioned above are effective for exporting SQL data, they are typically focused on extracting data for analytical purposes. However, what if you need a more comprehensive solution that not only exports your SQL data but also ensures its security and recoverability? This is where AOMEI Cyber Backup comes into play.
AOMEI Cyber Backup is a comprehensive backup software that offers specialized features for SQL database backup and recovery. With its user-friendly interface and robust functionality, AOMEI Cyber Backup simplifies the process of creating backups, ensuring the security and recoverability of your SQL database. Whether you need to protect critical business data or ensure data integrity for personal projects, AOMEI Cyber Backup provides a seamless and efficient solution, offering the following benefits:
✦ Easy-to-use: SQL backups may be configured without writing any code thanks to the user-friendly interface. ✦ Operation Within LAN: Assist you in doing numerous backups of SQL database, including SQL Express within LAN. ✦ Backup Schedule: Schedule an automatic backup task to back up the database at predetermined periods. ✦ Auto & Centralized Backup: Schedule SQL backups and run them automatically.
AOMEI Cyber Backup supports Microsoft SQL(2005-2022), VMware ESXi(6.0 and above), and Hyper-V(in Windows 8/8.1/10/11, Windows Server/Microsoft Hyper-V Server 2012 R2 and later versions) from a centralized console and click the button below to try the 30-day free trial:
✍ Before you perform a database backup, please make sure: 1. Your computer with both AOMEI Cyber Backup Agent and Microsoft SQL Server installed. 2. The local disk or network shared to store backup files.
1. Access to Source Device >> Add Microsoft SQL. If the database exists and the version is supported, it will appear automatically. Otherwise, you need click Add Microsoft SQL >> Download proxy program >> Already installed proxy and select the proxies you want to add.
2. Click ... >> Authentication to validate the database instance. You can choose Windows Authentication or SQL Authentication. Enter the credentials and click Verify.
3. Click Backup Task >> Create New Task to back up your SQL databases.
4. Select backup methods as full/incremental/differential backup and specify the backup time as daily/weekly/monthly. After that, your SQL databases will be backed up automatically and regularly.
5. Start Backup: You can choose to Add the schedule and start backup now or Add the schedule only.
6. Click Backup Task on the left menu bar, locate the task you want to restore, and click ... >> Restore. Then specify the target location by choosing Restore to original location or Restore to new location.
Exporting data from SQL to Excel offers a valuable way to leverage the strengths of both platforms for efficient data analysis and reporting. By following the precautions outlined in this guide and utilizing tools like AOMEI Cyber Backup, you can ensure the integrity, accuracy, and security of your exported data. Whether you choose the traditional SQL query export method or opt for backup and restore tools, the process of exporting data from SQL server to Excel opens up a world of possibilities for analyzing and visualizing your data.