Sufficient memory is one of the necessary conditions to run a virtual machine. If your computer is currently running slow or not having a good performance, you may think of a lack of storage space.

Virtual machines are similar to physical machines in that they both require enough memory to run. If VMs don't have enough memory, it is likely that you will fail to boot the virtual machine or run the workload at all. For physical computers, if you want to increase the storage capacity of your computer, you can add an external or internal hard drive to solve the problem. Meanwhile, do you know how to add more storage to a virtual machine?
For example, in Hyper-V, facing with the insufficient storage space, you can use Hyper-V Manager or cmdlet to expand Hyper-V disk. You can edit Settings and connect to Disk Management to allocate more storage in Hyper-V.
At the same time, this article will introduce how to increase hard disk space in VMware ESXi.

Before you allocate more storage in VMware, you should back up VMware VMs to avoid data loss. Besides, please remember to delete all the snapshots and power off virtual machines.
How to increase hard disk space in VMware ESXi
1. Open VMware ESXi vSphere Client, and right-click on the virtual machine to which you want to add more storage.
2. Select Edit Settings to start increasing size of a virtual disk in VMware ESXi
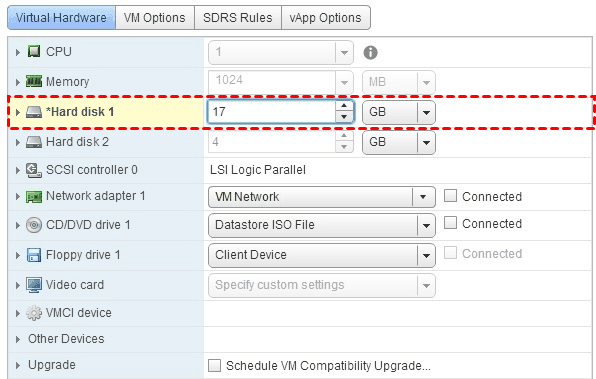
3. Navigate to the Hard Disk and re-allocate more storage size.

4. Click OK.
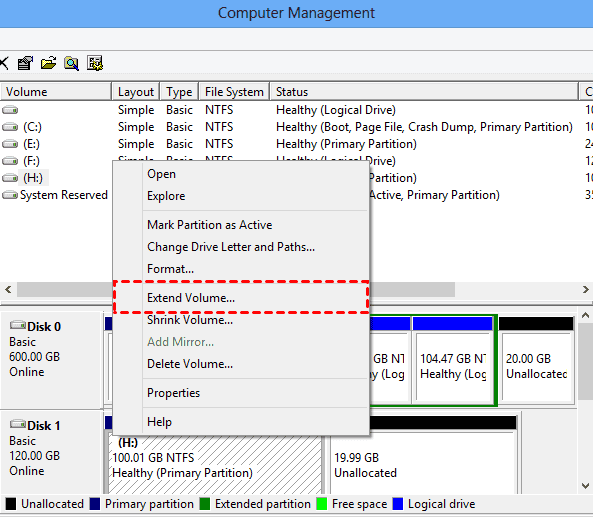
So far you have successfully increased the size of the virtual disk, but if the disk is already used by the host OS, you will need to extend the partition to utilize the increased size (or creating a new partition).
5. Enter diskmgmt.msc to open Windows Disk Management. You can notice the unallocated space on the disk. Then right-click the volume and select Extend Volume and follow the steps to select proper space.

After adding more storage to a virtual machine in VMware ESXi, you can run your workloads more smoothly.
Besides, if you want to add physical disk to VMware ESXi, you can use the ESXi web client and command line (esxcli/vmkfstools) to add hard drive to ESXi virtual machine.
As we mentioned, you should backup the virtual machine before adding more storage to a VM. You can never predict how much disk space will be taken up on your next operation, and it’s possible to result in irreversible damage to VM data by human error, malware attack natural disaster, etc. So in order to avoid data loss, you should back up virtual machine to secure your data.
Virtual disks store numerous data of virtual machines. In order to avoid disk-damaged, you can backup VM data regularly. Here, I will use a free VM backup tool AOMEI Cyber Backup to back up Hyper-V or VMware with flexible backup strategies and restore the VM within a few clicks. The reliable backup tool protects VM data continuously and reduces business downtime.
With this professional backup software, you can benefit a lot from these features.
Perpetual Free: No time limit for AOMEI Cyber Backup Free Edition. Support Free ESXi: support both paid and free versions of VMware ESXi. Easy-to-use: Backup and restore the entire VM only based on a few clicks without any complicated configuration. Automate Centralized Backup: Schedule and manage VMware ESXi / Hyper-V backups at host level and run the backup tasks automatically. Restore From Any Point: The recovery process is based on several clicks without installing or configuring any complicated programs or applications. Role-Assignment: allow one administrator to create sub-accounts with limited privilege, effectively reduce administration cost and manual errors.
Please hit the button below to download and use AOMEI Cyber Backup for free:
*You can choose to install this VM backup software on either Windows or Linux system.
1. Bind Devices: Access to AOMEI Cyber Backup web client, navigate to Source Device > VMware > + Add VMware Device to Add vCenter or Standalone ESXi. And then Bind Device.
2. Click Backup Task >> Create New Task to schedule VMware backups. In the interface, select the Device Type as VMware ESXi Backup, and configure more settings.
✦ In Device Name section, select virtual machines on the ESXi host.
✦ In Target section, specify a location to store VM backups such as network or local place. You can easily backup VM to NAS.
✦ In Archive section, enable archiving backup versions to Amazon S3 and then choose the added Amazon S3 bucket.
✦ In Schedule section, enable schedule task and choose full/incremental/differential backup, then specify backup time and frequency as daily/weekly/monthly.
✦ Click Start Backup. From the drop-down menu, you can decide to perform backup later or now.
When you need to perform VM recovery, click Restore. You can restore the VM to its previous status from history versions, and the process is based on a few clicks.
✍ While the Free Edition covers most of the VM backup needs, you can also upgrade to Premium Edition to enjoy: ✦ Batch VM backup & restore: batch backup and restore large numbers of VMs managed by vCenter Server or on standalone ESXi hosts. ✦ Backup Cleanup: Specify retention policy to delete unwanted VM backups automatically, thus saving storage space and cost. ✦ Restore to new location: Easily make a clone of a virtual machine in the same or another datastore/host, without reinstalling or configuring a new VM.
Regular backups can effectively avoid the possibility of losing data due to insufficient memory. AOMEI Cyber Backup allows you to protect your business from threats by running VM backups automatically.
This article introduces how to add more storage to a virtual machine. Due to insufficient disk space, you can simply configure its storage capacity using Edit Settings.
Besides, in vSphere Web Client, you can create a new VMware datastore to provide more storage and better performance for your virtual machines.