How to securely remove a virtual machine from Windows 10?

Virtual machines allow you to run multiple operating systems on a single physical machine, providing a flexible and efficient way to test software, run different operating system environments, or simply experiment with new systems.
However, there are times when you may need to remove a virtual machine from your Windows 10 system. Whether it's to free up disk space, reduce system clutter, or simply because you don't need it anymore, you should remove the virtual machine properly to avoid potential problems.
Next, you can follow the specific steps below to completely remove a virtual machine from Windows 10, making sure to delete all related files correctly.

Before removing a virtual machine, there are a few preparatory steps you should take to ensure that the process goes smoothly:
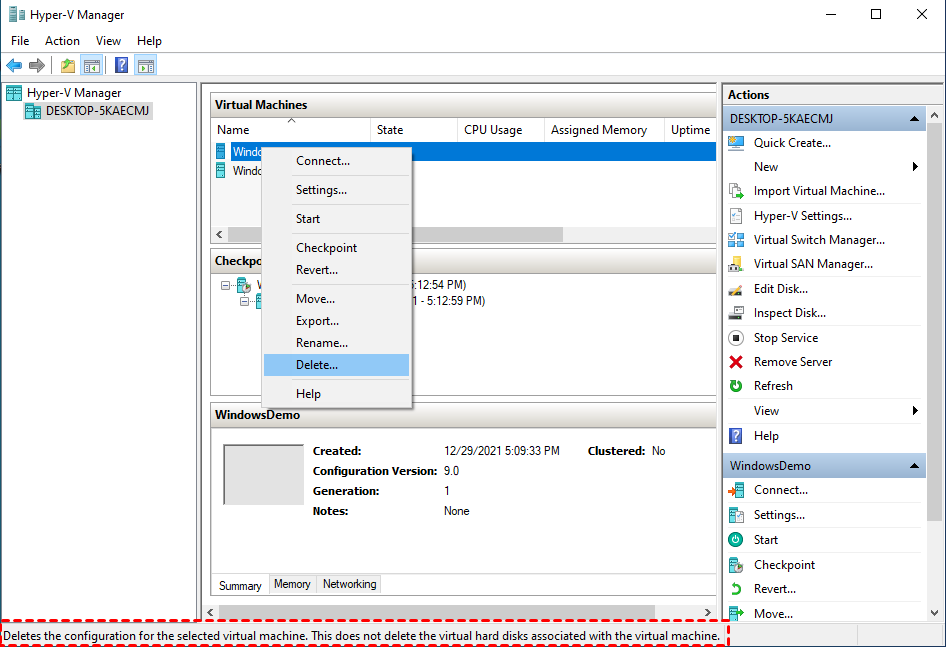
Hyper-V Manager is a tool in Windows that allows you to manage and delete virtual machines (VMs) created with Microsoft's Hyper-V virtualization technology. To remove a virtual machine from Windows 10 using Hyper-V Manager, please follow these steps:
1. Launch the Hyper-V Manager. In the left pane, locate the virtual machine you wish to delete.
Tip: If the VM is running, you'll need to shut it down before deleting it.
2. Right-click the VM again and select Delete. This will remove the VM from the list, but the virtual hard disks and other files such as Hyper-V checkpoints might still remain on your storage.

3. To completely delete the VM from Windows 10, you'll need to manually delete the VM's files from the storage location where they are saved.
* For example, navigate to the folder where the virtual hard disk is stored (usually in the C:\Users\Public\Documents\Hyper-V\Virtual hard disks directory) and manually delete any leftover files. These files typically include the virtual hard disks (with a .vhd or .vhdx extension) and configuration files.
When deleting a VM from Hyper-V Manager, the different disk AVHD(X) files from the Hyper-V checkpoint (if any) are merged into a single VHD(X) file. You can manually delete vhd files from Hyper-V.
✨Delete a Hyper-V virtual machine using PowerShell: If you can't use the Hyper-V Manager GUI to delete a VM. Simply run the Remove-VM cmdlet to quickly remove the virtual machine as well. Remove-VM "virtual machine name" Running this cmdlet removes the virtual machine's configuration file, but does not remove any virtual hard drives. If the virtual machine has any snapshots, these snapshots are deleted and merged into the virtual hard disk file after the virtual machine is deleted.
It’s also easy to delete a VM from VMware. Here’s how you can do it:
1. Open VMware Workstation or VMware vSphere Client. Find the VM you want to delete in the list, and power off it.
2. In VMware Workstation, right-click on the VM in the left sidebar and select Remove from Library. Navigate to the folder where the VM’s files are stored. Delete the folder containing the VM’s configuration files (.vmx), virtual hard disks (.vmdk), and other related files.
In VMware vSphere, right-click on the VM in the inventory list and select Delete from Disk. This option not only removes the VM from the inventory but also gives you the option to delete its files from the datastore.
3. Confirm the deletion to remove both the VM and its associated files permanently.
If you also want to remove a virtual machine from Oracle VM VirtualBox, you can do the following:
1. Start VirtualBox, click on the VM you want to remove.
2. Shut down the VM and right-click on the selected VM and choose Remove. Choose from two options:
3. Click Remove after selecting your preferred option. If you choose Delete All Files, the VM and its associated data will be permanently deleted.
Before you remove a virtual machine (VM) from Windows 10, it’s crucial to ensure that all important data is securely backed up. AOMEI Cyber Backup is a powerful tool designed to simplify this process by providing robust backup solutions for virtual machines. This way, you can focus on managing your VM without worrying about permanent data loss, as you’ll have reliable backups to restore from if needed.
1. Open AOMEI Cyber Backup web client, and access to Source Device >> Hyper-V >> Add Hyper-V to bind your Hyper-V host, then enter the required information and click Confirm.
2. Access to Backup Task >> Create New Task to configure your Hyper-V backup task. In the opened wizard, you can select Hyper-V virtual machines to back up, the storage location to save the backups or archive backup to Amazon S3 easily.
Also, you can configure Schedule to select backup method as full / incremental backup, and specify the backup frequency on basis of daily / weekly / monthly to automatically run the Hyper-V backup task.
3. Start Backup: click Start Backup and select Add the schedule and start backup now, or Add the schedule only.
When completing the Hyper-V backup solution, you can monitor the backing up process on the main interface, and you can also check the Backup Log to see if there are any errors that result in your backup failure.
4. When you want to Restore a VM from the backup, you can select any backup version from the history, and Restore to original location easily.
✍While the Free Edition covers most of the VM backup needs, you can also upgrade to enjoy:
By using AOMEI Cyber Backup, you can create comprehensive backups of your VMs to safeguard against data loss before deletion.
In Windows 10, you can delete an existing Hyper-V virtual machine directly from Hyper-V manager or PowerShell. Also, if you are running VMware or Oracle, you can remove the virtual machine without any problem by following the steps in this article.
Importantly, don't forget to backup your important data for quick recovery.