Running out of disk space on your Ubuntu VM can be a daunting issue, especially if it disrupts your workflow or server operations. Fortunately, increasing disk space on an Ubuntu VM is a straightforward process that involves a few key steps.

Prior to resizing the partitions on a virtual drive, make sure the following prerequisites are satisfied:
• While a virtual machine is operating, the virtual disk space can be expanded. To get the operating system to recognize the enlarged drive, you might have to restart a virtual machine.
• A virtual disk cannot have snapshots in order to be resized. Before you enlarge a virtual disk and change the size of the disk partition, remove (consolidate) any snapshots that may have been taken of your virtual machine.
It's advisable to create a virtual machine backup prior to doing any disk activities. Adjusting the size of a disk partition might be dangerous if you make a mistake in the settings.
Here, we will walk you through how to increase disk space on Ubuntu VM in Oracle VirtualBox and VMware.

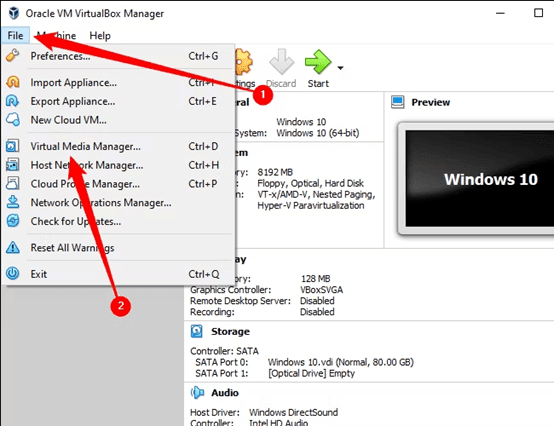
1. In VirtualBox, click on the "File" > "Virtual Media Manager" from the dropdown menu.

2. Locate the disk you want to resize from a list of all the virtual disks available.
3. Right-click on the disk and select "Properties." In the Properties window, you'll see a field labeled "Size." Use the slider to adjust this value to your desired new size.
4. Click "Apply" to save the changes.

This guide will walk you through increasing the virtual disk using VBoxManage command, and then extending the partition within Ubuntu.
1. Power off your virtual machine first.
2. Open a Command Prompt window from your Start Menu and change the directory to VirtualBox's program files folder. Run the command:
3. Use the VBoxManage command to resize the virtual disk.
✔ YourDisk.vdi: the path to your virtual disk file. ✔ 50000: the desired size in megabytes.
1. In VMware Workstation, shut down the Ubuntu VM.
2. Right-click the virtual machine, then go to edit the "Settings".
3. Select "Hard Disk" > "Expand" to increase the disk space. Enter the new size for your virtual disk and confirm by clicking "Expand."
✨Tip: In VMware ESXi, you can try to use vSphere web client help users to increase the disk size of Ubuntu VM.
After you're done expanding disk space on your Ubuntu VM, you'll also need to go ahead and resize the operating system’s partition on your virtual hard drive, otherwise you won't be able to access any of the space on it yet.
Before undertaking any significant changes or operations on your virtual machines (VMs), it is crucial to back them up. This ensures that you have a restore point in case something goes wrong. One of the most reliable tools for backing up VMware ESXi and Hyper-V VMs is AOMEI Cyber Backup.
AOMEI Cyber Backup is a powerful and user-friendly enterprise backup solution designed specifically for virtual environments. It offers robust features to ensure that your VMware ESXi and Hyper-V VMs are protected and can be quickly restored.
✤ Automated Backups: Schedule backups to run automatically at specified intervals, ensuring that you always have up-to-date copies of your VMs. ✤ Full and Incremental Backups: Choose between full backups, which save the entire VM, and incremental backups, which only save changes since the last backup, saving time and storage space. ✤ Flexible Restore Options: Restore entire VMs or individual files and folders with ease, providing flexibility in how you recover data. ✤ User-Friendly Interface: Intuitive and easy-to-navigate interface, making it accessible even for those who are not IT experts. ✤ Centralized Management: Manage all your VM backups from a single console, simplifying the backup process.
1. Bind Devices: Access to AOMEI Cyber Backup web client, navigate to Source Device > VMware > + Add VMware Device to Add vCenter or Standalone ESXi host directly. And then click … > Bind Device.
2. Create Backup Task: Navigate to Backup Task > + Create New Task, and select VMware ESXi Backup as the Backup Type.
3. Configure Backup: Set Task Name, Device, Target, Archive, Schedule, and Cleanup as needed.
▶ Archive (optional): Add an Amazon S3 bucket and archive VMware backup to AWS.
▶ Schedule (optional): Perform full, differential or incremental backup, and schedule backup daily, weekly or monthly according to the frequency you specified.
▶ Backup Cleanup (optional): Configure a retention policy to auto delete old backup files and save storage space.
4. Run Backup: Select to Add the schedule and start backup now, or Add the schedule only, and click Start Backup.
Created backup tasks will be listed and monitored separately, for restoring, progress checking and schedule changing.
5. Restore VM: Click Restore to recover a virtual machine from backup, saving the trouble of re-configuring the new VM.
☞ Once the backup task is created, it will be executed automatically according to your schedule. If you want to restore a virtual machine, you can click Restore and choose to restore entire VM to an available state from any historical restore point. ☞ In addition to restoring a VM to its original location, you can also choose Restore to new location, which will create a new identical VM directly from your backup to the target location.
By following these steps, you can increase the disk space on your Ubuntu virtual machine in VMware or Virtual Box. Remember to back up your data before making any significant changes to your virtual disks and partitions.