If you have decided to uninstall VMware Workstation from your Windows 10/11 PC or laptop, you are going to learn here the easiest way to remove VMware Workstation from Windows 10/11 PC or laptop.

VMware Workstation is the Type 2 hypervisors also known as hosted hypervisors, because they are installed on existing OSs, and rely on them for virtualization and resource management. VMware Workstation provides the flexibility to simulate a complete network environment on a single physical machine while running different operating systems, and developing, testing, and deploying new applications on a single desktop.
VMware Workstation Pro might offer you a lot of benefits, but in some cases, you might want to know how to remove workstation from Windows 10/11 computer. For instance:
However, some people had difficulty uninstalling and deleting VMware Workstations from Windows. You may have no idea how to remove it from Windows. Or you can't completely uninstall it. For example, the VMware icon is still in Start after uninstalling.
Don't worry, you can keep on reading. This article will guide you to uninstall Workstation from Windows 10/11 completely.

To completely uninstall VMware Workstation, firstly you need to uninstall the software, then delete leftover files and folders and the registry. Now please close your VMware Workstation software and follow the guide below.
To uninstall the VMware software, there are 3 tools you can use - Apps & features, Control Panel, and VMware installer
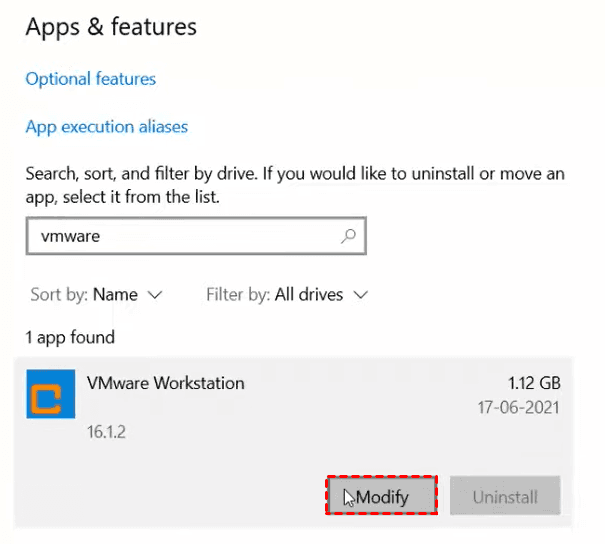
1. Press Windows Key + I to open Settings. Then select Apps on Windows 10.
Step 2. Locate and right-click on VMware Workstation under the Apps & features menu then click Modify. You will find out that the Uninstall option is greyed out.

Step 3. Click Next to open a new wizard with 3 options: Change, Repair and Remove. Then choose Remove.
Step 4. Uncheck the following 2 boxes to remove the configuration files of VMware Workstation. Click Remove >> Finish to complete the process to uninstall VMware Workstation from Windows 10.
Then wait for the program to uninstall the VMware software
Step 1. Click the Start button. Find and click Windows System to expand it. Click Contol Panel.
Step 2. On the Control Panel. Select Programs and Features.
Step 3. Right-click the VMware Workstation (or VMware Workstation Player).
Step 4. Click Change. And the setup wizard will pop up. Choose Remove and click Next to uninstall it.
This is how to uninstall Vmware Workstation from Windows host. But some left files, folders, and registry files could remain on your computer. You can read the following content to remove the Workstation completely
► Delete Program Files: Press Win key + E to open File Explorer > Navigate to C:\Program Files (x86) or C:\Program Files. > Find the VMware folder and delete it.
► Delete AppData Folder: Press Win key + R and type %appdata% Press Enter > In the Roaming directory, find the VMware folder and delete it. and go to "localappdata" folder and delete all VMware-related folders.
The registry is databases that store settings for the Windows system and for software that opts to use the registry. Here is how to remove it after uninstalling VMware workstation.
Step 1. Press Windows + R, type regedit, and press Enter.
Step 2. Navigate to HKEY_LOCAL_MACHINE\Software\Microsoft\Windows\CurrentVersion\Uninstall
Step 3. Expand the Uninstall. Right-click on VMware and choose Delete.
Step 4. Click Yes to confirm the operation if it asks.
This is how to completely remove workstation from Windows 10. Now you can reboot your computer and see if VMware Workstation is completely uninstalled.
If you have trouble uninstalling VMware Workstation. For example, can't find VMware Workstation from the Control Panel or App and feature, or some uninstalling operations are greyed out, here are some steps you can try.
1. Use a third-party software: Choose a popular and trustworthy uninstaller software such as IObit Uninstall to uninstall the program. Usually, these software provides user-friendly interfaces to completely uninstall software.
2. Execute the uninstall command: Press the Win+R keys to open the Run box. Type cmd on it to open Command Prompt. Then type:
msiexec / x {Product-Code}
Replace {Product-Code} with the actual product code of VMware Workstation, which you can find in the registry under HKEY_LOCAL_MACHINE\SOFTWARE\Microsoft\Windows\CurrentVersion\Uninstall.
Many users worry whether it will delete the virtual machines while deleting or upgrading the VMware Workstation. Theoretically, it will remain the existing virtual machines. However, it is recommended that you back up your virtual machines before such a major operation. In addition to this, it is also necessary for you to back up VMs regularly in your daily activities.
When running a virtual machine, you will find that your computer is obviously slowed down, sometimes even lagging for long periods of time. It’s possible to result in a system crash to loss of all your computer data. So, you should back up Workstation as well as your computers to protect data from threats.
Here, I will introduce a centralized backup software to protect your important data comprehensively.
AOMEI Cyber Backup is a specialized backup software, which allows you to create a backup task for multiple Windows computers on the network from a central management console. With it, you can easily backup your physical Windows machine and virtual machines using agent-backup way.
To create a Windows client backup, you need to install AOMEI Cyber Backup on the central management computer first, here's a detailed guide to walk you through the installation and backup process.
Step 1. Run AOMEI Cyber Backup. Then click Souce Device > Agents > +Add Agent. Click Download Agent to download the agent and copy it to your physical computer or virtual machines that need to be backed up and install the agent.
Step 2. Click Souce Device and choose Windows. The devices that installed the agent will be listed here. If you don't see them. Click + Add Windows Devices to add your devices.
Step 3. Now you can create a backup task. Click Backup Task > + Create New Task. Then choose backup type. Specify the task name, backup target, and schedule.
Step 4. Then click Start Backup button to commit and execute the task.
In this article, we discuss how to remove VMware Workstation from Windows 10 computer. However due to several reasons, such as a slowed down Windows performance, upgrade VMware Workstation, or troubleshooting a problem, you will want to uninstall workstation from your Windows host. You can first uninstall the software, and then delete leftover files and registry files to completely remove it.
In addition, If you want to backup your Virtual machines and Windows physical computer, AOMEI Cyber Backup is a good choice. it provides an easy way to back up multiple Windows clients. It supports file backup, partition backup, and disk backup to meet different requirements. If you are a VMware ESXi user, it can also help you centrally backup VMware ESXi VMs.