If you work with Linux, or you just want to test drive the OS, you can use Hyper-V to create a virtual machine on Windows 10

Starting with the recently released Windows 10 2004 Build 19041 or higher, you can run real Linux distributions. However, running Linux natively on Windows 10 can be somewhat limited in features and tools. Also, you can only pick from three distros, including Ubuntu, SUSE Linux Enterprise, and OpenSUSE Leap, and you're stuck with the command-line interface, which means that you can't run any of the graphical experiences (e.g., GNOME, KDE, XFCE) or Linux-based graphical applications.
Therefore, you may want to run Linux in a virtual machine to get the better experience. Is this possible? The answer is yes - you can create a Linux virtual machine running on Hyper-V with Windows 10 for testing.
In this Windows 10 guide, I will offer the steps to install Linux on virtual machines using Microsoft's Hyper-V virtualization feature.

To run a Linux virtual machine on Windows 10, you'll need the following:
Check if your machine is capable of running a Linux virtual machine, open the command prompt, then type in ‘systeminfo’ and press Enter.

You should enable Hyper-V on your device first, then use the following steps to create a Linux VM on your Windows 10.
1. Open Hyper-V Manager, click Action at the top, select New >> Virtual Machine.
2. Click Next to the Specify Name and Location window, you can change the name of the new virtual machine and store the virtual machine in a different location, and then click Next.
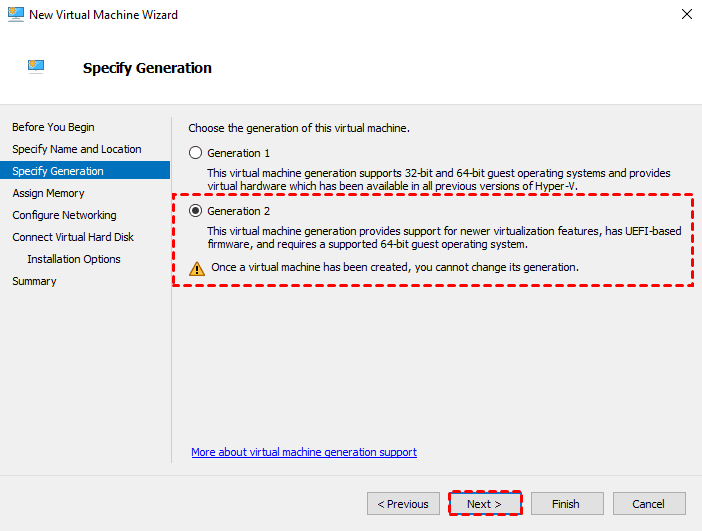
3. In the Specify Generations window, you can select Generation 1 or Generation 2 virtual machines according to the actual situation, and click Next.

4. Specify the amount of memory for your virtual machine. In the case of Ubuntu, you need a minimum of 2GB of memory. Then select the virtual switch.
5. In Connect Virtual Hard Disk window, select a location and specify the size of virtual hard disk (at least 25GB).
Then go to Installation Options wizard, select Install an operating system from a bootable CD/DVD-ROM. Select the Image file(.iso) >> path for the ISO file with the Ubuntu installation files.
6. Click Next to create a Linux virtual machine on your Windows 10.
You can use this method to install and run any other VM on Windows 10 as well. To protect your virtual environment, you should prepare Linux VM backup for long-time data archive, and complete VM backup helps to quickly restore data to a usable state.
Note: If you prefer to use snapshot as backup, you are exposed to risky operation. It is not recommended to manually manipulate a single snapshot file, as this can result in seriously data loss.
You are recommended to utilize a powerful and reliable host-level backup tool. Here, AOMEI Cyber Backup is a free Hyper-V backup software that supports backing up any virtual machines with Linux or any other guest OS. It offers a flexible and agentless solution for Linux VM backup, such as:
Support Free ESXi: support both paid and free versions of VMware ESXi. Easy-to-use: backup and restore multiple Linux virtual machines via central console without complicated configuration and re-installation. Auto image backup: schedule Linux VM backups flexibly, and provide full/incremental/differential backup as you need. Centralized Backup: Perform multiple VMs backup simultaneously without installing agent on each VM. Restore from history version: For VMs that have been backed up multiple times, you can select any of the history versions to restore.
Hit the button below to download and use AOMEI Cyber Backup Free Edition with no time limit. You can install it either on Windows or Linux OS.
To show you how to complete the operation, I will give an example to back up VMs with Linux guest OS.
1. Navigate to AOMEI Cyber Backup, then add your Hyper-V device and click Backup Task >> Create New Task.
2. In the opened wizard, do as followings to complete Linux backup in Hyper-V at image level.
✦ Enter a Task Name and select Hyper-V Backup as an example.
✦ On Device Name section, select guest VMs with Linux OS.
✦ On Target section, specify a location to store virtual machines.
For example, you can easily back up VM to network or local directory. According to 3-2-1 backup rule, you should save VM backups to two different storage devices or locations.
✦ On Schedule section, choose full/incremental/differential backup to keep tracking virtual machine data and select the time and frequency (daily/weekly/monthly), which protects business security all the time.
✦ Click Start Backup. It allows you to select start backup now or later.
3. When a backup is completed, you can restore VM from any selected backups, which saves time to restore the required VM data.
✦ For example, you can select a VM backup and click Restore to original location. It allows you to restore entire VM to its precious state easily and quickly.
✍ While the Free Edition covers most VM backup needs, you can also upgrade to enjoy more: ▶ Batch VM backup & restore: batch backup and restore large numbers of VMs managed by vCenter Server or on standalone ESXi hosts. ▶ Backup cleanup: Configure a retention policy to auto delete old backup files and save storage space. ▶ Restore to new location: Create a new VM in the same or another datastore/host directly from the backup to perform out-of-space recovery, saves the trouble of re-configuring the new VM.
For network administrators, programmers, and AI and ML developers, they may want to install Linux on Windows. This article offers you the detailed steps to create Linux VM on Windows 10. You need to check the requirements before running Linux virtual machine on Windows 10. Meanwhile, make sure you have a reliable and available Linux backup in case of disaster.