What is load balancing in SQL Server? With the load balancing, you can optimize system performance, reduce downtime, and improve resource utilization by distributing database workloads.

Load balancing reduces the risk of downtime by distributing workloads across multiple servers to ensure that individual servers function smoothly. Load balancing in SQL Server refers to the distribution of workloads across multiple instances of SQL Server to optimize the performance of SQL Server and manage traffic efficiently so that servers aren't swamped with requests.
Configure load balancing in SQL Server can be achieved through a variety of ways, using different strategies depending on your specific needs. The following provides a strategy to configure load balancing in SQL Server via Always On Availability Groups.
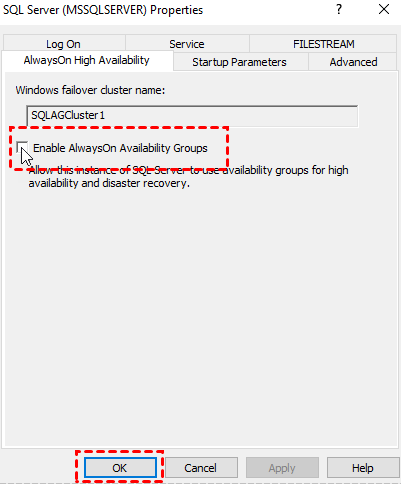
1. Open SQL Server Configuration Manager, go to SQL Server Service, and right-click the SQL Server instance > Properties. Check Enable Always On Availability Groups, and click OK.

2. On the Server Manager, select Tool > Failover Cluster Manager, right-click Failover Cluster Manager, and select Create Cluster.

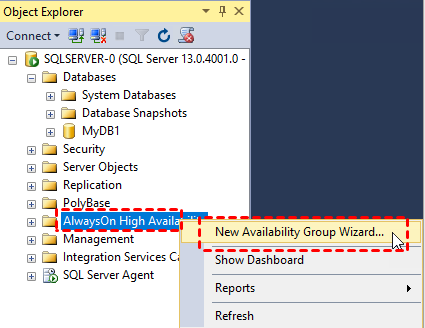
3. Open SQL Server Management Studio (SSMS), in the Object Explorer, right-click Always On High Availability > New Availability Group Wizard.

1. In the Azure portal, search for Load Balancer in the search bar. Click Create.
2. After opening the Create load balancer page, enter Project details and Instance details, including Subscription, Resource group, Name, and Region. Select SKU as Standard, Type as Internal, and Tier as Regional. Click Next: Frontend IP configuration.
3. Click + Add a frontend IP configuration, then enter Name, Virtual network, Subnet, IP address, Availability zone, and set the Assignment as Static. After all is done, click Add.
4. Select the load balancer that just created, select Backend pools > + Add to define a Backend Pool.
5. In the load balancer, select Health probes, and click + Add. Then enter the required information, choose TCP as the Protocol, set the Port to your custom SQL Server port, and set Interval to 5. Select Add.
6. In the load balancer settings, select Load Balancing Rules, and set the rules, then select Save.
1. Open SQL Server Management Studio, right-click the Availability Group, and select Add Listener. Then provide a Listener Name, set the Port, and choose the Static IP Address option.
2. Simulate a failover in a SQL Server Availability Group to verify that Azure Load Balancer is correctly routing traffic to the new primary replica.
Both SQL Server load balancing and backup can optimize the use of system resources, improve performance, and ensure data integrity. AOMEI Cyber Backup is a professional SQL Server backup software, and also you can easily backup SQL Server database to a remote location.
There are more advantages and features to meet your different needs:
User-friendly Interface: It provides an intuitive and easy-to-navigate interface to simplify the backup process, allowing you to effortlessly configure and manage SQL Server backups. Fast Backup and Recovery: It performs auto with fast speed, which is vital for business continuity. Centralized Backup: It can schedule backups for the SQL Server database and run it automatically from a single interface. Incremental and Differential Backup: It supports incremental and differential SQL backup to only backup newly added data or changed data to save time and space. Operation within LAN: Assists you in making large backups of your SQL databases, including SQL Express on your LAN.
Step 1. Before using AOMEI Cyber Backup to create backup tasks, you should run the download .exe file to install AOMEI Cyber Backup, and launch its main interface. Click Source Device > Microsoft SQL > Add Microsoft SQL.
Step 2. Choose Download proxy program to download the Agent program and install it on the device with SQL Server installed. Then click Already installed proxy to select the device. Next, click ... > Authentication to validate the database instance.
Step 3. Click Backup Task > Backup Task > Create New Task, and choose the Microsoft SQL Backup as the backup task.
Step 4. Click Device Name to specify the instance and databases you want to back up. You can select one or multiple databases as you need.
Step 5. Select a Target storage to save your SQL backups, it could be a local path or network path.
Step 6. You can select the Backup Method as full, incremental, or differential, and specify the Schedule Type as daily, weekly, or monthly to have a scheduled SQL database. Then your SQL database will be backed up automatically and regularly.
Step 7. Click Start Backup to execute automatic SQL Server backup. You can choose to Add the schedule and start backup now or Add the schedule only.
Step 8. Click Backup Task, and locate the task you want to restore, then click ... > Restore.
Step 9. Select the specific database backup version you want to restore, and click OK.
Step 10. You can specify the target location by selecting Restore to original location or Restore to new location.
Step 11. Click Start Restore to begin the process. You can click ... to check the restore details or cancel it.
For growing workloads, SQL Server load balancing appears to be a great solution. It can provide distribution of workloads across multiple servers through various architectures to increase productivity. Choosing a right load balancing strategy by understanding your needs can handle demanding workloads.