Are you ready to unlock the power of SQL Server and seamlessly migrate your MySQL database? Look no further than this comprehensive guide, providing expert insights and step-by-step instructions on converting your database using the SQL Server Migration Assistant.

MySQL is an open-source relational database management system (RDBMS) that is widely used for managing and organizing data. It was initially developed by a Swedish company called MySQL AB and is now owned and maintained by Oracle Corporation.
MySQL is known for its simplicity, speed, and scalability, making it a popular choice for various applications and industries. It follows the client-server architecture, where multiple clients can connect to MySQL server to access and manipulate data stored in databases.
SQL Server is a relational database management system (RDBMS) developed by Microsoft Corporation. It provides a robust and feature-rich platform for storing, managing, and retrieving data. SQL Server is widely used in various industries and is known for its scalability, security, and integration with other Microsoft technologies.

It is a complex process to convert MySQL database to SQL server that requires careful consideration and planning. To ensure a successful migration, here are key considerations to keep in mind:
By considering these key factors, you can mitigate potential challenges and ensure a successful and smooth conversion from MySQL to SQL Server. Proper planning, testing, and attention to detail will help minimize downtime and maximize the efficiency and effectiveness of your migrated database.
Microsoft provides a powerful tool called SQL Server Migration Assistant (SSMA) to simplify the conversion process. Please follow these steps to migrate MySQL database to SQL Server:
▶ Create an assessment
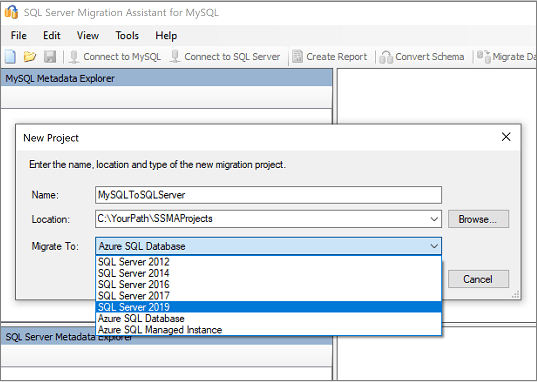
1. Launch SSMA for MySQL. Choose New Project from the File menu. Next, input the migration target, the project name, and a location to save your project. Then choose SQL Server from the Migrate To menu.

2. Enter connection information in the Connect to MySQL dialog box, then connect to your MySQL server.
3. Select the MySQL databases you want to migrate.
4. In MySQL Metadata Explorer, right-click the selected MySQL database and select Create Report. And the Create Report tab is another option, located in the top-right corner.
5. To understand conversion numbers and any issues or warnings, review the HTML report. For an inventory of MySQL objects and the time needed to make schema conversions, you may also open the report in Excel. The report's default destination is in the SSMAProjects report folder, as demonstrated below.
drive:\Users\\Documents\SSMAProjects\MySQLMigration\report\report_2016_11_12T02_47_55\.
▶ Validate the type mappings
Verify the default data type mappings and, if necessary, modify them to meet needs. To do this:
1. Choose Project Settings from the Tools menu. Change the type mapping for each table by selecting it in MySQL Metadata Explorer.
▶ Convert the schema
1. (Optional) Right-click the node and choose Add Statement to convert dynamic or ad hoc queries.
2. Click Connect to SQL Server, then choose the level of detail you require. Next, select Connect.
3. In MySQL Metadata Explorer, right-click the MySQL database to select Convert Schema. Alternatively, you can select the Convert Schema tab in upper-right corner.
4. Once the conversion is complete, compare and contrast the converted and original objects to spot any potential issues and fix them in accordance with the recommendations.
5. Review the suggestions and compare the original code to the modified Transact-SQL text.
6. Review the errors in the Error List pane by selecting Review results in the output pane.
7. Save the project locally for offline schema remediation exercises. Select Save Project on the File menu.
1. In SQL Server Metadata Explorer, right-click the database and choose Synchronize with Database to publish the schema. The MySQL database will be published to the SQL Server instance with this action.
2. Review the mapping between your source project and your target.
3. Right-clicking the database or object you want to migrate in MySQL Metadata Explorer and select Migrate Data. Alternatively, you can select the Migrate Data tab. Select the checkbox next to the database name to migrate all of the data for that database. Expand the database, expand Tables, then select the check boxes next to the particular tables to move data from. Clear the check boxes to remove data from certain tables.
4. View the Data Migration Report once the migration has been finished. After that, connect to MySQL database with SQL Server Management Studio, and check the data and schema to ensure that the migration is successful.
In the world of database management, ensuring the safety and integrity of your SQL databases is paramount. One of the essential practices in this regard is regular backup. Here’s an intelligent SQL database software – AOMEI Cyber Backup for you. It is a feature-rich backup and recovery software that offers comprehensive SQL Server management capabilities. With its intuitive interface and advanced functionalities, AOMEI Cyber Backup provides efficient database backup, disaster recovery solutions and the following benefits:
✦ Easy-to-use: SQL backups may be configured without writing any code thanks to the user-friendly interface. ✦ Operation Within LAN: Assist you in doing numerous backups of SQL database, including SQL Express within LAN. ✦ Backup Schedule: Schedule an automatic backup task to back up the database at predetermined periods. ✦ Auto & Centralized Backup: Schedule SQL backups and run them automatically.
AOMEI Cyber Backup supports Microsoft SQL (2005-2022), VMware ESXi (6.0 and above), and Hyper-V (in Windows 8/8.1/10/11, Windows Server/Microsoft Hyper-V Server 2012 R2 and later versions) from a centralized console and here’s a 30-day free trial for you:
✍ Before you perform a database backup, please make sure: 1. Your computer with both AOMEI Cyber Backup Agent and Microsoft SQL Server installed. 2. The local disk or network shared to store backup files.
1. Access to Source Device >> Add Microsoft SQL. If the database exists and the version is supported, it will appear automatically. Otherwise, you need click Add Microsoft SQL >> Download proxy program >> Already installed proxy and select the proxies you want to add.
2. Click ... >> Authentication to validate the database instance. You can choose Windows Authentication or SQL Authentication. Enter the credentials and click Verify.
3. Click Backup Task >> Create New Task to back up your SQL databases.
4. Select backup methods as full/incremental/differential backup and specify the backup time as daily/weekly/monthly. After that, your SQL databases will be backed up automatically and regularly.
5. Start Backup: You can choose to Add the schedule and start backup now or Add the schedule only.
In conclusion, migrating MySQL database to SQL Server can be a transformative process that unlocks the full potential of advanced features and scalability. Throughout this guide, you have explored the steps and considerations involved in this conversion, as well as the importance of efficient data backup.
Please remember, except for MySQL to SQL Server migration, implementing reliable data backup practices also empower you to embrace a future where your data remains secure, and your organization thrives.