The recovery model in SQL Server is a critical aspect of database management. It determines how a database handles backups, logging, and recovery of data in case of disasters or failures.

Recovery model SQL Server represents a critical component of database management. They determine how the database engine handles transactions and maintains data integrity. There are three primary recovery models to consider:

Selecting the appropriate SQL Server recovery model for your SQL Server database is a crucial decision. It should be based on factors such as:
Once you've decided on the appropriate recovery model for your database, you can configure it in SQL Server. You can change the recovery model using SQL Server Management Studio (SSMS) or T-SQL commands. Carefully follow best practices when making this change to avoid data loss and ensure a smooth transition.
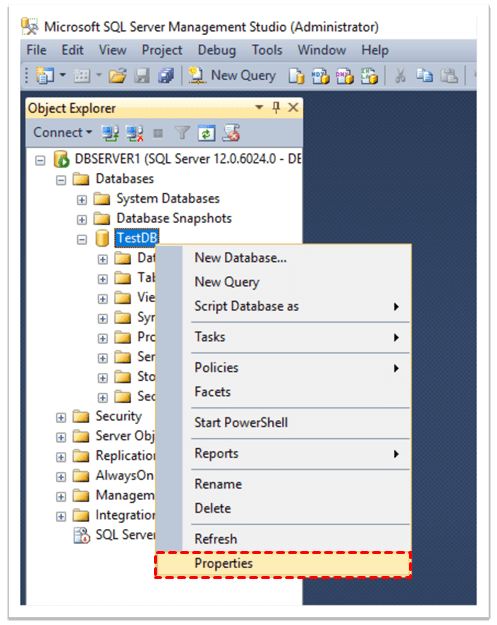
1. Once you've established a connection with the appropriate instance of the SQL Server Database Engine, navigate to Object Explorer and choose the server name to expand the server tree.
2. Expand Databases and, based on your specific database, either pick a user database or expand System Databases to select a system database.
3. Right-click the database, and then select Properties, which opens the Database Properties dialog box.

4. Within the Select a page panel, go ahead and click on Options.
5. The current recovery model SQL Server will be visible in the Recovery model list box.
6. If you wish to modify the recovery model, you can select a different one from the list—your options include Full, Bulk-logged, or Simple. Confirm your choice by selecting OK.
Note: Plan cache entries for the database will be flushed or cleared.
❖Check database recovery model SQL Server
1. Establish a connection with the Database Engine.
2. On the Standard toolbar, click on New Query.
3. Copy and paste the provided sample query into the query window, then click Execute. This sample demonstrates how to retrieve information about the recovery model of the model database from the sys.databases catalog view.
SELECT name, recovery_model_desc FROM sys.databases WHERE name = 'model'; GO
❖Change recovery model SQL Server
1. Establish a connection with the Database Engine
2. On the Standard toolbar, choose New Query.
3. Paste the provided example into the query window and click on Execute. This illustration demonstrates how to modify the recovery model of the model database to FULL by utilizing the SET RECOVERY option within the ALTER DATABASE statement.
USE [master]; GO ALTER DATABASE [model] SET RECOVERY FULL; GO
Note: Plan cache entries for the database will be flushed or cleared.
While configuring the recovery model SQL Server is a significant step in ensuring data protection, having a robust backup and restore strategy is equally crucial. You may need a software that offers a comprehensive solution for backing up and restoring SQL Server databases efficiently and securely.
AOMEI Cyber Backup stands as a robust and versatile SQL database backup software, specifically designed to empower users with comprehensive and efficient data protection capabilities. With its user-friendly interface and advanced features, AOMEI Cyber Backup caters to the precise needs of SQL database administrators, ensuring the safety and recoverability of critical data assets.
You can use this software to backup and restore multiple SQL Server within simple steps. Here’s a 30-day free trial for you:
1. Access to Source Device >> Add Microsoft SQL. If the database is present and compatible with the supported version, it will automatically show up. Otherwise, you can click Add Microsoft SQL >> Download proxy program, and install the program on the device with SQL Server installed. Then click Already installed proxy and select the proxies you want to add.
2. Click…>> Authentication to validate the database instance. You can choose Windows Authentication or SQL Authentication.Enter the credentials and click Verify.
3. Create Backup Task: Click Backup Task >> Create New Task, and select Microsoft SQL Backup as your backup type.
4. Backup Target: Specify a local path or network path as backup target. To back up SQL database to remote location, you could click Add a new network storage.The added path will be saved in Add storage.
5. Schedule Backup: Set up a schedule to run the SQL database backup daily/weekly/monthly, and set the backup method as Full/Incremental/Differential.
6. Start Backup: You can choose to Add the schedule and start backup now or Add the schedule only and click Start Backup to executeSQL server automatic backup.
7. Restore from backup: Click Backup Task on the left menu bar, locate the task you want to restore, and click … >> Restore. You can specify the target location by choosing Restore to original location or Restore to new location.
In conclusion, mastering the art of configuring the recovery model of a database in SQL Server is essential for effective data management. It empowers you to make informed decisions about data protection, recovery, and continuity.
When combined with the best practices for backup and restore using AOMEI Cyber Backup, you not only configure your databases correctly but also fortify them against data loss, ensuring that your valuable information remains secure and accessible. With this knowledge and approach, you're well-prepared to navigate the dynamic landscape of SQL Server database management, ensuring the resilience and integrity of your data assets.