SQL backup tools are critical for protecting data integrity and ensuring business continuity, so it’s crucial to choose a SQL backup tool to protect data. This article provides you two SQL backup tools with step-by-step guide to backup and restore your SQL Server database.

Backup is an important aspect of data management and IT strategy for individuals and organizations. It provides a safety net against data loss due to various threats such as hardware failures, software problems and accidental deletion.
With reliable backups, it is possible to recover lost or corrupted data. You can perform a SQL backup in the following ways.
Rather than operating SQL database backup manually, with AOMEI Backup, you can easily perform SQL backup operations even if you are not a database expert. You can set up automatic SQL backup tasks in just a few simple steps.
Next, this guide focuses on the professional and simplified SQL backup tool - AOMEI Cyber Backup with step-by-step process.

There are a lot of SQL backup tools in the market, but it is not so easy to choose a satisfactory backup tool that not only meets your needs and strong data protection ability, but also affordable.
AOMEI Cyber Backup is a professional SQL backup software, and it provides a versatile and easy-to-use interface that caters to both novice and IT professionals. Using AOMEI Cyber Backup you can enjoy lots of benefits, there are some key features of it.
✍Auto and Schedules Backup: You can set up a schedule to automatically run the backup task daily, weekly, and monthly. ✍Incremental and Differential Backup: You can create incremental and differential SQL backup to only backup newly added data or changed data to save time and space. ✍Backup Cleanup: You can delete old or outdated SQL Server backup versions automatically to save storage space. ✍Recovery to New Server: You can backup the SQL database to another server.
You can click the following button to use AOMEI Cyber Backup for free trial.
📌Note: To use AOMEI Cyber Backup correctly, you should pay attention to the following Microsoft SQL Backup prerequisites: ▶ The computer has AOMEI Cyber Backup Agent and Microsoft SQL Server installed. ▶ A local disk or network share is available for storing backup files.
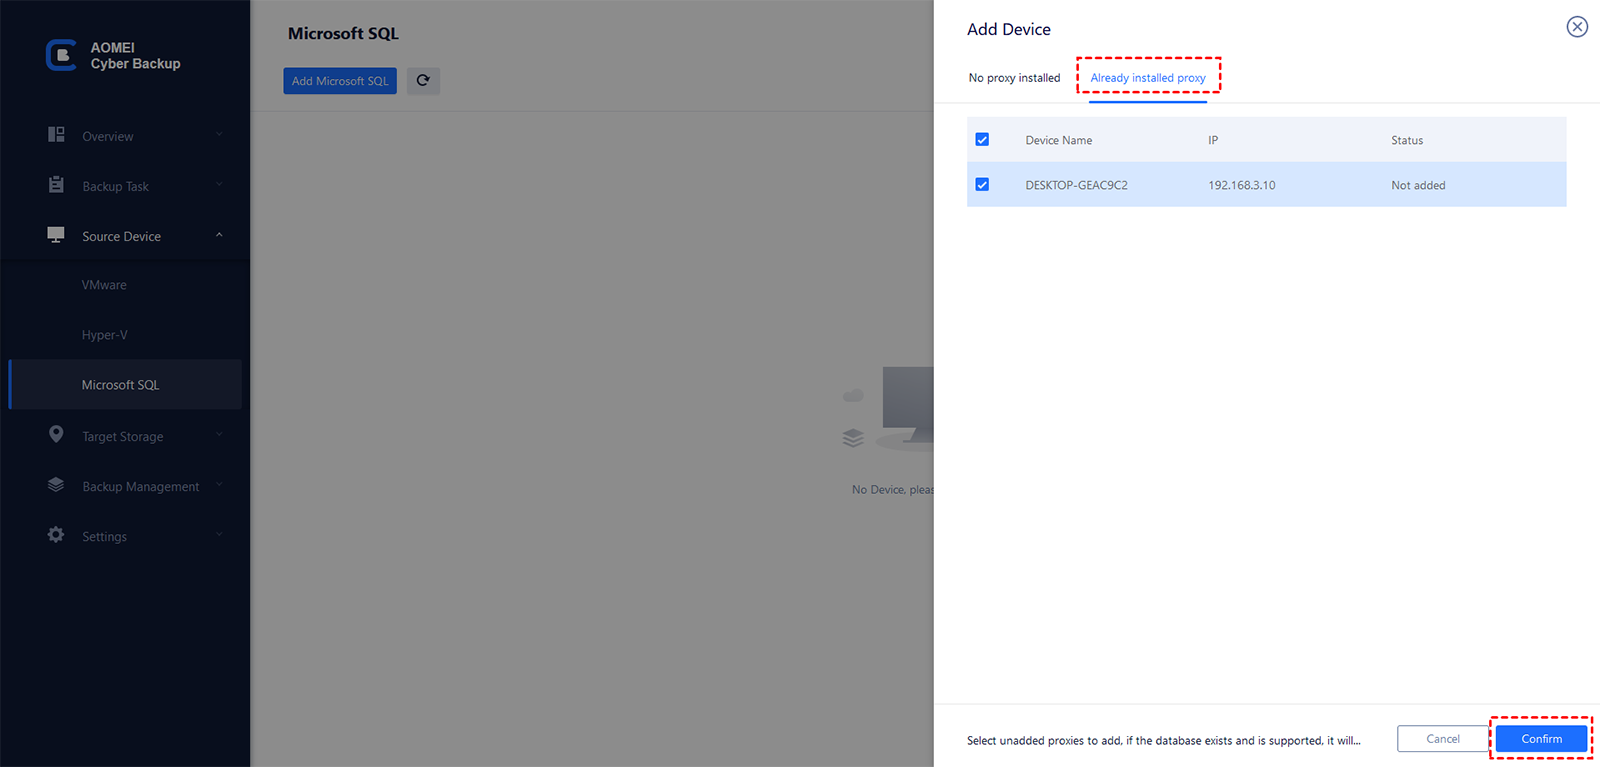
1. Access to Source Device, choose Microsoft SQL > Add Microsoft SQL to Download proxy program, and install the program on the device with SQL Server installed. Then click Already installed proxy and select the proxies you want to add.

2. Click ... > Authentication to validate the database instance. You can choose Windows Authentication or SQL Authentication, then enter credentials and click Verify.
3. Navigate to Backup Task and click Create New Task. Then choose backup type as Microsoft SQL Backup.
4. You can select backup methods as full, incremental, and differential, then specify the schedule Type as daily, weekly, or monthly to have a scheduled SQL database. Then your SQL database will be backed up automatically and regularly.
5. Enable Backup Cleanup to save storage space, it assists you in automatically removing previous backup versions. With this option turned on, you can let AOMEI Cyber Backup clean up automatically so you don't have to worry about backup failures due to full disk space.
6. Click Start Backup, when it’s finished, you can find the task in the Backup Task tab.
1. Click Backup Task on the menu bar to locate the task you want to restore, and click ... > Restore.
2. Select the specific database backup version you want to restore, and click OK.
3. Select the target location to restore to. By default, it will Restore to original location.
If you want to Restore to new location, you need to select the target and specify the name of the new database. The storage location can also be modified.
4. When all the settings are done, click Start Restore to begin the process. You can click on the ... to see the restore details or cancel it.
SQL Server Management Studio (SSMS) is a powerful-integrated environment designed for managing Microsoft SQL Server infrastructure. It is a free SQL backup tool provided by Microsoft for SQL Server administration. It provides built-in backup and restore capabilities and is the preferred choice of many administrators.
✍Backup SQL Server databases using SSMS
1. In Object Explorer, click Database.
2. Right-click the Database > Tasks > Back Up...
3. Under Destination, verify that the backup path is correct. If you need to change the path, select Remove to delete the existing path and then select Add to type the new path. You can use ellipses to navigate to specific files.
4. Select OK to take a backup.
✍Restore your backup by following steps below
1. In the Object Explorer tab, right-click the Database and then select Restore Database...
2. Select Device, and then select ...to locate your backup file.
3. Select Add and navigate to the location of the .bak file. Then select the .bak file and choose OK.
4. Select OK to close the Select backup devices dialog box.
5. Select OK to restore the database.
In an ever-changing data management environment, having a reliable SQL backup tool is essential. These tools not only prevent data loss, but also allow organizations to rest easy and focus on their core business. By implementing best practices and using the right tools, organizations can ensure the security and recoverability of their SQL databases.