Are you looking to level up your data management skills? This article delves into SQL CREATE TABLE from SELECT statement. Read on to uncover the secrets of efficient data management and safeguarding your information.

MySQL create table from SELECT statements is a powerful feature in SQL that offers numerous advantages, contributing to more efficient and streamlined data management practices. Here are several key reasons highlighting the importance of this capability:
In SQL, you can create a new table based on the result of a SELECT statement. This process is often referred to as creating a table from a select query. The basic syntax for this operation is as follows:
CREATE TABLE new_table_name AS SELECT column1, column2, ... FROM existing_table_name WHERE condition;
* Here's a breakdown of the syntax:
Securing your SQL database is crucial to protect sensitive data and ensure the integrity of your information. AOMEI Cyber Backup offers robust solutions for data protection, and integrating it into your security strategy involves careful consideration of several key security aspects:
❈Easy-to-use: SQL backups may be configured without writing any code thanks to the user-friendly interface. ❈Operation Within LAN: Assist you in doing numerous backups of SQL database, including SQL Express within LAN. ❈Backup Schedule: Schedule an automatic backup task to back up the database at predetermined periods. ❈Auto & Centralized Backup: Schedule SQL backups and run them automatically. ❈Point-in-Time Recovery: Easily recover databases to specific points in time, providing a safety net against data loss.
AOMEI Cyber Backup supports Microsoft SQL (2005-2022), VMware ESXi (6.0 and above), and Hyper-V (in Windows 8/8.1/10/11, Windows Server/Microsoft Hyper-V Server 2012 R2 and later versions) from a centralized console and you can click the button below to try the 30-day free trial:
✍Before you perform a database backup, please make sure: 1. Your computer with both AOMEI Cyber Backup Agent and Microsoft SQL Server installed. 2. The local disk or network shared to store backup files.
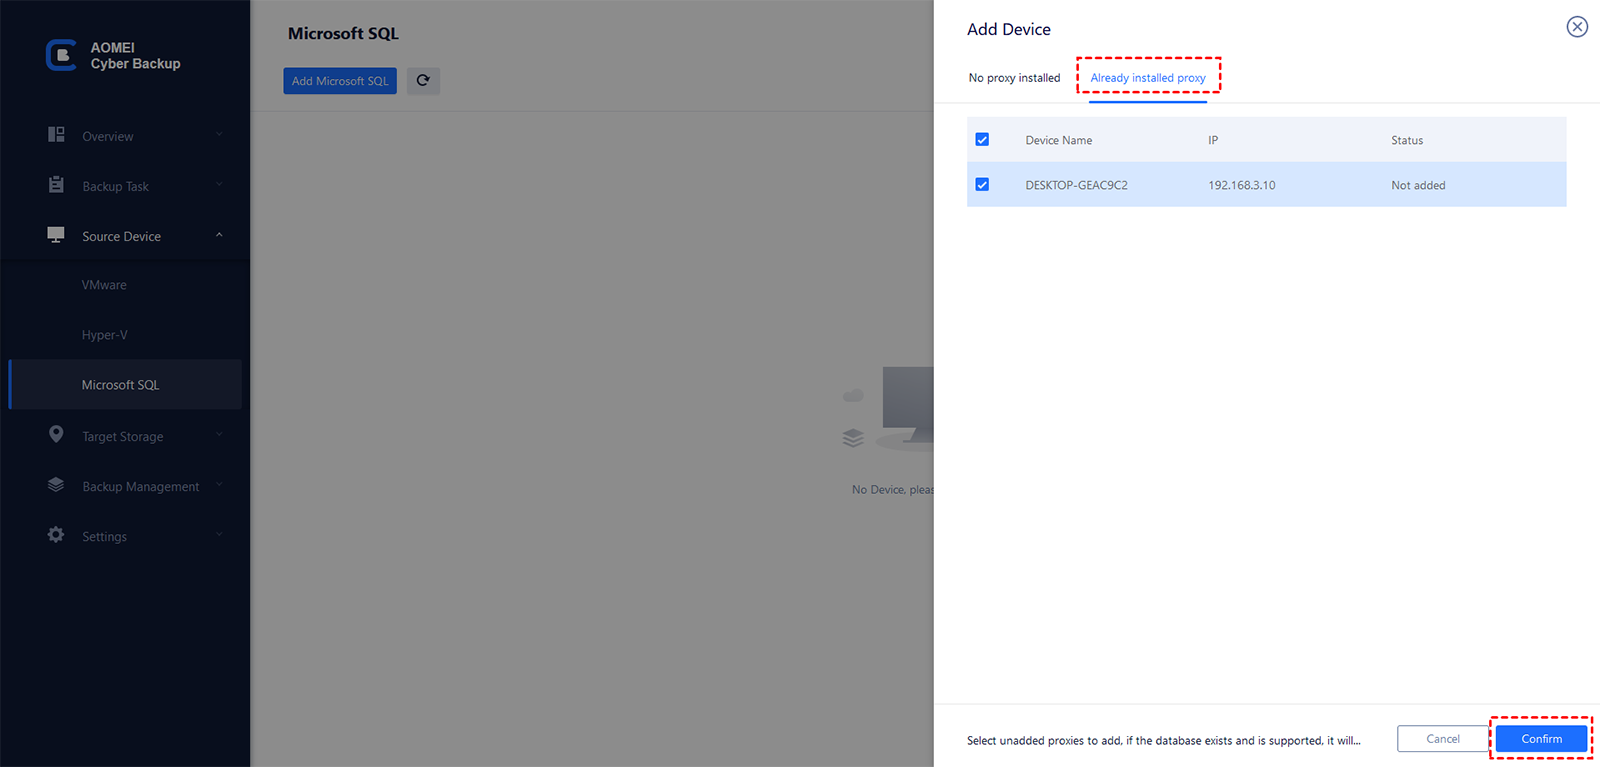
1. Access to Source Device >> Add Microsoft SQL. If the database exists and the version is supported, it will appear automatically. Otherwise, you can click Add Microsoft SQL >> Download proxy program, and install the program on the device with SQL Server installed. Then click Already installed proxy and select the proxies you want to add.

2. Click … >> Authentication to validate the database instance. You can choose Windows Authentication or SQL Authentication. Enter the credentials and click Verify.
3. Click Backup Task >> Create New Task, and select Microsoft SQL Backup as your backup type.
4. Device Name: Click Device Name to select SQL instance and database for backup. You can choose the number of databases you want to backup according to your needs.
5. Backup Target: Specify a local path or network path as backup target. To back up SQL database to remote location, you could click Add a new network storage. The added path will be saved in Add storage.
6. Schedule (optional): Set up a schedule to run the SQL database backup daily/weekly/monthly, and set the backup method as Full/Incremental/Differential.
7. Start Backup: You can choose to Add the schedule and start backup now or Add the schedule only and click Start Backup to execute SQL server automatic backup.
8. Restore from backup: Click Backup Task on the left menu bar, locate the task you want to restore, and click … >> Restore. You can specify the target location by choosing Restore to original location or Restore to new location.
In the dynamic realm of SQL, the ability to create tables from SELECT statements stands out as a game-changer for efficient data management. This article explored the significance of this feature, provided insights into the SQL CREATE TABLE from SELECT syntax, and highlighted the crucial role of securing your SQL database with AOMEI Cyber Backup. By leveraging these tools, users can enhance data management practices, ensuring both efficiency and security in their SQL environments.