Ever found yourself in the perplexing situation where SQL Server seemingly misplaces a stored procedure? Dive into our comprehensive guide to understand the causes behind the 'SQL Server Could Not Find Stored Procedure' error.

"Could Not Find Stored Procedure SQL Server" error can be perplexing and disruptive in database management. Understanding the potential causes behind this error is crucial for effective troubleshooting. Here are common reasons why this error may occur:

Resolving the "Could Not Find Stored Procedure Microsoft SQL Server Error 2812" involves systematic troubleshooting to identify and address the root cause. Here are step-by-step troubleshooting measures to guide you through resolving this issue:
1. Verify Procedure Existence: Double-check the spelling and ensure that the stored procedure exists in the database. Use the appropriate database management tool or query to confirm its presence.
2. Check Schema and Object References: Confirm that the schema and object references in the query match the actual location of the stored procedure. Ensure the correct schema is specified to avoid any schema-related issues.
3. Grant Sufficient Permissions: Make sure the user executing the query has the necessary permissions to access and execute the stored procedure. Grant the required permissions if needed.
4. Refresh IntelliSense Cache: If you are using an integrated development environment (IDE) with IntelliSense support, refreshing the cache can help update the stored procedure metadata. This can be done by pressing the appropriate key combination (e.g., Ctrl+Shift+R) or through the IDE's menu options.
Except “SQL Server Could Not Find Stored Procedure Explain”, configuring the distribution database is a crucial aspect of setting up SQL Server replication. The distribution database plays a central role in managing the flow of data between the publisher and subscribers in a replication topology. Here's a step-by-step guide on how to configure the distribution database:
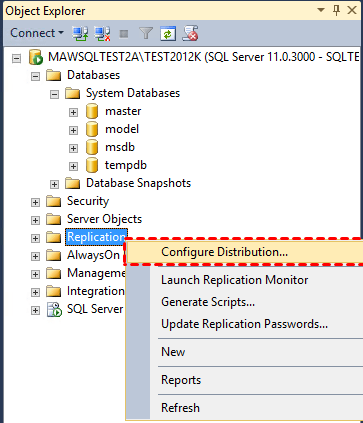
1. Launch the SQL Server Management Studio and connect to the desired instance for Distributor configuration. Right-click on the Replication Folder, then select the Configure Distribution option.

2. On the Distributor page, choose to set up the current instance as a Distributor or choose another pre-configured instance. Proceed by clicking Next.
3. Navigate to the SQL Server Agent Start page, where you have the option to enable the SQL Server Agent if it's not configured to start automatically. Click Next to proceed.
4. Specify the snapshot folder location on the Snapshot Folder page. This folder is crucial during the initial synchronization or re-initialization of replication. Click Next to continue.
5. On the Distribution Database page, provide the distribution database name and designate the location for the data and log files. The distribution database will be created based on the specified parameters. Click Next.
6. The Publisher page defaults to the local instance. This is because a SQL Server instance configured as a Distributor can only use itself for publishing. Proceed by clicking Next.
7. The Wizard Actions page offers the choice to generate a script for later execution. Click Next to proceed.
8. Review the selected configuration on the Complete the Wizard page. Click Finish to create the Distributor. Proceed by clicking Next.
9. The Configure page displays the ongoing creation of the distribution database.
Beyond the intricacies of distribution database configuration, the landscape of database management benefits immensely from cutting-edge software solutions. AOMEI Cyber Backup emerges as a professional and comprehensive tool for efficient database management. Key features include:
✧Easy-to-use: SQL backups may be configured without writing any code thanks to the user-friendly interface. ✧Operation Within LAN: Assist you in doing numerous backups of SQL database, including SQL Express within LAN. ✧Auto & Centralized Backup: Schedule SQL backups and run the backup automatically. ✧Backup Schedule: Schedule an automatic backup task to back up the database at predetermined periods.
AOMEI Cyber Backup supports Microsoft SQL (2005-2022), VMware ESXi (6.0 and above), and Hyper-V (in Windows 8/8.1/10/11, Windows Server/Microsoft Hyper-V Server 2012 R2 and later versions) from a centralized console and you can click the button below to enjoy the 30-day free trial:
✍ Before you perform a database backup, please make sure: 1. Your computer with both AOMEI Cyber Backup Agent and Microsoft SQL Server installed. 2. The local disk or network shared to store backup files.
1. Access to Source Device >> Add Microsoft SQL. If the database exists and the version is supported, it will appear automatically. Otherwise, you need click Add Microsoft SQL >> Download proxy program >> Already installed proxy and select the proxies you want to add.
2. Click ... >> Authentication to validate the database instance. You can choose Windows Authentication or SQL Authentication. Enter the credentials and click Verify.
3. Click Backup Task >> Create New Task to back up your SQL databases.
4. Select backup methods as full/incremental/differential backup and specify the backup time as daily/weekly/monthly. After that, your SQL databases will be backed up automatically and regularly.
5. Start Backup: You can choose to Add the schedule and start backup now or Add the schedule only.
6. Restore from backup: Click Backup Task on the left menu bar, locate the task you want to restore, and click … >> Restore. You can specify the target location by choosing Restore to original location or Restore to new location.
Encountering the "SQL Server Could Not Find Stored Procedure" error can be frustrating, but by understanding its causes and following the troubleshooting steps outlined in this article, you can effectively resolve the issue. Remember to pay attention to spelling, schema references, and user permissions.
Additionally, consider using professional software like AOMEI Cyber Backup to enhance your database management capabilities and ensure data protection. With the right approach and tools, you can overcome this error and maintain a smooth SQL Server environment.