Don't miss out on the chance to fortify your data protection strategy and navigate the complex landscape of SQL Server transaction log backups with confidence.

The SQL Server transaction log is a critical component that records all modifications made to the database. It serves as a chronological record of transactions, capturing both committed and uncommitted changes. This log ensures data consistency and enables recovery to a specific point in time, making it an indispensable feature for maintaining the integrity of your SQL Server databases. The transaction log comprises several key components:

To ensure the resilience of your data and facilitate efficient recovery, establishing a robust transaction log backup system is essential. Here's a step-by-step guide on how to backup transaction logs in SQL Server:
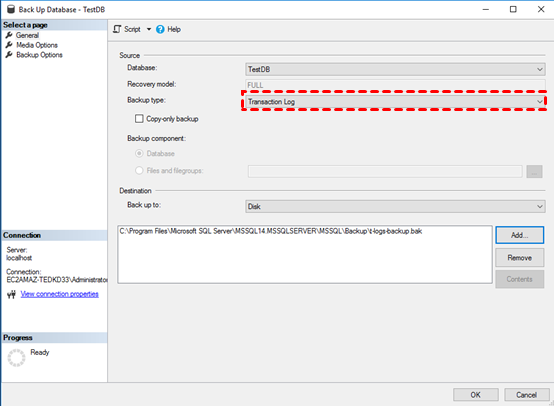
1. Begin by right-clicking on the desired database and opt for the Tasks - Back Up choice. Modify the Backup Type to Transaction Log, and you're set to proceed.

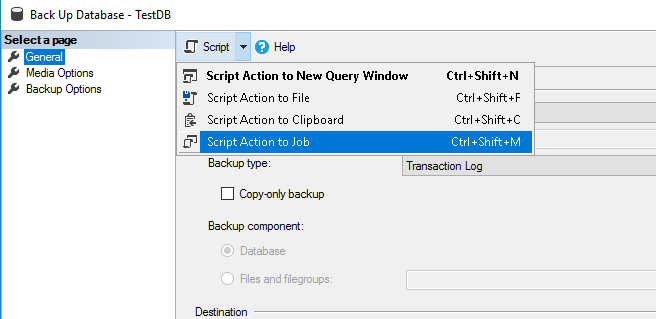
2. Subsequently, you can effortlessly transform these backup configurations into a scheduled job by selecting the Script option at the top:

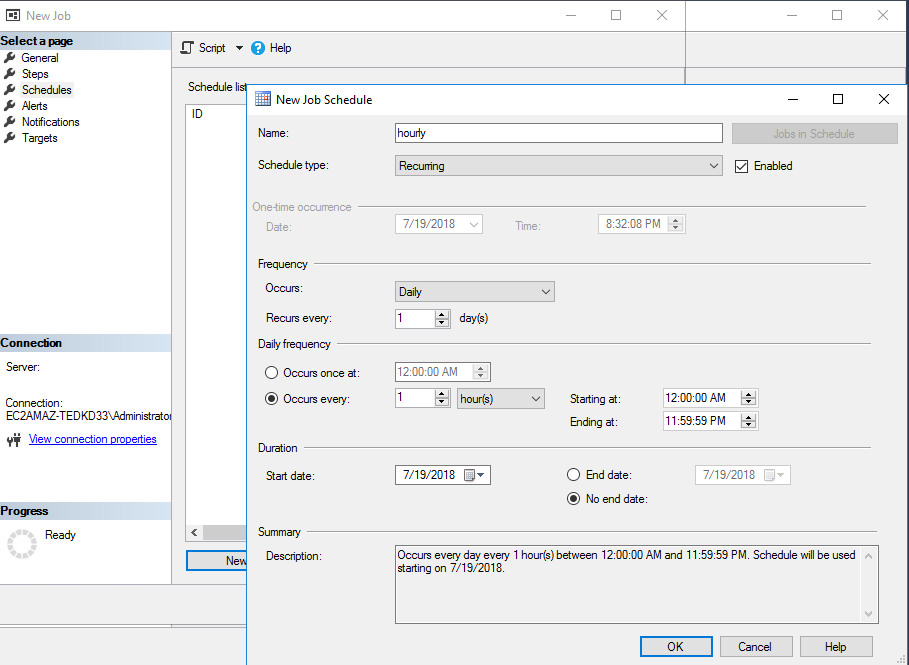
3. While most settings are self-explanatory, let's focus on the Scheduling tab:

* If you prefer, you can backup transaction log SQL Server script. For instance, insert the script below as a new step in the New Job window of SQL Server Agent:
BACKUP LOG [DB_NAME] TO DISK = N'path_to_backup_file' WITH NOFORMAT, NOINIT, NAME = N'JOB_NAME', SKIP, NOREWIND, NOUNLOAD, STATS = 10 GO
4. Settings for the resulting step:
* The syntax for full or differential data copies will be quite analogous - simply substitute LOG with DATABASE for a full backup. If you need to generate a differential copy, include WITH DIFFERENTIAL to the script:
BACKUP DATABASE TestDB TO diff_backups WITH DIFFERENTIAL; GO
In addition to transaction log backups, regular SQL database backups play a pivotal role in comprehensive data protection. AOMEI Cyber Backup, a reliable backup software, offers a user-friendly interface and robust features for SQL Server databases. It ensures the safety of your critical data by providing:
✤Easy-to-use: With the intuitive interface, it's easy to configure SQL backups without script. ✤Centralized Backup: Schedule backups of SQL server database and run it automatically. ✤Schedule Backup: Create backup schedules to automate backups daily, weekly, monthly. ✤Point-in-Time Recovery: It simplifies point-in-time recovery, enabling you to restore your SQL Server databases to specific moments in time.
Regular backups are a fundamental aspect of data protection strategies, especially for SQL Server databases. Therefore, click the following button to download the 30-day free trial:
*AOMEI Cyber Backup supports Microsoft SQL 2005-2022, including SQL Express.
1. Access to Source Device >> Add Microsoft SQL. If the database is present and the version is supported, it will be automatically detected. Otherwise, you can click Add Microsoft SQL >> Download proxy program. To do this, download the proxy program and install it on the device where SQL Server is located. Subsequently, choose Already installed proxy and designate the desired proxies for addition.
2. Click … >> Authentication to verify the database instance. You can make a choice between Windows Authentication or SQL Authentication. Input the credentials and click Verify.
3. Click Backup Task >> Create New Task, and select Microsoft SQL Backup as your backup type.
4. Configure the Device Name by specifying the SQL instance and the target database for backup. Depending on your needs, you have the flexibility to choose the number of databases for backup.
5. Define the Backup Target by specifying a local path or a network path. If the objective is to execute an SQL database backup to a remote location, you can click on Add a new network storage. The newly added path will be saved within the Add storage section.
6. Schedule (optional): Set up a schedule to run the SQL database backup daily/weekly/monthly. Additionally, you have the flexibility to specify the backup method as Full/Incremental/Differential.
7. Start Backup: You can choose to Add the schedule and start backup now or Add the schedule only and click Start Backup to executeSQL server automatic backup.
1. Go to the Backup Task section within the page, find the task linked to the restoration of the database, and select the … option, then choose Restore.
2. Select the specific version of the database backup that you want to restore. Subsequently, click OK.
3. Specify the destination where you want the restoration to take place. The default setting is to Restore to the original location.
To ensure data security, it is important to perform SQL Server traction log backups regularly. By combining transaction log backups with regular SQL database backups using tools such as AOMEI Cyber Backup, you can strengthen your data's ability to defend against potential threats.
Adopting these practices ensures the resiliency and recoverability of your SQL Server database, giving you peace of mind in an evolving data management environment.