Some users reported that they have different datacenters and clusters hosting numerous virtual machines. The users would like to export the virtual machines to excel sheet, but the process requires much time. Is there any easy way to achieve this?

It takes time to export list of VMs from vCenter when you need a quick inventory of the VMs in your vCenter with their IPs, Computer name, power on status & all these simple things. Is there any quick and easy way to do it?
In this article, I am going to show you the few easiest methods of doing this. If you love GUI, you can use VMware vSphere Traditional Client or VMware vSphere Web Client and if you are a command line lover, you can use VMware vSphere PowerCLI.

There are 3 ways to export the list of virtual machines to an Excel or Text file. This can be achieved using scripting language that vSphere support. And here I will also show you the steps to get a simple inventory of your VMs using VMware vCenter GUI & following it will show you how to get the Export list in vCenter file menu in business.
Manual export involves using built-in tools and features within the vCenter interface to generate and download a list of VMs. Here you are going to export list of VMs from vCenter.
1. Access to the “Inventory > VMs & Templates” in the vSphere inventory.
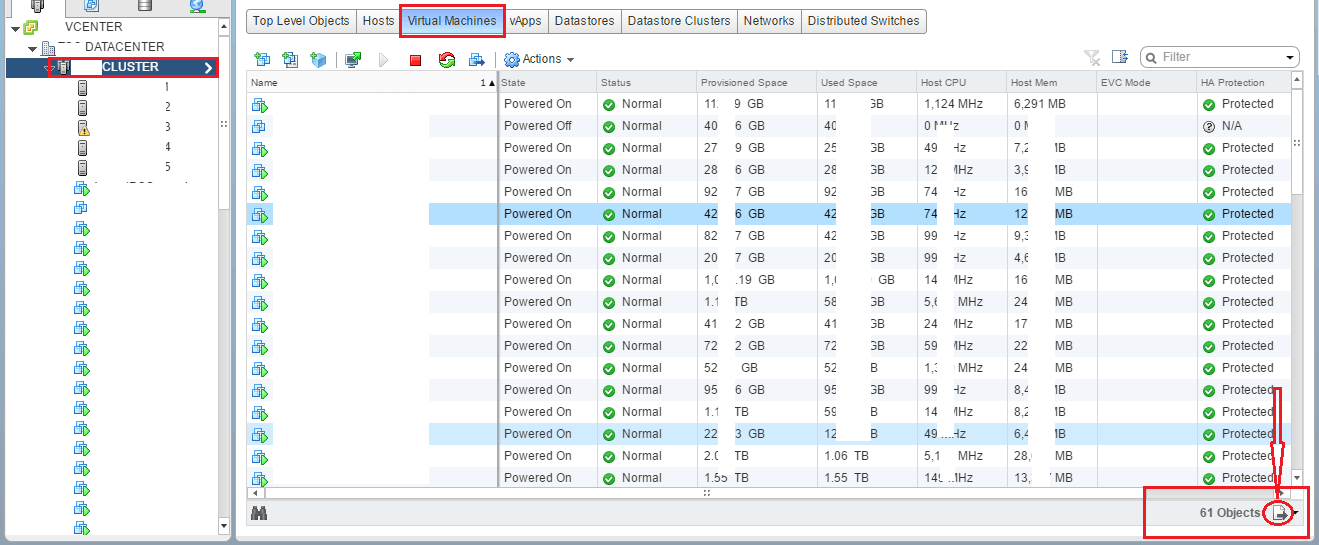
2. Click the “Virtual Machines” tab to show a list of all VMs. Make sure you have selected the top level vCenter in the Navigator tree on the left. Then select the paper with an arrow icon in the bottom right-hand corner of the screen.

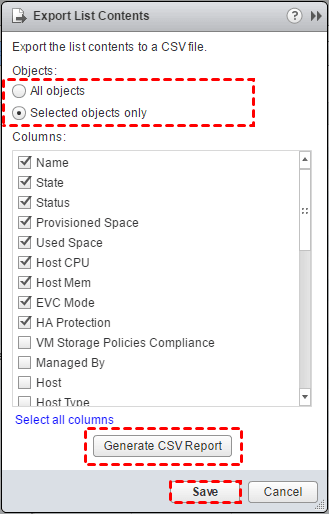
3. Select one or multiple objects or select all objects depending on your requirements. Check the "Name", "State", "Host", "Guest OS”, “IP Address”, “DNS Name”, “UUID”, “Datacenter”, and “Cluster” columns.

4. Click on “Generate CSV Report”, and after finishing generating the report, click “Save” button and enter the name of the vCenter followed by “-VMList”. E.g.
Exporting a VM list using the vSphere Client is straightforward and involves navigating through the inventory and using the export functionality.
1. Login to your vCenter Server using VMware vSphere Traditional Client > select your vCenter Server > navigate to “Virtual Machines” tab.
2. Select “File” > “Export” > “Export List…” option.
3. Enter a name for the file > choose a File Type and save the files at desired folder path.
You should open VMware vSphere PowerCLI and connect with your vCenter Server.
1. Type this command on the command prompt.
Get-VM | Export-Csv -path "d:\test.csv"
2. Press Enter to execute the command, and wait for the command to be completed successfully.
3. Go to your destination folder path, here should be having your VMs inventory in a CSV file.
Before you export all virtual machines from vCenter, it's recommended to backup vCenter virtual machine since the network outage or any accident can cause you to permanently lose important data.
If you have numerous virtual machines and want to export ESXi VMs safely, an automated backup solution is needed. AOMEI Cyber Backup, the cost-effective and centralized VMware backup software is a considerable choice.
This software can help you to do the followings easily.
✦ Automatic VMware Backup: Auto backup virtual machines on regular basis to protect VMware workloads continuously. ✦ Batch vCenter Backup: Batch add and backup large numbers of VMs managed by vCenter Server, or multiple VMs on a standalone ESXi host. ✦ Easy-to-use: Backup and restore multiple virtual machines via central console without complicated configuration and reinstallation. ✦ Role-Assignment: Allow one administrator to create sub-accounts with limited privilege, effectively reduce administration cost and manual errors. ✦ Instant recovery to new location: Restore VM from any backup point directly and quickly to a new host/cluster/datastore, eliminating the need to restore a full backup plus each subsequent backup point.
AOMEI Cyber Backup supports VMware ESXi 6.0 and later versions. Next, I will show you how to batch backup VMs managed by vCenter Server with AOMEI Cyber Backup. You can click the following button to download the software.
*You can choose to install this VM backup software on either Windows or Linux system.
1. Bind Devices: Access to AOMEI Cyber Backup web client, navigate to Source Device >> VMware >> + Add VMware vCenter or Standalone ESXi host. And then click … >> Bind Device.
2. Create Backup Task: Navigate to Backup Task >> + Create New Task, and then select VMware ESXi Backup as the Device Type. Set Task Name, Device, Target, Schedule, and Cleanup as need.
Created backup tasks will be listed and monitored separately, for restoring, progress checking and schedule changing.
3. Backup the main screen, click Restore to perform instant VM recovery when the original virtual machine corrupted. When restoring, you can also restore to new location to create a new VM in the same or another datastore/host directly from the backup, saves the trouble of re-configuring the new VM.
Within several clicks, you can simply obtain a secure backup of multiple virtual machines, and restore VM timely. It helps you migrate VMs with this cost-effective data protection solution.
You could follow the instructions in this article to export the list of VMs from vCenter environment. Here are 3 ways for you to generate all VM inventory report including using commands, vSphere Client and vCenter Web Client.