Some users have reported that when they have to cancel a task via vCenter or ESXi UI, but it just stays there hanging and nothing further happens. Did you also experience such a dilemma?

Force canceling a task means to stop a running task and its sub-tasks from occurring immediately.
Sometimes you see that a certain virtual machine on the VMWare ESXi host freezes and it’s impossible to turn off or restart it from via from vSphere console by any means.
For example, you need to shut down a virtual machine with huge snapshots, but it requires +20 hours to cancel the task. You could not wait that long to power off/on the machine again, so you had to do something. But you can't cancel the task from the vSphere Client.
While the Web clients weren’t really helpful in that case, you can cancel this task using ESXi command line.

Note: Interupting certain tasks, for example snapshot consolidations or Storage vMotions, can lead to issues or corrupted VMs. So only do this if you don’t have any alternatives and need the task to be canceled. And better have a VM backup at your hand.
When you log in to vCenter, and click the cancel button next to the progress bar in the Status column for the task you want, but it doesn’t work. Here, it shows the process to force kill a VMware VM for example. First you need to determine on which ESXi host the hung virtual machine is running.
1. Log in to the ESXi host and enable SSH from the vSphere interface. Click on the ESXi host name, go to Configure > Services > SSH > Start.
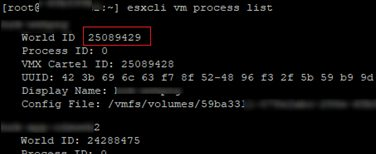
2. Connect to this host via SSH using the putty client and run the esxcli command to kill vm process.
List the VMs running on the ESXi host, and copy the “World ID” of the specific virtual machine.

3. You can stop the frozen virtual machine using the PowerCLI (when connecting to vCenter you don’t need to find the hostname on which the VM is running and enable SSH shell on it). Check that the VM is running:
Force stop the VM process with the command:

Afterward you can check in the task info whether the task has been canceled successfully.
Make sure that there are no active snapshots, backups, and similar tasks for VM, and VM is not in the “Virtual Machine disks consolidation is needed” state. Otherwise, you can break your VM and you will have to restore VM from backup.
When you force canceling a task, it’s risky to pose your virtual machine data into danger. Data is the lifeblood of any organization, losing data can lead to serious damage and interrupt business operations. Therefore, it is critical to back up your VMs regularly.
To offer complete VM protection, many IT staff prefer a specialized backup software such as AOMEI Cyber Backup, a VMware backup software, which is professional and reliable for virtual machine backup.
With AOMEI Cyber Backup, you can enjoy these features easily.
✦ Image-level VM Backup: Creating independent image-level VM backups can be used to create new VMs. ✦ Batch vSphere Backup: Batch backup large numbers of VMs managed by vCenter Server, or multiple VMs on a standalone ESXi host. ✦ Schedule Auto Backup Plan: Schedule VM backups to automate virtual machine protection. ✦ Restore Entire VM: Immediately restore available VMs from any selected restore points.
AOMEI Cyber Backup supports VMware ESXi 6.0 and later versions. Next, I will demonstrate how to perform backup of multiple VMware ESXi VMs. You can click the following button to download the 30-day free trial.
1. Bind Devices: Access to AOMEI Cyber Backup web client, navigate to Source Device > VMware > + Add VMware Device to Add vCenter or Standalone ESXi host directly. And then click … > Bind Device.
2. Create Backup Task: Navigate to Backup Task > + Create New Task, and select VMware ESXi Backup as the Backup Type.
3. Set Task Name, Device, Target, Schedule, and Cleanup as needed.
▶ Device: Navigate to the vCenter Server and select a datastorecenter, it will show all the VMs in the right pane. With one click, you can easily backup multiple virtual machines.
▶ Target: Select to back up to a local path, or to a network path. Used paths will be saved in Favorite Storage for handy selection.
▶ Archive (optional): Add an Amazon S3 storage and archive VMware Backup versions to this S3 storage.
▶ Schedule (optional): Perform full, differential or incremental backup, and automate execution daily, weekly or monthly according to the frequency you specified.
▶ Backup cleanup (optional): Configure a retention policy to auto delete old backup files and save storage space.
▶ Run Backup: Select to Add the schedule and start backup now, or Add the schedule only, and click Start Backup.
Created backup tasks will be listed and monitored separately, for restoring, progress checking and schedule changing.
4. Restore: Click Restore to recover a virtual machine from backup, saving the trouble of re-configuring the new VM.
✔ Once the backup task is created, it will be executed automatically according to your schedule. If you want to restore a virtual machine, you can click Restore and choose to restore entire VM to an available state from any historical restore point. ✔ In addition to restoring a VM to its original location, you can also choose Restore to new location, which will create a new, identical VM directly from your backup to the target location.
The vSphere Client displays the task with "The task was canceled by a user." status. This article introduces the steps to cancel task in vCenter. The vCenter Server system or ESXi host stops the progress of the task and returns the object to its previous state.