Are you tired of constantly having to enter multiple usernames and passwords just to access your virtualization environment? Let’s streamline your virtualization authentication with vCenter SSO.

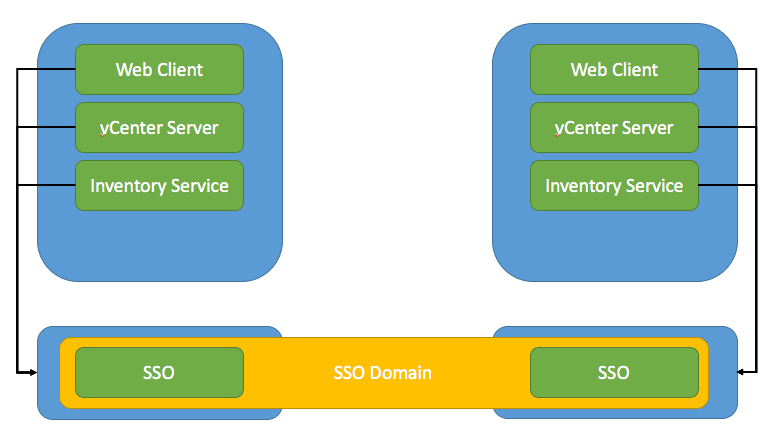
vCenter SSO (Single Sign On) is a component of VMware vCenter Server that provides a secure authentication and authorization mechanism that allows users to access multiple vCenter Server instances and related services through a single authentication.
The components of vCenter SSO concretely include the Security Token Service (STS), administration server, identity management service, and the VMware Directory Service (vmdir).

vCenter SSO allows vSphere components to communicate with each other through a secure token mechanism which will greatly improve the security of your output environment.
Moreover, the VMware vSphere suite is integrated with vCenter through the SSO authentication mechanism. This allows you to use SSO to control or grant permissions to resources across the suite and offers the following services:
1. Unified authentication: By using vCenter SSO, users can access multiple vCenter Server instances and related services with a single login, eliminating the need to enter a username and password each time.
2. Security: It provides a secure authentication and authorization mechanism that ensures that only authenticated users can access protected resources.
3. Multi-domain support: It also supports cross-domain access for users and groups across multiple domains, making it easier to manage vCenter Server across multiple security domains.
4. Centralized management: It provides a centralized management interface that makes it easy to manage users, groups, certificates and other security-related configurations.
In simple terms, vCenter SSO provides a unified authentication and authorization mechanism that greatly simplifies the process of managing multiple vCenter Server instances and associated services, thus improves security and protect your environment.

If you need configure a vSphere SSO domain in vCenter, here are the steps for you. Please deploy the vCenter server at first, because the deployment of vSphere SSO is handled by the platform services controller at the time of vCenter server installation.
Step 1. When you deploy vCenter server, follow the steps, finish vCenter Server configuration >> SSO configuration. Click Create a new SSO domain, and you can set the SSO domain name and SSO password here.
Step 2. Add an active directory domain: Navigate to Single Sign On >> Configuration >> Identity Provider >> Active Directory Domain, then click JOIN AD to add the active directory domain as a vCenter SSO domain.
Step 3. Input the domain name, and select the Organization Unit (optional). Then input your Username and Password, and click JOIN to reboot VCSA.
Step 4. Identity provider: Go back to Sigle Sign On >> Configuration >> Identity Provider, click Identity Sources and choose the available identity source as you want, and click Add.
Step 5. Manage users and groups: In Single Sign On, click Users and Groups >> Users, select a domain which can be a default vSphere local domain or an active directory domain which can be used as a vCenter SSO domain. Then click ADD to add a new user for the selected domain and save your settings.
In Single Sign On, click Users and Groups >> Groups, and click ADD MEMBERS to assign the permissions to groups and add multiple users to groups.
Step 6. Input Group Name and Description. Then select domain from Add members which can be vSphere local domain or an active directory domain and click SAVE.
Both from a personal perspective and from an enterprise perspective, SSO simplifies the user authentication process for applications and makes it easier to access protected resources. But there are no shortcuts to resource and data protection, and you'll have to put in a little effort if you want to keep your data secure.
AOMEI Cyber Backup is a VMware backup software that allows you to back up multiple running virtual machines, either managed by vCenter Server or on a separate ESXi host. It can reduce the effort you need to put in, because the steps are so simple that it will not take no longer than 10 minutes to download AOMEI Cyber Backup and add VMs from VMware vCenter or ESXi host in the centralized web console.
Agentless Image Backup: Create independent and image-based backup for VMware ESXi and Hyper-V VMs. Support Free ESXi: Support both paid and free versions of VMware ESXi. Various Backup Methods: Besides full backup, you can perform incremental or differential VM backup to capture only changed data and save storage space. Automated Backup: You can configure a backup schedule. This software will automatically run backup task according to the schedule. For example, you can run full backup, incremental backup, differential backup daily, weekly, or monthly. Restore from Any Point: Restore a whole VM to a usable state from any history backup version.
And here are the steps on how to quickly back up virtual machines managed by vCenter after installing:
Step 1. Access to AOMEI Cyber Backup web client, select Source Device, click VMware >> +Add VMware Device. Then Add vCenter or Standalone ESXi to add a host. And then click … to Bind Device.
Step 2. Navigate to Backup Task and Create New Task. Then select VMware ESXi Backup for Backup Type. After that, set the Task Name, Device, Target, Schedule and Cleanup according to your need.
Step 3. Click Start Backup and choose Add the schedule and start backup now or Add the schedule only.
Step 4. When the backups are completed, it is easy to restore VM from backup. Navigate to Start Restore >> Restore to, you can change restore location here to create a new VM or another datastore/host. If you choose to Restore to a new location, it can help you avoid the hassle of reconfiguring the new VM by creating it directly from the backup.
Many people may wonder whether SSO is secure or not. About this, the answer is yes. For now, SSO is an advanced and desirable solution. SSO can help organizations manage user access to enterprise applications and resources, improving convenience as well as security.
However, I would like to remind you that SSO reduces the risk of security incidents against passwords. Your data security is best protected by backup, and AOMEI Cyber Backup is a good choice for you.