Veeam instant recovery write cache folder plays a crucial role in managing changes made to the VM during Instant Recovery.

The write cache folder is a temporary storage area used by Veeam Backup & Replication during the Instant Recovery process.
When a VM is recovered using Instant Recovery, it runs directly from the backup file rather than from production storage. Since the backup file itself is read-only, any new data generated by the running VM, or any changes made to the VM’s state, cannot be written back to the backup file. Instead, these changes are redirected to the write cache folder.

By default, Veeam stores the write cache on the Veeam Backup Server or a specified backup repository. Users can configure the location of the write cache folder to suit their performance and storage needs. Here are some guidelines on where to place the write cache folder:
To specify or change the location of the write cache folder in Veeam, follow these steps:
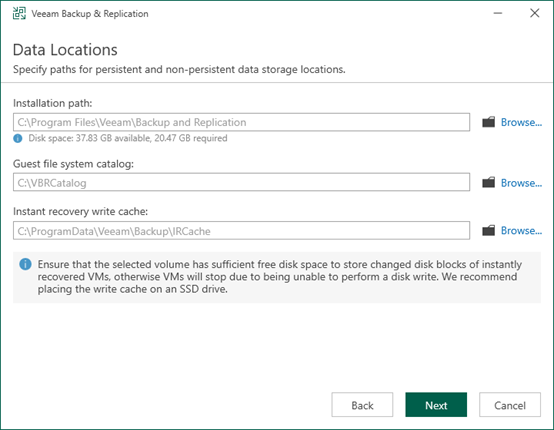
1. To change the default installation folder, click Browse next to the Installation path field.
By default, the setup wizard uses the following installation folder: C:\Program Files\Veeam\Backup and Replication.
2. To change the path to the folder where index files will be stored, click Browse next to the Guest file system catalog field.
By default, the setup wizard creates the VBRCatalog folder on a volume with the maximum amount of free space, for example: C:\VBRCatalog.
3. [For VMware environments] The instant recovery cache folder stores the write cache for machines that are started from backups during recovery verification or restore operations. To change the path to the IR cache folder, click Browse next to the Instant recovery write cache field. Make sure that you have at least 100 GB of free disk space to store the write cache.
By default, the setup wizard creates the IR cache folder on a volume with the maximum amount of free space, for example: C:\ProgramData\Veeam\Backup\IRCache.
* You do not need to configure this data location for Microsoft Hyper-V environments.

You may start seeing alerts in the Veeam Backup & Replication console, indicating that the cache limit has been exceeded.
In Veeam Backup & Replication, if backup cache size limit is exceeded, Veeam starts prioritizing which data to retain, potentially overwriting the oldest data to make room for new backup data.
Option 1: Restart the Backup Cache Sync
Right click on the Veeam Agent icon and select Pause Sync.
Option 2: Delete Restore Points from the Backup Cache Manually
1. Open the Backup Cache > View cache. Alternatively, select Control Panel to open the Veeam Agent for Windows. Hover over the name of the job that created restore points in the backup cache and select Open backup cache.
2. In the Backup Cache view, click Delete Cache.
3. In the window notifying that restore points will be deleted from the backup cache, click Yes.
Instead of waiting for a complete restore process that can take hours or even days. AOMEI Cyber Backup enables businesses to quickly restore an entire system or individual virtual machines (VMs) directly from a backup file. With this instant recovery software, you can easily
Note: * The instant restore feature is applicable to backup points of ESXi virtual machines. AOMEI Cyber Backup must be installed on Windows Server * 2012 or higher versions of the operating system. * The backup points of the virtual machine must be stored on the local disk.
Step 1. Create VMware ESXi VMs Backup and then start VM instant recovery.
Step 2. Create New Instant Restore as following:
✐ Click "Task" > "Instant Recovery" > "New Instant Recovery". Here we take "Restore from task" for an example.
✐ Select Source and choose the virtual machine and backup version.
✐ Select the device to be restored to in "Restore to". Choose the target device.
✐ Set the hardware settings for the new virtual machine, such as CPU quantity, CPU Cores and memory size.
✐ Enter a name for the new virtual machine.
✐ Click "Start Restore" to start the instant restore.
Step 3. After creating vm instant recovery, start the migration process timely by selecting “Migrate Virtual Machine” from the task menu or details page to resume normal business operation.
AOMEI Cyber Backup’s instant VM recovery is especially useful for businesses that rely on virtualized environments, as it allows them to avoid significant downtime during the recovery process.
The Veeam Instant Recovery Write Cache Folder is essential for handling write operations during Instant Recovery, allowing businesses to rapidly recover VMs while maintaining data integrity.