Performance is crucial when it comes to any production environment. Do you may find that your virtual machine running slow in Hyper-V environment? To ensure the best performance possible when running workloads, what you should do to optimize Hyper-V performance.

You may find that virtual machines usually run slower than physical machines, because it depends on the hardware device of the physical machine and requires a proper configuration. If your virtual machine does not have a good processor or enough RAM, it may run slower and slower in Hyper-V.
Besides memory and processor, many factors can cause a Hyper-V virtual machine to run very slowly, such as insufficient resources allocated, host overloaded, etc.
So in this post, I'll introduce some commonly used operations to optimize Hyper-V performance and speed up your VMs. You can try them one by one.

If your virtual machine runs slowly in Hyper-V, you can try the following methods to optimize Hyper-V performance one by one:
Tip 1. Assign and monitor RAM properly
Tip 2. Use fixed VHD files
Tip 3. Add more virtual processor
Tip 4. Choose Generation 2 and 64-bit guest Oss VM
Tip 5. Enable Hyper-V Integration Services (Guest services)
Tip 6. SSD instead of HDD
Tip 7. Close unnecessary applications
The next section will describe several methods to optimize Hyper-V performance and increase the speed of running virtual machines.
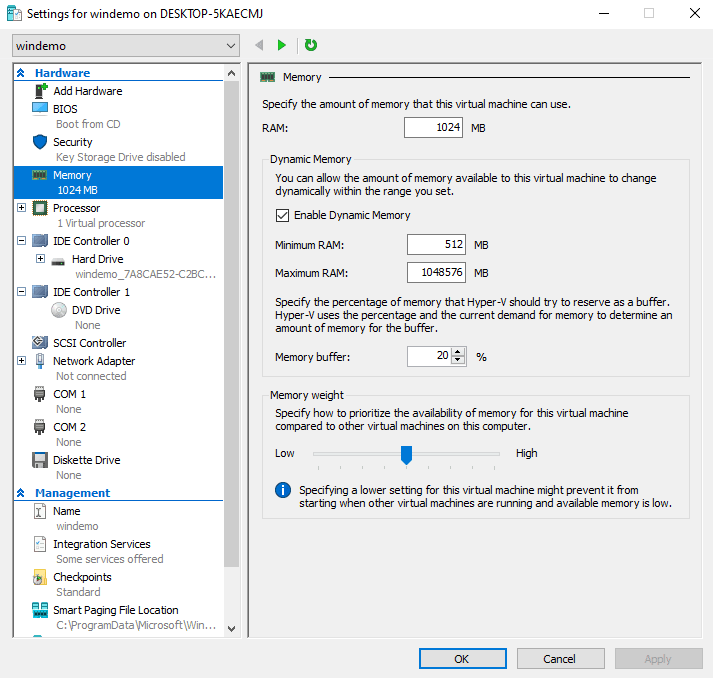
It is very important to allocate and manage Hyper-V memory correctly. If you assign less memory than needed to your virtual machine, your Hyper-V virtual machine will run very slowly when Hyper-V virtual machine run out of memory.
If you are using Dynamic Memory that will automatically resize memory based on the requirement of VM, you should monitor the consumption of memory. Although it’s convenient and flexible, it’s possible to run out of VM memory silently, which will poor Hyper-V performance.
Besides, according to the priority of the VM, you could allocate more memory to the higher-weighted virtual machine to run your workload properly.

To improve Hyper-V VM performance, you should know your RAM requirements and configure dynamic memory properly for each virtual machine.
Tips: Hyper-V checkpoint should not be used as backup since it depends on parent disks. If the VM is damaged or deleted, Hyper-V checkpoints will be lost as well. Besides, checkpoints are running out of Hyper-V memory very fast.
In Hyper-V, when creating VMs, you should know that dynamically expanding disks are slower than fixed size disks since dynamically expanding disks will cause disk fragmentation and require additional processing of disk read and write accesses.
However, for fixed size disks, disk fragmentation does not easily occur. Because if you delete a file on it, it will be marked as write-over so that the newly created file can be stored over it. So, if you have enough storage space and want higher performance, it’s recommended to use fixed VHD files.
Make sure the processors that are configured with the Hyper-V host support Second Level Address Translation (SLAT) and Extended Page Tables (EPT), additionally Nested Page Tables (NPT).
Virtual machine requires an ample amount of processing power. If you are running Windows 11 OS, it needs more higher requirements on processor.
Access to Hyper-V Manager >> VM >> Settings >> Processor, then increase the number of virtual processors, and click OK.
When creating a Hyper-V virtual machine, you need to choose the VM type as Generation 1 or Generation 2. If you are using Gen 1 VM, it’s recommended to convert your Generation 1 VMs to Generation 2 since it offers better performance for Hyper-V VMs.
1. Load VMs from the SCSI controller. Gen 2 can boot from SCSI virtual disks without any restrictions or conditions than loading the VM from the IDE controller (used in Generation 1).
2. Gen 2 VM is based on the VMBUS and VSP / VSC architecture of the boot level, which significantly increases the overall VMs performance.
Moreover, in many cases, a 64-bit guest OS provides more additional memory space than a 32-bit one. Thus, if you want to increase the overall memory speed and improve VM performance, it is better to deploy a 64-bit OS, although not obligatory.
Hyper-V Integration Services is a suite of special drivers and utilities used to improve the performance of guest operating systems running inside a Hyper-V VM. It is recommended that you enable Hyper-V Integration Services on both the Hyper-V host and all guest OSs.
On newer Windows operating systems, integration services are almost always enabled except for the guest service. If your virtual machine is running an older Windows OS, you need to check if integration services are enabled.
The reason most people replace their HDD drive with an SSD is to optimize Hyper-V performance. The best way to increase the storage speed is to consider utilization of fast disks such as SSDs. Depending on the task at hand, SSDs can be up to 10 times faster than their HDD counterparts.
When working with multiple VMs at the same time, it can be difficult to monitor every single application you open. However, if you leave them running for too long, they start consuming available system resources, which eventually affects the overall VM performance. Be ready to close Virtual Machine Connection Window, Hyper-V Manager, and any other application window if you have completed the task and you don’t need them anymore. This is a simple yet effective way to improve VM performance.
Meanwhile, creating too many VMs on the same Hyper-V host will slow down the virtual machine in Hyper-V. So to optimize Hyper-V performance, you should delete the useless VMs so that they are no longer consuming available hardware resources and overloading your Hyper-V host.
In the process, backup is necessary to avoid data loss in Hyper-V VM. You can regular backup VM data to save VM storage and resource. It also safeguards VM data in case of any disaster or malware attack.
Just like your physical machine, virtual machines tend to go through a process of performance deterioration. It starts out running slowly, then gets slower and slower, and one day it suddenly goes down and your important data and business can be destroyed. To prevent such situations, the safest way is to backup beforehand.
AOMEI Cyber Backup is a free Hyper-V backup tool that was designed to back up Hyper-V with flexible backup strategies and restore the Hyper-V VM within a few clicks. The reliable backup tool protects VM data continuously and reduces business downtime.
With this professional backup software, you can benefit a lot from these features.
Perpetual Free: no time limit for AOMEI Cyber Backup Free Edition. Easy-to-use: Backup and restore the entire VM only based on a few clicks without any complicated configuration. Automate VM Backup: Schedule VMware ESXi / Hyper-V backups to run the backup task automatically, reducing the human errors and offering regular backups. Fast Recovery: The recovery process is based on several clicks without installing or configuring any complicated programs or applications. Centralized VM Backup: Backup multiple Hyper-V / VMware virtual machines at host level without installing agent on each VM, and simply manage the tasks though central console.
Please hit the button below to download and use AOMEI Cyber Backup for free:
*You can choose to install this VM backup software on either Windows or Linux system.
1. Click Backup Task >> Create New Task to schedule Hyper-V backups.
2. In the wizard, enter the Task Name and select Hyper-V Backup.
✦ In Device Name section, select virtual machines on the Hyper-V host.
✦ In Target section, specify a location to store VM backups such as network or local place. You can easily backup VM to NAS.
✦ In Schedule section, enable schedule task and choose full/incremental backup, then specify backup time and frequency as daily/weekly/monthly.
✦ Click Start Backup. From the drop-down menu, you can decide to perform backup later or now.
3. Click Restore. You can restore the VM to its previous status fast and easily.
✍ While the Free Edition covers most of the VM backup needs, you can also upgrade to Premium Edition to enjoy: ✦ Batch VM backup & restore: batch backup and restore large numbers of VMs managed by vCenter Server or on standalone ESXi hosts. ✦ Backup Cleanup: Configure retention policy to auto-delete the old backup files and save storage space. ✦ Restore to new location: Easily make a clone of a virtual machine in the same or another datastore/host, without reinstalling or configuring a new VM.
Regular backups can effectively avoid the possibility of losing data due to memory exhaustion. AOMEI Cyber Backup allows you to protect your business from threats by running VM backups automatically. With the auto cleanup plan, it also saves storage space and cost for multiple virtual machines.
Running a virtual machine may slow down your host computer because the virtual machine consumes the CPU resources all the time. So this article introduces multiple methods to solve virtual machines running slow in Hyper-V and in what ways you can optimize Hyper-V performance.
In addition, an effective Hyper-V backup solution can protect virtual machine data from security threats.