VMware VM settings could be modified to meet new demands. If you find that your VMware cannot edit VM settings, the methods described in this article can help you troubleshoot safely requires performing a troubleshooting as introduced in this article.

Case: VMware cannot edit VM Settings
I have deployed a VM from a template and I was trying to edit the VM settings in VMware (Note: VM is powered off) but I can't it is greyed out. I tried to migrate the VM to another ESXi host even migrate option is also greyed out and also delete from disk and remove from inventory is also greyed out. Can anyone suggest me on this please?
In most cases, you can reconfigure a VMware virtual machine to meet new performance demands. For example, in vSphere Client, you can right-click the VM and select the Edit Settings to modify VM’s CPU and memory resources, configure VM options, add or remove virtual hardware, etc.
However, in the case above, if you fail to edit virtual machine settings, it may cause inconvenience to your work. The reasons of unable to change VM settings in VMware varied, which may be the followings:

If you are not sure of the specific cause, you can refer to the methods below to troubleshoot this issue.
If you find that the virtual machine options are grayed out and you cannot edit VM settings in VMware vSphere Client, you can try the following methods one by one to troubleshoot the error.
☞ Check if the permissions of VM are not set correctly
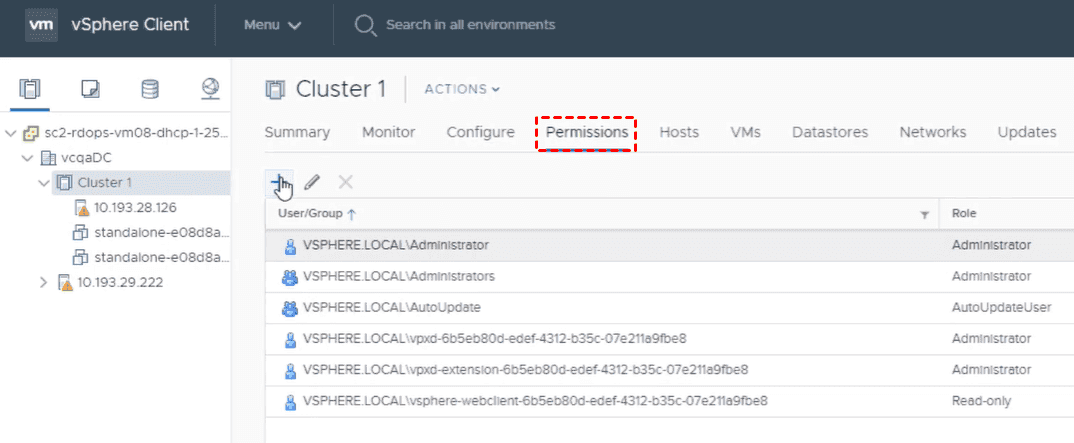
1. Check the permissions on the virtual machine. In vSphere Client, select the virtual machine, and click the Permission option. Ensure that sufficient permissions are applied to the user/group.

2. If permissions are defined at a host, cluster, datacenter or vCenter level, apply the required permissions to the user or group to edit the virtual machine settings.
☞ Check if there are virtual machine tasks running in the background
If there are virtual machine tasks running in the background, you are unable to edit VM settings in VMware. To check if other virtual machine tasks are running in the background:
1. Log in to the ESXi host using SSH or on the console.
2. List all registered virtual machines by running the command:
3. To check tasks running on the virtual machine, run the command:
Note: If a task is running on that virtual machine, you see output listing the tasks. For example: (ManagedObjectReference) ['vim.Task:haTask-8-vim.VirtualMachine.createSnapshot-534613324', 'vim.Task:haTask-8-vim.VirtualMachine.powerOn-534613303'] Note: Wait for the task(s) to finish before performing operations on the virtual machine. If there is no task running on that virtual machine, you see output: (ManagedObjectReference) []
☞ Check if the .vmx file is corrupted
The .vmx file associated with the virtual machine may be corrupted. The .vmx file size displays as zero and the content may be garbled or empty. So you need to repair the corrupted .vmx file.
☞ Check if there are invalid arguments in the .vmx file
It’s recommenced to make a backup of the .vmx file before modifying it. For example, you can export VM including its .vmx file.
To check if the .vmx file contains blank lines or invalid arguments:
1. Open the .vmx file using a text editor.
2. Search for any blank lines and delete them. You can press d twice to delete a line using vi editor.
3. Compare the .vmx file with a working virtual machine .vmx file and see if there are any invalid arguments. If so, you can correct them accordingly.
4. To apply the changes, reload the .vmx file by running the command:
Note: The default location of the .vmx file: /vmfs/volumes/name_of_the_datastore/VM_name/VM_name.vmx
After you have upgraded ESXi to 5.5, you may have an error message: You cannot use the vSphere Client to edit the settings of virtual machines of version 10 or higher.
In order to fix this error, you should downgrade your virtual hardware to 8 or lower, then change the VM settings in vSphere Web Client.
Note: This operating is irreversible, which will make your virtual machine incompatible with earlier versions of VMware software products. It is recommenced that you make a backup of your disk before proceeding.
1. Power off the virtual machine, then right-click it and select Remove from Inventory.
2. SSH into ESXi.
3. cd /vmfs/volumes/datastore1/testvm
4. Locate virtualHW.version. For example: virtualHW.version = “10”
5. Change the value to 8. For example: virtualHW.version = “8”
6. Register this VM back into Inventory with command:
As we mentioned above, when you cannot edit VM settings or need to make big changes to your virtual hardware, you should always make a VMware backup to protect VM from data threats.
When the virtual machine suddenly crashes or you need to perform some dangerous operations on a virtual machine, you are required to back up your virtual machine first. It aims to avoid irreversible data loss, which will cause great damage to your work or even threaten the development of the enterprise.
Here, you may need a reliable backup tool to protect your increasing VM data automatically. AOMEI Cyber Backup, a free backup software, is able to backup VMware virtual machines automatically and offers flexible backup strategies to meet your requirements. With its recovery feature, you can restore a VM easily and quickly when your original VM cannot be opened.
It allows you to back up virtual machines at host level from the centralized console, which simplifies VM backups and managements. With AOMEI Cyber Backup, you can benefit from these features:
Perpetual Free: no time limit for AOMEI Cyber Backup Free Edition. Support Free ESXi: support both paid and free versions of VMware ESXi. Easy-to-use tool: Based on several clicks, you can easily backup and restore VMs. Auto VM Backups: It created full/incremental/differential backups for multiple VMs to save time and reduce manual errors. Instant VM Recovery: You can restore entire VM from any backup version when the original VM is damaged, and the process doesn't require complicated configuration and reinstallation. Role-Assignment: allow one administrator to create sub-accounts with limited privilege, effectively reduce administration cost and manual errors.
AOMEI Cyber Backup simplifies a complete backup task, and next I will demonstrate how to create one. Please download the free edition:
*You can choose to install this VM backup software on either Windows or Linux system.
1. Access to AOMEI Cyber Backup and enter your credentials to Add vCenter or Standalone ESXi host.
2. Click Task >> Backup Task >> Create New Task to start creating the reliable task.
3. Enter backup Task Name, and select VMs and target location according to 3-2-1 backup rule. It's convenient to store VM files to network or local place securely.
◆To customize a backup schedule, select Backup Method as full/incremental/full, and its Backup Type as daily/weekly/monthly.
◆Click Start Backup and wait it to complete. The created tasks will be listed in the Backup Task tab, you can check its status or restore VMs from it any time you need.
4. When necessary, click Restore to achieve fast recovery from any backed-up history version.
✍ While the Free Edition covers most of the VM backup needs, you can also upgrade to Premium Edition to enjoy: ✦ Batch VM Backup: Batch backup large numbers of VMs managed by vCenter Server or standalone ESXi hosts. ✦ Backup Cleanup: Configure retention policy to auto delete the old backup files and save storage space. ✦ Restore to new location: Easily make a clone of a virtual machine in the same or another datastore/host, without reinstalling or configuring a new VM.
It only requires several steps to create multiple VM backups and run it automatically, which safeguards virtual machine data automatically and keep business continuity all the time.
In this article, I have introduced how to troubleshoot the issue of VMware cannot edit VM settings. By changing virtual machine settings, it allows virtual machines to meet your work requirements better.
Besides, to avoid data loss due to being unable to change VM settings, you should make a virtual machine backup.