VMware, a leader in virtualization technology, offers a powerful solution to seamlessly convert physical machines into virtual ones. Please read this article to know more about the conversion process.

Virtualizing physical machines offers a range of key features and benefits that can significantly improve IT infrastructure management, flexibility, and efficiency. Here are some of the most notable features and advantages:
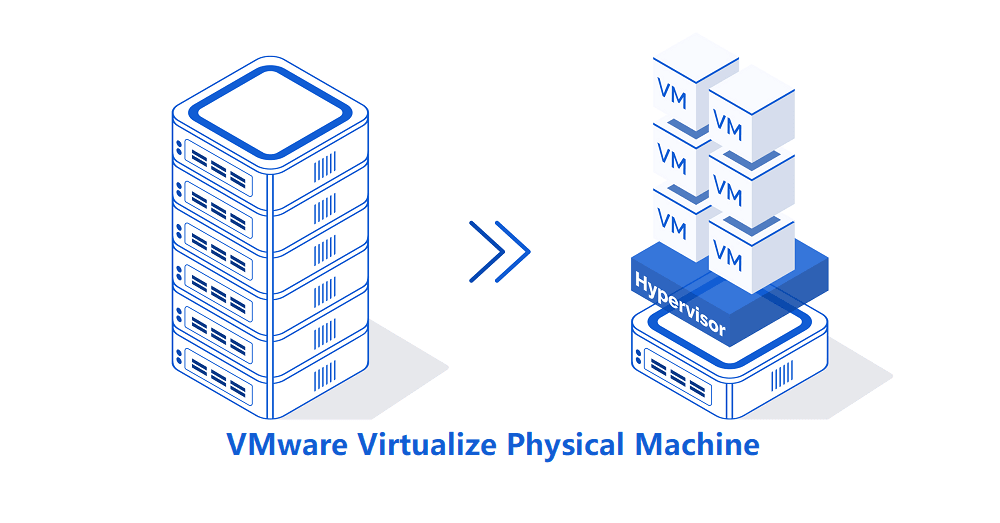
It involves several steps to convert physical machine to virtual VMware, and you can use the VMware vCenter Converter tool to simplify this process. Here are two methods about how VMware virtualize physical machine:
1. Open VMware Workstation, then navigate to File >> Virtualize a Physical Machine.
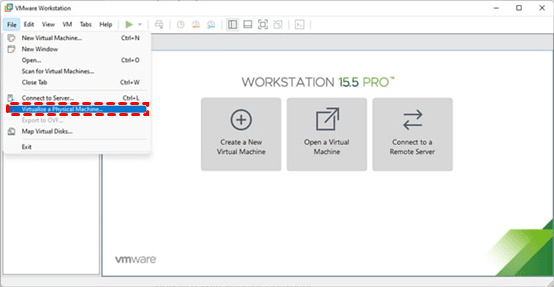
Note: If Converter is not yet installed, the conversion feature installation prompt will appear the first time you use it.
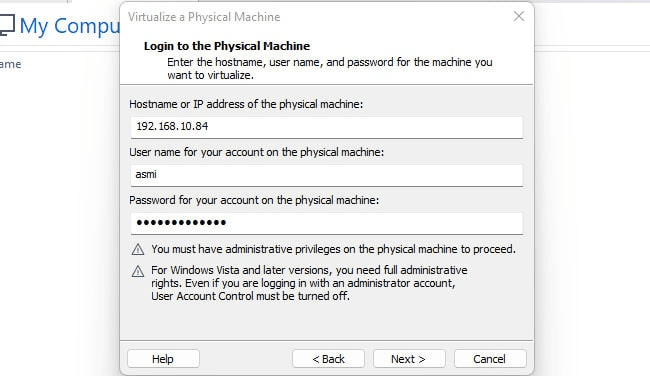
2. Upon completing the installation, to connect VMware workstation virtual machine to physical network, once again select File >> Virtualize a Physical Machine within VMware Workstation.
3. Provide the IP address or hostname of the target machine, along with the username and password, and click Next.
4. If a security certificate prompt appears, select Connect Anyway.
5. Assign a name to the new virtual machine and specify the preferred storage location for its files.
6. Enter the username and password of the host machine and click Finish.
✍ To confirm the successful conversion: 1. Go to File >> Open and navigate to the directory where the virtual machine files are stored. 2. Select the .vmx file corresponding to the new virtual machine and click Open. 3. Power on the virtual machine.
1. Open vCenter Converter Standalone and choose Convert Machine. Alternatively, you can go to File >> New >> Convert Machine.
2. From the Select source type menu, select Powered on. The "Powered off" option is used for converting existing VMs to VMDK, which isn't relevant for our current task of virtualizing a physical machine.
3. In the Specify the powered-on machine section, choose This Local Machine, and click Next for this tutorial. The other options allow you to convert a remote machine by specifying its IP address and credentials.
4. From the Select Destination Type menu, select VMware Workstation or other VMware virtual machine.
5. In the Select VMware product menu, select the appropriate version of VMware.
6. Assign a name to the VM, click Browse to specify the location for saving the VM, and confirm your selection.
7. If you want to specify the partitions to convert, click on Edit in the Data to Copy. Alternatively, click Next if you don't need to specify partitions.
8. Review the conversion parameters one last time, and if you’re satisfied, click Finish.
When you've successfully converted physical machines into virtual ones using solutions like VMware, such as those we've discussed, it's crucial to ensure the ongoing protection and security of these VMs. This protection extends beyond the conversion process and is an essential part of maintaining a resilient and reliable IT infrastructure.
AOMEI Cyber Backup, a professional VMware backup software, steps in as a reliable solution, offering data protection, backup, and recovery features tailored for VMware environments. It provides:
◆Support Free ESXi: Support both paid and free versions of VMware ESXi. ◆Agentless Image Backup: Create independent and image-based backup for VMware ESXi and Hyper-V VMs. ◆Auto VM Backup: Run multiple VM backups automatically without human intervention and business downtime. ◆InstantRecovery: Once the VMware crashes, quickly restore VMware to normal state and reduce business-critical downtime. ◆Perpetual Free: You can use AOMEI Cyber Backup Free Edition with no time limit.
AOMEI Cyber Backup supports VMware ESXi 6.0 and later versions. Here I will demonstrate how to backup VMware ESXi VMs and then restore them with ease. Click the following button to download the 30-day free trial.
*You can choose to install this VM backup software on either Windows or Linux system.
❇ Simple steps to back up VMs:
Step 1. Access to AOMEI Cyber Backup web client, select Source Device, click VMware >> +Add VMware Device >> Add vCenter or Standalone ESXi. And then click … to Bind Device.
Step 2. Create Backup Task: Navigate to Backup Task >> Create New Task. Then select VMware ESXi Backup for Backup Type. After that, set the Task Name, Device, Target, Schedule and Cleanup according to your need.
Step 3. Click Start Backup and choose Add the schedule and start backup now or Add the schedule only.
❇ Easy steps to restore from backup:
Step 1. Once your backups have been successfully completed, initiating the process to restore VM from backup is straightforward. Navigate to the Backup Task section, then click ... and choose the Restore option to commence the VMware data recovery operation.
Step 2. Within the Restore menu, select the specific VM you wish to restore, and then confirm your selection by clicking OK.
Step 3. You have the flexibility to decide whether you want to restore to original location or new location. If you choose to Restore to new location, you can change the RAM and Vital Processor according to your needs.
AOMEI Backupper provides a user-friendly interface and various backup and recovery options to protect your physical machine's data and system. It's essential to regularly schedule backups to ensure your data is safe in case of unexpected events or system failures.
Now download AOMEI Backupper to have a try:
Step 1. Click Backup and then choose the item you want to backup. Here we take File Backup as an example.
Step 2. Choose Add File/Add Folder as the source.
Step 3. Then choose the destination. You can choose to backup to your disk, a USB flash drive, network or a cloud drive.
Step 4. Confirm your settings and click Start Backup.
VMware virtualize physical machine brings a plethora of benefits to the table, from resource optimization to cost savings and flexibility. By following this step-by-step guide, you can smoothly convert physical machines into virtual ones, harnessing the power of virtualization.
However, it's imperative to ensure the protection and security of your virtualized machines. In this dynamic IT landscape, VMware, complemented by AOMEI Cyber Backup, empowers your businesses to thrive and stay resilient in the face of evolving challenges.


