Whether you want to run Hyper-V or VMware Workstation, or want both to coexist, this article offers solutions.

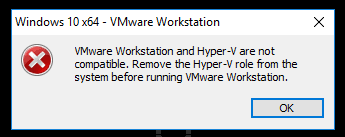
Activating both VMware Workstation (or VMware Player) and Microsoft Hyper-V on a Windows host system results in the message “VMware Workstation and Hyper-V are not compatible”.

Either the Type 1 or Type 2 hypervisor requires a processor virtualization extension such as Intel VT-x or AMD-V. So the reason for the conflict is that at Windows startup, Hyper-V seizes control of these extensions, which prevents VMware Workstation from using them when Windows is loaded. Only one software component can use Intel VT-x or AMD-V at a time.
This article specifically describes 5 ways to resolve the incompatibility issues between VMware Workstation and Hyper-V.
You can use Control Panel to disable Hyper-V role before running VMware Workstation.
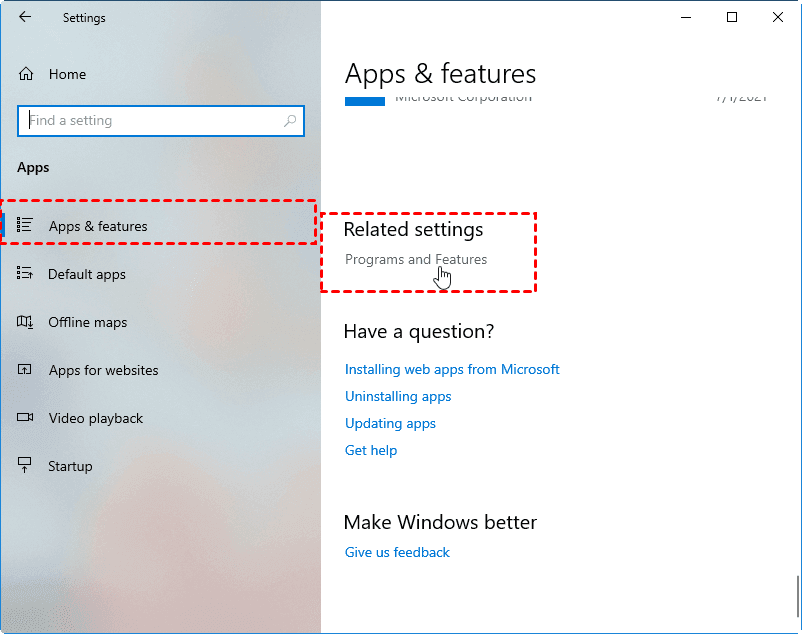
1. Press Windows key + X and select "Apps and Features."

2. Click on "Programs and Features" on the right side.
3. In the left panel, select "Turn Windows features on or off.

4. Locate "Hyper-V" in the list, uncheck it, and click "OK" to disable Hyper-V in the GUI.
5. Restart your computer.
* Besides, you can also remove Hyper-V feature via PowerShell (command: Disable-WindowsOptionalFeature -Online -FeatureName Microsoft-Hyper-V-All) or Command Prompt (command: bcdedit /set hypervisorlaunchtype off).
1. Press Windows key + R to open the Run dialog. Then type gpedit.msc and press Enter.
2. In the Local Group Policy Editor, go to Computer Configuration -> Administrative Templates -> System.
3. Click Device Guard, and double-click on "Turn On Virtualization-Based Security" in the right pane.
4. Select the "Disabled" option and click "Apply" and then "OK."
5. Restart your computer.
If your Windows 10 version is 2004 (20H1) build 19041 or newer, you can upgrade VMware Workstation to version 15.5.6 or later. This update lets you run VMware virtual machines on Windows without having to turn off Hyper-V and Virtualization Based Security (VBS) features.
Microsoft and VMware fixed compatibility issues by letting VMware Workstation sue Microsoft Windows Hypervisor Platform (WHP) APIs, so it can manage resources even when Hyper-V is active.
Earlier VMware versions couldn't access CPU features when Hyper-V was enabled. In version 15.5.6, VMware updated its Virtual Machine Monitor (VMM) to run at the user level, allowing it to work alongside Hyper-V and fix compatibility issues.
If you uninstall Hyper-V features, VMware Workstation detects it and switches the VMM to direct CPU access. To run VMware VMs on a Windows host with Hyper-V, install the Windows Hypervisor Platform (WHP) feature from the Control Panel.
In summary, by updating Windows 10 and VMware Workstation to versions supporting simultaneous use of Hyper-V and VMware VMs, you can seamlessly run both virtualization solutions on your computer.
* Not Supported on Certain Windows Server Versions: Windows Hypervisor Platform isn't supported on Windows Server 2016 and other server versions. So, VMware Workstation can't run VMs in Host VBS mode on machines with these Windows Server versions.
Limitations of the Host VBS mode: ✏ In nested virtualization, you can't run VMs inside VMware Workstation VMs in this mode. ✏ VMware VMs might run slower in Host VBS mode. ✏ X86 Performance Monitoring Counters (PMC) aren't supported. ✏ The User-mode Protection Keys (PKU) capability is not available. ✏ Restricted Transactional Memory (RTM) and Hardware Lock Elision (HLE) aren't available in Host VBS mode.
Protecting your Hyper-V virtual machines (VMs) is always crucial for ensuring the security and integrity of your data. Before removing the Hyper-V role from the system, it's secure to backup Hyper-V virtual machines in case you need to restart Hyper-V to recover data in time.
AOMEI Cyber Backup stands out as an excellent solution for Hyper-V and VMware environment. With it, you can enjoy the robust features like:
💡 Comprehensive Backup Options: Supporting flexible backup options allows users to choose the most suitable backup strategy based on their specific needs ✨ Automated and Scheduled Backups: Automatic and scheduled backups enables users to set up regular backup intervals, ensuring continuous data protection without the need for manual intervention. ✍ Centralized Management: Easily backup and monitor backups from the central console instead of manually installing agents one by one, ensuring the security of backed-up VM data. ⏰ User-Friendly Interface: The intuitive and user-friendly interface makes it accessible to users of varying technical expertise, allowing users to navigate and utilize the software effectively. 🎊 Backup Archive: Help users to save backup to a Cloud storage. You can add an Amazon S3 object storage, and archive backups to the S3 storage.
1. Begin by installing AOMEI Cyber Backup on the host machine. Once installed, launch the software to access its interface.
* It helps you create Hyper-V image-based backup for virtual machines without installing agent on each of them.
2. Within the AOMEI Cyber Backup interface, choose the Backup > Create New Task > Hyper-V Backup option. This specific setting is tailored to address the unique requirements of backing up virtual machines in a Hyper-V environment.
3. Once the backup settings are configured, click Start Backup to initiate the backup process. AOMEI Cyber Backup will systematically back up the selected Hyper-V VMs according to the setup.
📢 While the Free Edition covers most of the VM backup needs, you can also upgrade to enjoy: ✦ Backup cleanup: Configure retention policy to auto delete the old backup files and save storage space. ✦ Restore to new location: Easily make a clone of a virtual machine in the same or another host, without reinstalling or configuring a new VM. ✦ Backup for more devices: Create comprehensive backup for your Microsoft SQL Database or Physical PC & Servers.
AOMEI Cyber Backup offers comprehensive Hyper-V backup and recovery features in a user-friendly design. It is ideal for virtual machine protection, you can easily set up flexible backup options without worrying about the risk of data loss.
The issue of “VMware workstation and Hyper v are not compatible” stems from the conflicting nature of their virtualization technologies, resulting in the inability of both to coexist on the same system. Users must choose carefully between VMware Workstation and Hyper-V based on their specific requirements and priorities when resolving this compatibility issue. Also, this article describes multiple solutions when VMware and Hyper-V are not compatible.