Windows Server Backup Deduplication is the key to reducing redundant data and optimizing storage efficiency. This guide help you enable it in 3 ways and backup Windows Server in 2 ways.

Data storage is one of the biggest concerns for IT administrators, especially when managing backups on Windows Server. As backup sizes grow, storage costs rise, and performance slows down. That’s where Windows Server backup deduplication comes in—an advanced feature that helps eliminate redundant data, optimize storage space, and improve backup efficiency.
In this guide, we’ll explore what data deduplication is, how it works, how to enable it on Windows Server, and the best ways to back up deduplicated data. This guide will help you make the most of Windows Server’s built-in deduplication features.
Data deduplication is a technique that eliminates duplicate copies of data, reducing the overall storage footprint. Instead of storing multiple identical files, the system keeps a single instance and references it wherever needed.
This is different from compression, which shrinks individual files but does not remove redundancy across multiple files. Windows backup deduplication works at the block level, identifying and eliminating repetitive data across different files stored on a system.
Windows Server's data deduplication feature works by:
There are 3 ways to set up Windows Server Backup Deduplication, and we’ll break them down step by step.
1. Windows Server supports deduplication in Standard and Datacenter editions. However, it is not available in Windows Server Essentials or on the system (C:) drive.
2. To use data deduplication, you need:
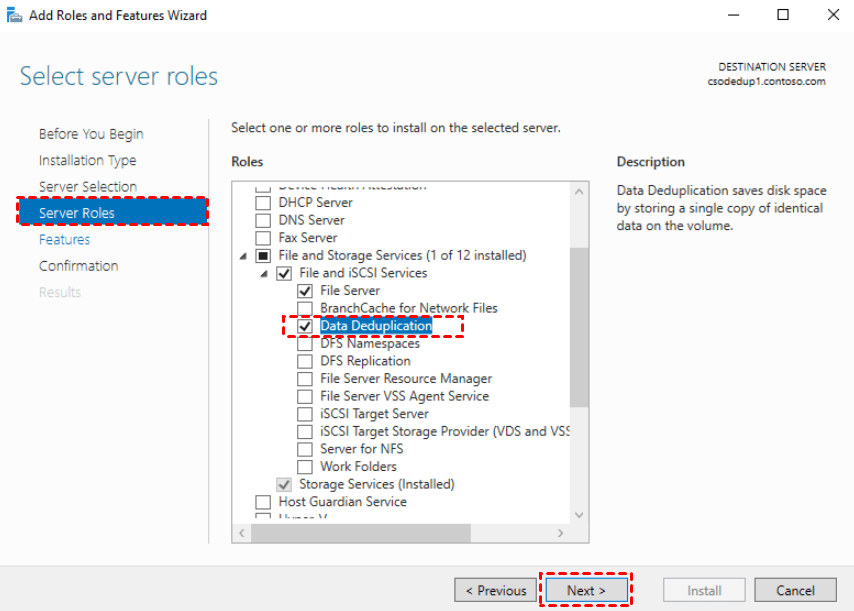
1. Open the Add Roles and Features Wizard in Windows Server. In the wizard, go to Server Roles and check the box for Data Deduplication. Click Next to continue.
2. Click Install to enable the feature on your server.

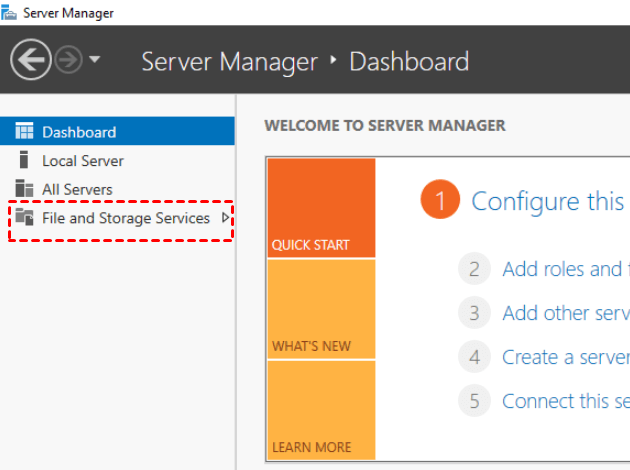
3. Once installed, open Server Manager and go to File and Storage Services.
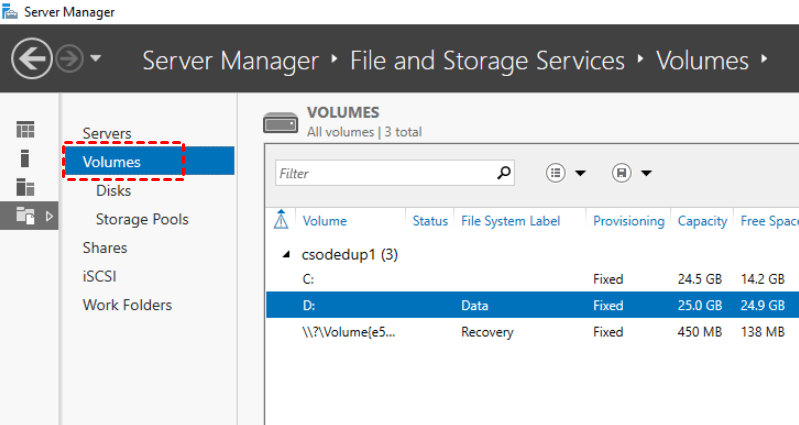
4. Click on Volumes from the left panel and select the volume you want to enable deduplication on.
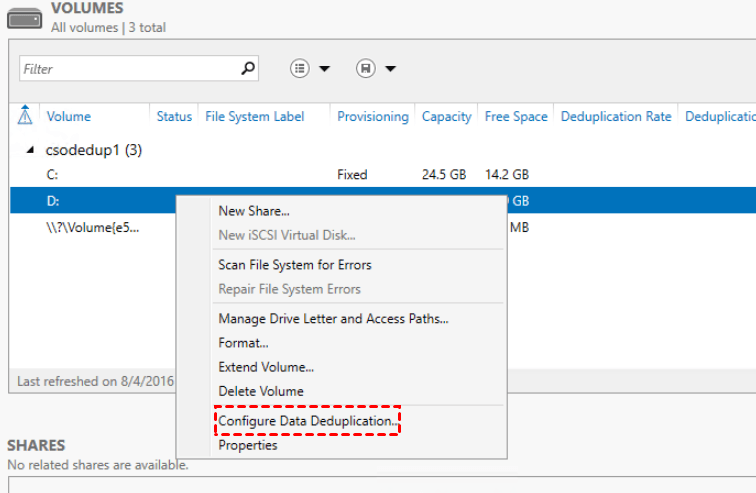
5. Right-click the chosen volume and select Configure Data Deduplication.
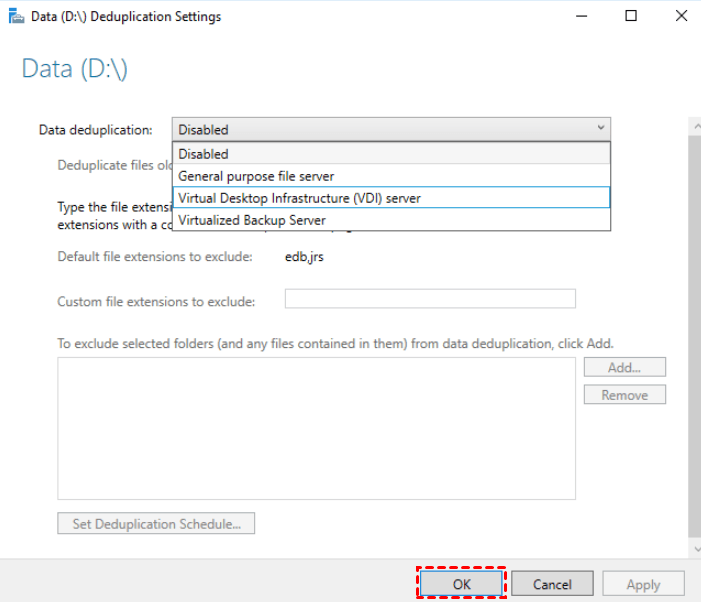
6. Choose the Usage Type from the drop-down menu and click OK to apply the settings.
For those who prefer PowerShell, use the following command to enable deduplication on a specific drive (e.g., D:):
1. Open PowerShell as Administrator.
2. Run the following command to enable deduplication:
Install-WindowsFeature -Name FS-Data-Deduplication3. Verify the installation by running:
Get-WindowsFeature | Where-Object Name -like "*Dedup*"
4. Apply deduplication on a backup volume:
Enable-DedupVolume -Volume "E:" -UsageType Backup
5. Schedule deduplication jobs using:
Set-DedupSchedule -Name BackupSchedule -Type ThroughputOptimization -Start 01:00 -DurationHours 5For organizations managing multiple servers, setting deduplication through Group Policy is a smart choice:
1. Open Group Policy Management Editor.
2. Navigate to Computer Configuration > Administrative Templates > System > Deduplication.
3. Enable Configure Deduplication and set parameters as required.
4. Apply and restart the server for settings to take effect.
In this part, you can get 2 best backup methods for deduplicated data.
AOMEI Cyber Backup is an easy-to-use backup tool that helps protect Windows Servers, VMware, Hyper-V, and SQL databases. It allows you to back up multiple systems without the hassle of installing extra software on each one, saving both time and money.
With a simple and user-friendly design, AOMEI Cyber Backup lets you schedule backups and choose different backup methods, ensuring your data is always safe. Whether you're protecting personal files or important business data, this tool makes backups easy and reliable.
Why Choose AOMEI Cyber Backup?
Many users trust AOMEI Cyber Backup for their data protection. Download the free version and try it today!
1. First, install the AOMEI Cyber Backup Agent on your target device before creating a Windows server backup.
2. Go to Source Device to add Windows Device, then fill in the correct IP address and user information.
3. Click Backup Task > Create New Task > System Backup.
4. Choose your Windows Server from the list of available devices.
5. Choose a destination to save the backup. You can save it to a local drive, an external disk, or network storage.
6. Set up a backup schedule to run automatically every day, week, or month.
7. Click Start Backup to protect your Windows Server data.
Windows Server Backup supports deduplicated volumes natively. However, for large volumes, it may consume additional processing power.
To back up a deduplicated volume:
1. Open Windows Server Backup and select Backup Once or Schedule Backup.
2. Choose Custom backup and select the deduplicated volume.
3. Set the destination drive and configure additional settings.
4. Run the backup and monitor for any errors related to deduplication.
If you’re tired of running out of storage due to redundant backups, Windows Server Backup data deduplication is an essential toolto save storage space, optimize backups, and reduce costs. By enabling deduplication through Server Manager, PowerShell, or Group Policy.
Windows Server Backup Deduplication By following the steps outlined in this guide, you can enable data deduplication, set up efficient backups, and troubleshoot common issues to ensure maximum performance.
1. Can I enable deduplication on my system drive?
No, deduplication is not supported on the Windows system drive (C:).
2. What types of files benefit most from deduplication?
Large, repetitive files like VM backups, ISO files, and log files benefit the most.
3. Does deduplication slow down backup processes?
It can, but using optimized backup software minimizes the impact.
4. What happens if a deduplicated backup volume gets corrupted?
You may need to rebuild the deduplication database or restore from a previous backup.
5. Is Windows Server Deduplication free?
Yes, it is included in Windows Server Standard and Datacenter editions at no extra cost.