What’s the best way to transfer photos from iPhone to PC? It depends on the method you prefer and the number of photos to be transferred. Read this guide to learn more.

There are several methods that can help you download photos from iPhone to PC. To save time and energy, you may want to know the best way to transfer iPhone photos to PC. Well, the truth is that it is hard to say which method is the best.

It’s possible to transfer photos via a cable but sometimes it is kind of inconvenient; You can take advantage of cloud storage services to achieve the transfer but it requires a stable internet connection; There are ways to transfer photos wirelessly but the transfer can be affected by many factors.
In short, each method has its advantages and disadvantages. To help you find the best way to transfer photos from iPhone to PC, we will show you all the details of each method. You definitely can make the best decision after knowing every option.
If you find it troublesome to connect your iPhone using a USB cable, you may want to know the best way to transfer photos from iPhone to PC wirelessly. Just read on to see how to transfer iPhone photos using Wi-Fi.
If you have enough iCloud storage, then iCloud may be the best way to transfer photos from iPhone to PC wirelessly. iCloud provides an easy way to help you sync photos across your devices. You can first upload photos from iPhone to PC and then download photos from iCloud to computer.
Step 1. Upload photos from iPhone to iCloud
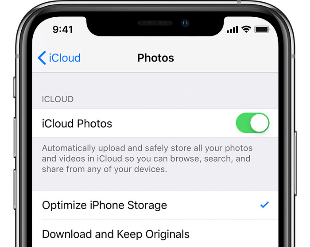
Upload all iPhone photos: go to Settings > [your name] > iCloud > Photos > turn on the sync. It won’t tell you if all photos have been uploaded. You can go to iCloud.com to see the photos that have been uploaded.

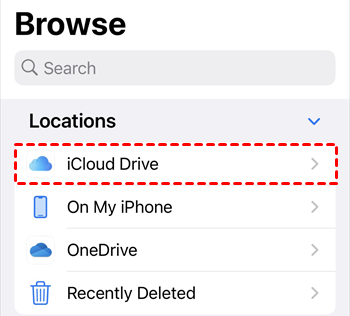
Upload selected photos: go to Photos app > select the photos you need > tap the Share button > scroll down and choose Save to Files > select iCloud Drive > tap Save to confIrm (you can tap the three-dots icon to create a new folder to save your photos).

Step 2. Download photos from iCloud to PC
Open a browser and go to iCloud. com > Sign in to your account > Choose Photos or iCloud Drive > Choose the photos you need and click the Download button to save them to PC.
Google Photos can also be the best way to transfer photos from iPhone to PC wirelessly. It offers 15 GB of free storage space, which is enough to save all your photos. You can download Google Photos from App Store and follow the steps below to transfer your photos.
Step 1. Open Google Photos app > Sign in to your account.
Step 2. Tap the three-dots icon > Select Settings > Choose Back up & sync and turn on the backup.
Step 3. When the backup is complete, you can go to Google Photos website to download photos to PC.
If you want to transfer a small number of photos, then Snapdrop can be the best way to transfer photos from iPhone to PC wirelessly. Snapdrop is one AirDrop-like utility that allows you to transfer files between iPhone and PC. You do not need to download any app and can complete the transfer via the browser.
Step 1. Connect your iPhone and PC to the same Wi-Fi.
Step 2. Open the browser and go to SnapDrop.net on iPhone and PC > When the connection is established, you will see a computer icon on your iPhone.
Step 3. Tap the computer icon > Choose Photo Library and select the photos you want to transfer.
Step 4. Accept the transfer on PC and that’s it.
While you can complete the transfer via WiFi, a direct cable connection is still a good choice. The transfer will not be effect by bandwidth. When the internet connection is poor, wired connection can be the best way to transfer iPhone photos to PC.
It is recommended to use the cable that comes from your iPhone or use an MFi (Made For iPhone) certified cable. Otherwise, the transfer may not go smoothly and it may do harm to your iPhone.
If you do not want to download any app, then File Explorer may be the best way to transfer photos from iPhone to PC. With File Explorer, you can access the DCIM folder that stores all your camera roll photos. However, it will not display your albums so may not be a good choice if you want to transfer photo albums from iPhone to PC.
Step 1. Plug in your iPhone and trust the PC.
Step 2. Go to This PC > Find your iPhone and open it.
Step 3. Go to Internal Storage > DCIM. Then you will see your photos are categorized into monthly folders.
Step 4. Select the folders or photos you need > Right-click and select Copy > Go to the destination, right-click and choose Paste. You can also choose to copy the DCIM folder.
Notes:
? Since iOS 11, Apple uses HEIC as the default photo format. You can ask Apple to convert the photos into compatible JPEG format during the transfer. Go to Settings > Photos > Choose Automatic.
If your photos are saved in HEIC format, you may need to download HEIF Image Extensions so you can view HEIC files on Windows.
Or you can use one HEIC converter to convert your photos to JPG, JPEG or PNG.
If you want to transfer photos saved in different albums, then AOMEI FoneBackup can be the best way to transfer photos from iPhone to PC. AOMEI FoneBackup is one professional iPhone data management tool for Windows PC. With AOMEI FoneBackup, you can:
? Easily access all photo albums and find the photos you need
? Save live photos as video or save them in .jpg or .heic
? Transfer full-resolution photos from iPhone to PC
? Transfer photos between iPhone and PC/flash drive/external hard drive
Let’s start to see how to use this tool to transfer iPhone photos to PC.
Step 1. Download, install and launch AOMEI FoneBackup on your PC > Plug in your iPhone and enter your passcode when asked.
Step 2. After AOMEI FoneBackup recognizes your device, choose Phone Transfer from the left pane > Go to iPhone to PC and click Get Started.
Step 3. Choose Photos and you will see all your photo albums > Select the photos you need and click OK. (Uncheck uncheck Music/Videos/Contacts.)
Step 4. Click Start Transfer > On the pop-up window, choose the storage path and adjust other settings > Click Transfer.
Notes:
If you want to delete your photos from your phone after the transfer, then Photos app is probably the best way to transfer iPhone photos to PC. However, this app is only available on Windows 8, 10 and 11. With Photos app, you can transfer, edit, delete or share your photos.
Step 1 Go to Start and search Photos app > Click to open it.
Step 2. Plug in your iPhone and allow your PC to access your photos and videos.
Step 3. In Photos app, click Import from the top-left corner > choose From a connected device.
Step 4. Select the photos you want to transfer > Change the destination or choose Delete original items after import > Finally, click the Import button to transfer photos to PC.
Hope you can find the best way to transfer photos from iPhone to PC after reading this guide. These methods can help you transfer photos in different situations. When you want to transfer a large number of photos, AOMEI FoneBackup may be he best choice; when you want to transfer one or two photos, Snapdrop may be a better choice.