In the digital era, preserving your cherished memories is paramount. This guide delves into the critical process of transferring your OneDrive photos to an SD card, providing insights into why this seemingly straightforward task holds great significance.

Yes, you can transfer files from OneDrive to an SD card. Here's a general outline of how you can do it:
![]()
After understanding the general outline, let us now take a look at why and how to move photos from OneDrive to SD card! You can click the link below to see how to auto backup your data to OneDrive to prevent your data loss!
👉Auto back up Windows to OneDrive with a third-party tool
There are several compelling reasons why you should consider moving your photos from OneDrive to an SD card.
Next, we will tell you how to transfer photos from OneDrive to SD card, please read carefully!
Now, let's dive into the detailed instructions for transferring your photos from OneDrive to an SD card. These steps will empower you to effortlessly manage and organize your photo library. Remember, although the process may vary slightly depending on your device and operating system, the general principles remain the same.
1. Insert the SD card into the appropriate slot on your device. Ensure it is recognized and accessible.
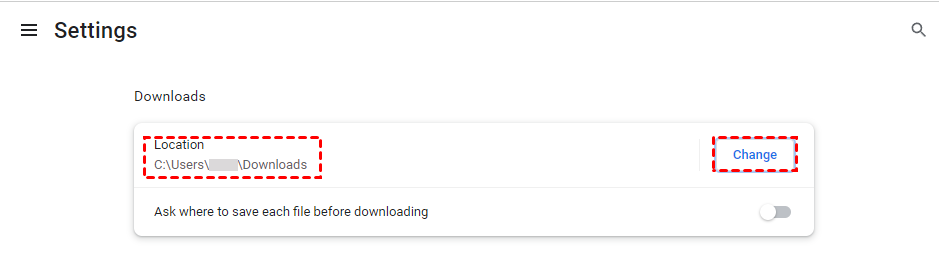
2. Change the download location of your browser. Take Chrome as an example.
3. Visit the OneDrive website and sign in.
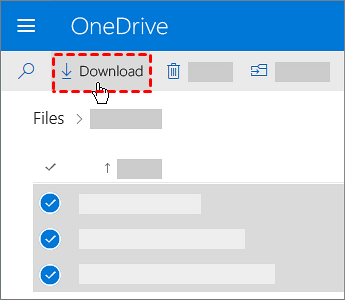
4. After logging in, click Photos from the left pane. Then manually select individual photos or opt for batch selection using built-in features.
5. Click Download from the upper menu bar to save photos to your SD card.
6. Confirm you can access the photos from the SD card. Then change the download location of your browser back.
For seamless auto backup to OneDrive, consider leveraging AOMEI Backupper Standard, a trusted third-party backup solution. This top-tier free software specializes in effortlessly safeguarding your crucial files and system data to the cloud, eliminating the hassle of manual backups.
Designed with user convenience in mind, AOMEI Backupper features intuitive interfaces and step-by-step guidance suitable for beginners, requiring no prior expertise. Its array of robust functionalities includes:
✵ Versatile Backup Options: Choose from four backup types, including System, File, Disk backup, and Partition Backup. ✵ Flexible Backup Locations: Store backups on various platforms, such as OneDrive, Google Drive, Dropbox, local drives, external disks, network locations, and NAS, including Windows 11 backups to Synology NAS. ✵ Customizable Backup Schedules: Tailor backups to your preference, with options for daily, weekly, or monthly frequencies. ✵ Universal Compatibility: Compatible with all Windows editions, from Windows 11 to XP, and for server users, AOMEI Backupper Server is available.
To effortlessly set up automatic OneDrive backups for your Windows data, simply follow the user-friendly instructions provided below. Download AOMEI Backupper Standard today to experience its seamless functionality. Additionally, ensure the OneDrive client is installed on your PC and sufficient cloud storage is available for your backup images.
Best free Windows backup software for personal use.
Step 1. Launch the tool and navigate to the "Backup" section, then select "System Backup."
Step 2. The software automatically identifies the system-related partition(s) as the source data. Simply designate the OneDrive folder as the destination for storing your system backup image. Typically, the OneDrive desktop folder can be found at C:\Users\UserName\OneDrive.
Step 3. To set up automatic backups of your Windows 11 to OneDrive, navigate to the Schedule Backup option located at the bottom left. Customize your backup schedule according to your preferences, selecting from options such as daily, weekly, monthly, event triggers, or USB plug in triggers.
✨ Additional Customization:
Step 4. Once you've finalized your personalized settings, simply click "Start Backup" to initiate the automatic backup process to OneDrive on Windows 10/11.
Storing your photos on an SD card offers numerous advantages. Firstly, it provides a physical backup, reducing the risk of losing your precious memories. Additionally, it frees up space on your OneDrive, allowing you to utilize the cloud storage for other important files. Furthermore, accessing your photos directly from an SD card provides convenience, especially in situations where an internet connection is unavailable.
During the transfer process of how to move photos from OneDrive to SD card, you may encounter some common issues. Here are a few troubleshooting tips to help you overcome them:
While transferring photos from OneDrive to an SD card is a popular choice, it's essential to explore alternative options based on your specific needs. These alternatives include external hard drives, USB flash drives, or cloud storage services other than OneDrive. Consider factors such as security, accessibility, and ease of use when evaluating these alternatives.
How to move photos from OneDrive to SD card? In conclusion, transferring your OneDrive memories to an SD card is a practical and reliable method of preserving and managing your photo collection. By following our step-by-step guide, you can ensure a seamless transfer process. Embrace the benefits of SD card storage, troubleshoot any issues that arise, and take into account alternative storage options. Start organizing your photos in the way that best suits your needs while keeping your cherished memories secure for years to come.


