In this article, we will explore how TeraCopy enhances file copy speeds and minimizes errors. We will cover practical solutions for using TeraCopy effectively with detailed step-by-step instructions. Additionally, it includes AOMEI Backupper, an alternative backup solution, and answers to FAQs.

TeraCopy for Windows 10 is a specialized file transfer utility designed to enhance the speed, efficiency, and reliability of copying and moving files on the Windows operating system. It replaces the default file copier, offering advanced features that make it ideal for users who need to transfer large volumes of data or require more control over the transfer process. Here’s why using TeraCopy is beneficial:

🚩Faster File Transfers: TeraCopy accelerates the process of copying and moving files, particularly for larger files, by using dynamically adjusted buffers, which improve transfer speed. 🚩Error Handling and Recovery: Unlike the default Windows copier, which can halt the entire transfer when an error occurs, TeraCopy skips problematic files and retries them later, allowing the rest of the transfer to continue uninterrupted. 🚩Pause and Resume: It allows users to pause transfers and resume them later, giving greater flexibility in managing large file transfers. 🚩File Integrity Verification: After files are copied, TeraCopy verifies them using checksums to ensure no data corruption occurs during the transfer and that the files are transferred accurately. 🚩Streamlined Workflow: For users who deal with numerous or large file transfers frequently, TeraCopy provides a smooth and uninterrupted experience, allowing batch transfers and detailed progress monitoring.
Using TeraCopy on Windows 10 is easy and can make file transfers, such as transferring files from C drive to D drive, more efficient. Here’s how you can get started:
Step 1: Visit the official website, download TeraCopy for Windows 10, follow the prompts to install it, and then launch the application.
Step 2: Once opened, click on the "Source" button. From there, choose "Add Files" or "Add Folders" to pick the items you want to transfer.

Step 3: Next, click on the "Target" button and choose "Browse" to set the destination folder where you want to move the files.
Step 4: Finally, hit "Copy" to start transferring the selected files.
Tips:
💦Error Handling: If a file fails to copy, TeraCopy will skip the problematic file without stopping the entire process.
💦File Integrity Checks: TeraCopy supports 17 different checksum algorithms, like MD5, SHA1, BLAKE3, and xxHash3, to verify that the copied files are identical to the originals. It can also generate or verify a checksum file.
💦Explorer Integration: TeraCopy easily integrates with Windows Explorer in Windows 7, 8, 10, and 11. You can simply right-click on the source files, choose "Copy," navigate to the destination, right-click, and select "Paste" using TeraCopy from the context menu to start the process.
While TeraCopy is widely used for file copying and syncing, there are other alternatives that offer similar functionality. AOMEI Backupper Standard is an excellent option for Windows users, providing a reliable and easy-to-use tool for syncing files. Compatible with Windows 11, 10, 8.1, 8, 7, XP, and Vista (both 32-bit and 64-bit versions), here are some of its standout features:
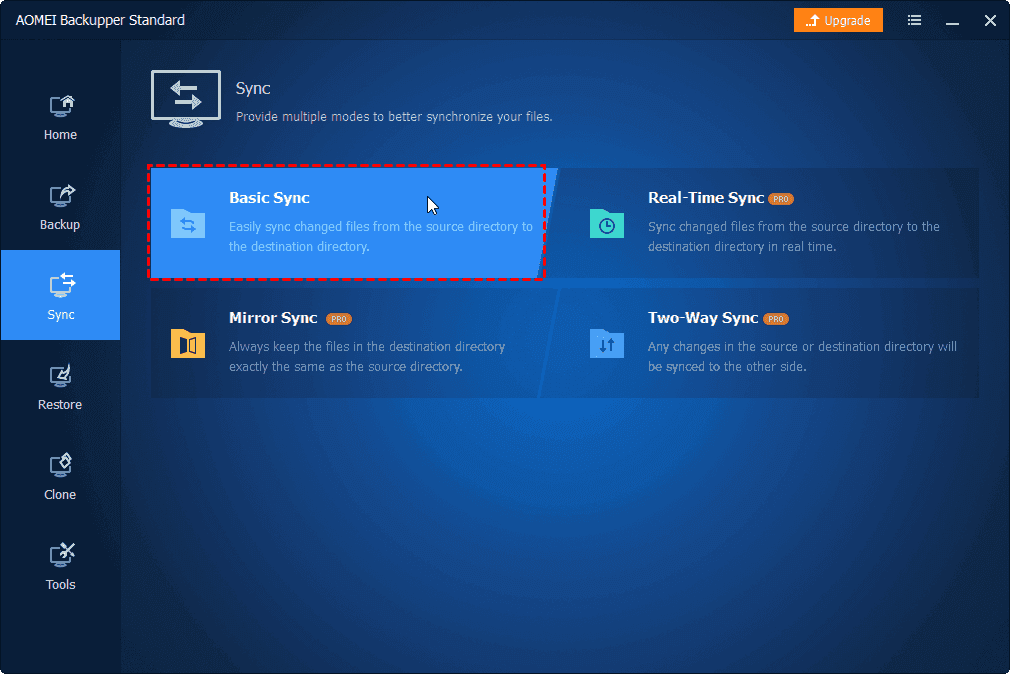
Step 1: Download and open AOMEI Backupper on your PC. From the left menu, select Sync and then choose Basic Sync.
🧡 If you’re syncing to an external drive, plug it in and ensure it’s recognized by your computer beforehand.
🧡 The Basic Sync option syncs files one-way, meaning updates happen from the source to the destination. For two-way syncing or advanced options like real-time or mirror sync, you can upgrade to the Pro version of the software. Real-time Sync, Mirror Sync, and Two-Way Sync features.
Step 2: Click Add Folder to choose the files or folders you want to sync. Next, click the destination bar to pick where you want the files to be synced.
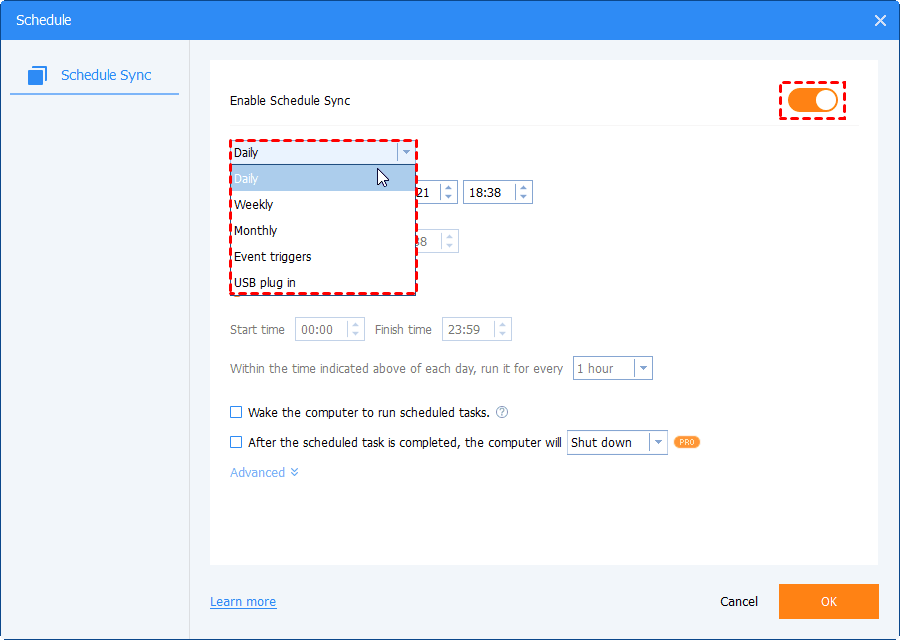
Step 3 (Optional): If you want to automate this process, click Schedule Sync to set up automatic syncing based on your preferences (daily, weekly, etc.).
Step 4: Press Start Sync to begin transferring files from the source to the destination automatically.
Q 1: Can TeraCopy copy multiple files simultaneously?
A 1: TeraCopy supports batch file transfers, meaning you can select multiple files or folders and transfer them all at once. It optimizes transfer speed by using dynamic buffer adjustments.
Q 2: Does TeraCopy work with external drives and USBs?
A 2: Yes, TeraCopy supports all types of storage devices, including external hard drives, SSDs, and USB flash drives. It is particularly useful for transferring large files between external devices and internal storage.
Q 3: How can I verify file integrity after using TeraCopy?
A 3: TeraCopy automatically verifies file checksums after a transfer is complete. This ensures the copied or moved files are not corrupted during the process.
TeraCopy for Windows 10 is a vital tool for users who regularly transfer large files or require error-free copying. With its enhanced speed, robust error management, and data verification capabilities, it offers a significant upgrade over the default Windows file copier. Whether you're transferring files between internal drives or external devices, TeraCopy ensures your data is moved efficiently and safely. Pair it with AOMEI Backupper for an all-encompassing backup and transfer solution.