If you wonder know how to transfer voice memos from iPhone to iPad, please scroll down for the useful information and step-by-step guide.

Voice memos are one of the default features of iPhone, and iOS users can use voice memos to timely record ideas, music, lectures, or any other content they may hear while on the road. Voice memos can help you quickly find what you need later and the recordings can be edited, cropped, or added. Thus it is writers’ and musicians’ favorite tool.

When users need to transfer a meeting record or a sample of a song to an iPad or other Apple devices for editing. They may wonder know how to transfer voice memos from iPhone to iPad or other Apple devices. There are many methods to be able to get the process done, please continue to read this passage to learn how to transfer voice memos.
In the following, we provide 4 effective ways to fix the “how to send voice memo from iPhone” issue. If you want to transfer voice memos from iPhone to iPad conveniently and securely, you can skip to the fourth method, which is a great choice. Moreover, iCloud and iTunes can also complete the transfer of voice memos.
iCloud can move most of your iOS data (such as photos, contacts, etc) from your iPhone, including voice memos. It is the most straightforward way, because this way doesn’t need to rely on the computer to perform, and data syncing can happen automatically.
Now, please follow the steps below to learn how to transfer voice recordings from iPhone to iPad.
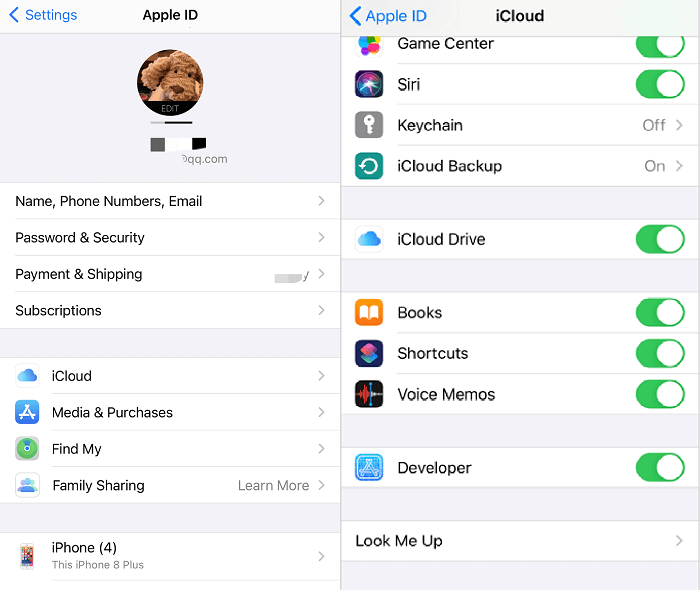
Go to Settings > click your name > iCloud > then turn on Voice Memos.

✎Note: This way is simple but you should notice that iCloud only support 5GB for free, if your iCloud storage is full, you need to spend money on storage space. Another disadvantage is that this way needs to rely on the internet connection, if the connection is unstable, the transfer process may be interrupted.
Due to all Apple devices supporting AirDrop, the share feature of voice memo also allows you to send voice memos to the iPad via AirDrop. Scroll down to learn how to move voice memos from iPhone to iPad.
Here are the guidelines you can follow:
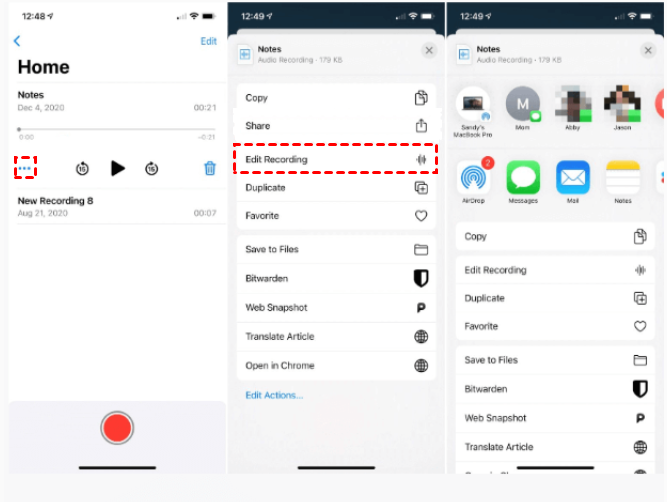
Open Voice Memos > choose the memo you want to transfer > click on the three dots in the lower-left corner > tap Share > tap AirDrop.

✎Note: Turn on AirDrop on the target device and let it be discoverable to everyone and click accept the AirDrop request to receive voice memos.
iTunes is a good tool for Apple users to manage iPhone storage, users can transfer voice memos to iPad and other iOS devices, through iTunes on their computers.
Now follow the steps below to learn how to transfer a voice memo from iPhone to iPad.
Step 1. Downloaded the latest version of iTunes on your PC Windows.
Step 2. Connect your iPhone to the computer > Open iTunes > click on your device button > Select the Music option > click Include Voice Memos > click Apply to confirm.
Step 3. After the process is completed, please open File Explorer or Finder and tap Music > iTunes > iTunes Media > Voice Memos to locate your recordings on your computer.
Step 4. Connect your iPad to your computer via USB cable and open iTunes.
Step 5. Click the Restore Backup button to transfer voice memos to the iPad.
But how to move voice memos from iPhone to iPad with different Apple IDs? Don’t worry, AOMEI FoneBackup, a free and professional iOS backup tool can help you transfer data from iPhone to iPad with different Apple IDs. With AOMEI FoneBackup, you can transfer data to other iOS devices without hitch, including photos, contacts, voice memos, and so on.
The outstanding advantages of AOMEI FoneBackup: ★Secure Transfer: AOMEI FoneBackup will encrypt the process and provide stronger protection for important data. ★Flexible Transfer: Except for voice memos, you can also transfer contacts, photos, music, apps, and any other data required by the user. ★Widely Compatible: It supports most iOS devices, including the latest iPhone 14, and is perfectly compatible with the previous iPhone 4. ★No Internet Connection Required: Compared to iCloud, AOMEI FoneBackup supports transfer without the internet connection.
Download and install AOMEI FoneBackup now and transfer voice memos to the iPad.
Step 1. Connect your iPhone to the computer and click Phone Transfer > iPhone to PC icon on the screen.
Step 2. Click the “+” button > choose the voice memos you need > click OK.
Step 3. Choose a destination > click Transfer to send voice memos to computer.
Step 4. Unplug your iPhone, next plug in your iPad > click the Phone Transfer tab > choose the PC to iPhone option.
Step 5. Click the “+” button > select voice memos you wonder to add to iPad > click Open.
Step 6. Click Transfer > click OK after the transfer is completed.
✎Note: The service also offers a mobile app named AOMEI FoneBackup for iOS, you can convert voice memos to files, thus AOMEI FoneBackup for iOS can help you transfer files, photos, videos, and music from iPhone to iPad easily. You can scan the QR code to get AOMEI FoneBackup for iOS from App Store.
That’s all for how to transfer voice memos from iPhone to iPad, the above 4 ways can be effective. If you have a computer, AOMEI FoneBackup is undoubtedly the best choice to help you complete the transfer process between iOS devices quickly without errors.