Want an app to backup iMessages on iPhone and iPad? This guide will show you how to use the iMessage backup app to backup important conversations.

iMessage allows us to quickly and easily share all kinds of information with other people. We can send not only text messages but also emojis, photos, audios, videos, documents and even locations. Sometimes, you may need to backup iMessages on iPhone for the following reasons:
● Prevent important iMessages from being lost. Some or all of the iMessages mean a lot to you so you want to make sure you will never lose them. ● Backup iMessages before deleting them from iPhone. You are planning to delete old iMessages to free up space so you need to backup some important information. ● Transfer to another device. You want to transfer iMessages to another device, maybe your new iPhone/iPad so you want to backup iMessage first and then restore it to the target device.
iMessages are important and backups ensure that we will not lose any important information. In fact, iCloud provides the way to help us backup iMessages, but why are you still looking for an app for iMessages backup and restore?
iCloud provides two ways to backup iMessages: upload iMessages to iCloud server & backup all content on device including iMessages.
In short, if you want to back up your iMessages to another safe place and be able to view them whenever you want, iCloud doesn't help you much. That’s why you need iMessage backup app not iCloud, right?
There are quite a few iMessage backup apps on the market, but usually, we only choose one to help us accomplish our goal - one that meets our backup needs. Here we recommended AOMEI FoneBackup, a tool that provides various features to meet the needs of backing up and restoring iMessage in different situations.
✓ Backup iMessages you need. You are allowed to preview and select the iMessages you want to backup. ✓ Backup iMessages to a specified location. You can choose to backup iMessages to computer/external hard drive/USB flash drive. ✓ Backup files are readable. You can view the backed up iMessage through the tool anytime you want. ✓ Incremental backup. It’s possible to run an incremental backup to backup the newly sent/received iMessages, which helps save time and space. ✓ No-data-loss restoration. Restore selected iMessages back to device or to another iPhone/iPad with a different Apple ID and no existed data will be erased.
With the user-friendly interface, iMessage backup can be completed in only a few clicks. It does not require expert skills or knowledge, all you have to do is connect iPhone or iPad to computer and choose the iMessages you need to backup.
You can click the button below to get this iMessage backup app. It supports all iPhone and iPad models.
With AOMEI FoneBackup, you can easily backup iMessages to a safe space. Below are the steps to backup iPhone iMessages to computer.
Step 1. Open AOMEI FoneBackup > Connect your iPhone to computer via the USB cable > Enter passcode on iPhone to unlock the screen so that AOMEI FoneBackup can access your device.
If you want to backup iMessages to external hard drive or USB drive, just connect them to computer and make the drive can be recognized.
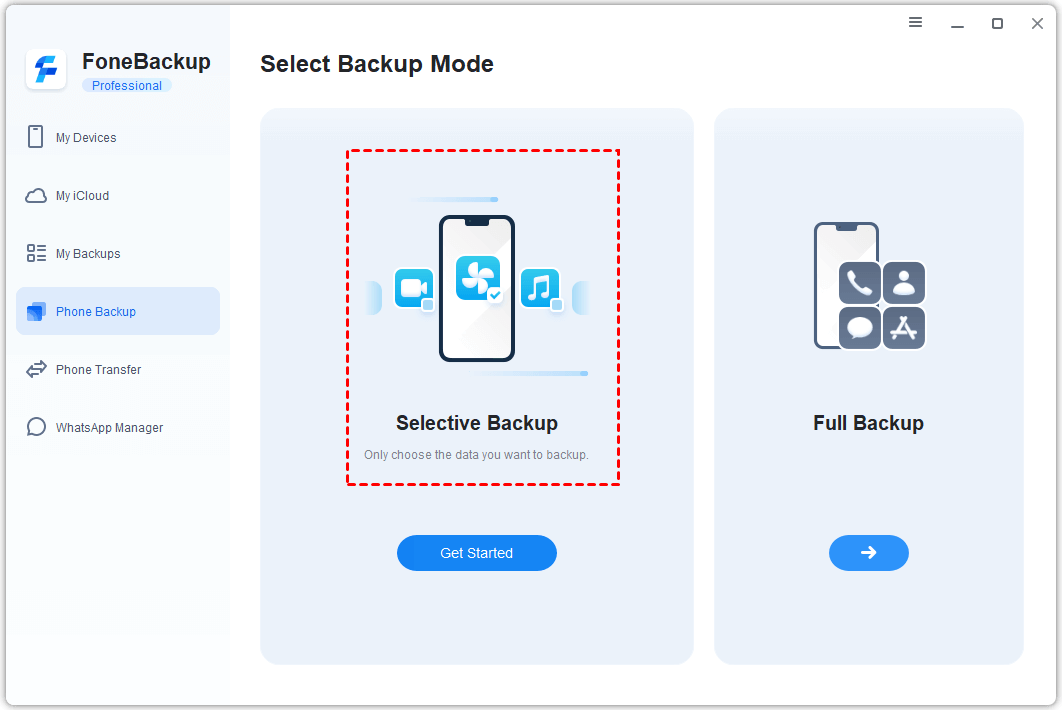
Step 2. On the home interface, click Phone Backup > Click Get Started under Selective Backup.

Step 3. Preview and select the iMessages you want to backup > Click OK to continue.
Step 4. Choose a path to save your iMessages > Click Start Backup to make it.
When the backup is complete, you can go to the Backup History page to check the backup task.
If there are a lot of important messages or warm conversations on iMessage, it is crucial to make iMessage backups. iCloud doesn't offer much help in backing up iMessage, so we need to rely on iMessage backup app. With AOMEI FoneBackup, you can easily backup selected iMessages to computer/external hard drive/USB flash drive.
PS: AOMEI FoneBackup supports not only data backup but also data transfer. It can help you transfer photos, videos, music and contacts between iPhone and computer, between iPhone and another iPhone/iPad.