When you add music to iPhone after updating, restore or resetting it, you might have the problem that iTunes sync session failed to start. Follow this passage to know why it happens and how to solve it.

The iPhone could not be synced because the sync session failed to finish.
The iPhone “Tom iPhone iPhone 16 Pro Max” could not be synced because the sync session failed to finish is the message.
- Question from Apple Community
iTunes could report many other error messages. When you want to transfer music from computer to iPhone, you need to quickly sync music with it and this could be very necessary when you get a new iPhone. However, after you are sure transferring purchases to iPhone, iTunes won’t let you import music, or the progress can’t start or finish.
The following section will tell you why the sync session could not start and give the solution to fix the iPhone could not be synced because the session failed to start issue. If you want, you could also learn how to send music to iPhone via an easier way.
Why does this issue happen? Generally speaking, this issue often appears after updating iOS or restoring/erasing iPhone so that conflict could be detected by iTunes and it refuses to sync music or other data to iPhone.
The simplest possible way to fix the issue should be restart iTunes and it works for many users.
1. Disconnect iPhone from computer and close iTunes.
2. Connect iPhone to PC with USB cable and start iTunes.
☛ P.S. If iTunes tries to sync your iPhone automatically in step 2, stop it and reboot it.
If background refresh is activated, some apps could run in the background, drain power, and also cause system glitches when you sync iPhone with iTunes. You need to keep the background clean.
1. Close apps running in the background
How to see the recently closed apps? ● On an iPhone X or later: Swipe up on the screen from the bottom. ● On an iPhone 8 or earlier: Double-click the Home button. ● Swipe up all the apps you see to close them all.
2. Force restart your iPhone
How to hard reset iPhone? ● iPhone 8 or later: Press the volume+ button and then quickly release. Press the volume- button and then quickly release. Press the power button for seconds, wait for the Apple logo appearing and release the buttons. ● iPhone 7 and iPhone 7 Plus: Press both the power button and volume- button for seconds, wait for the Apple logo appearing and release the buttons. ● iPhone 6s or earlier: Press both the power button and the Home button for seconds, wait for the Apple logo appearing and release the buttons.
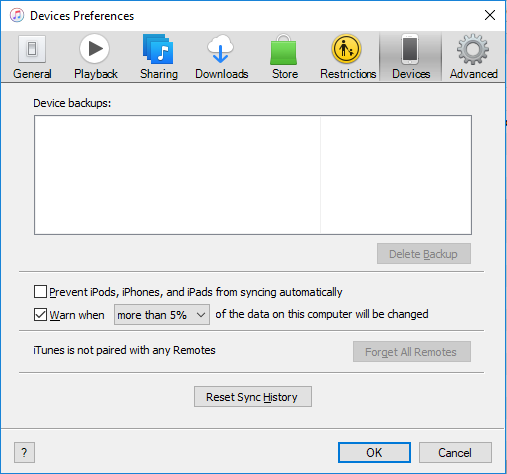
To resolve the conflict, you could reset the sync history to let iTunes sync your iPhone like the first time.
1. Open iTunes on computer.
2. Click Edit at the top of the screen.
3. Select Preferences section.
4. Select Devices section in the pop-up.
5. Click the Reset Sync History button.
The current version of iTunes might not support this iPhone. You can try different versions of iTunes.
If you wish to use new iTunes, click Help and then click Check Updates.
☛ Note: iTunes from Microsoft Store will be automatically updated every time you start it. If you wish to use previous iTunes, go to download the latest version of iTunes you want.
iTunes is not an ideal tool to sync music. Many factors could make you can’t transfer music to iPhone and your iCloud music library will be covered by the music from computer. You need a professional iPhone music transfer.
AOMEI FoneBackup is a brilliant software to make you freely share music between iPhone and computer. It will safely import songs to your iPhone without erasing any data on iPhone.
Free Software: You can transfer unlimited music between iPhone and computer for free.
Easily to Use: You just need to drag and drop music to iPhone. No special skills are needed.
Widely Support: AOMEI FoneBackup supports all iOS devices including iPhone 16, iPhone SE, iPad Mini/Air/Pro and iPod Touch.
Step 1. Download AOMEI FoneBackup and connect iPhone to computer with a premium USB cable.
Step 2. Launch AOMEI FoneBackup and select Phone Transfer on the left side of the interface. Choose PC to iPhone. And click Get Started.
Step 3. Drag and drop music from computer to the box. You can also click the plus icon to locate and add music from iPhone.
Step 4. Click Start Transfer to sync music.
You might find iTunes sync session failed to start after updating, restoring, or resetting iPhone. This passage gives you 4 useful ways to help you troubleshoot and solve the issue.
Using iTunes is not the perfect way to sync iPhone. You can try a new way to share music between iPhone and computer and AOMEI FoneBackup could be your choice. You can also use it to backup iPhone to computer.
Is this passage helpful? You could share it to help more people.


