How to Create Surface Recovery Drive from Another Computer
Learn the essentials of creating a Surface recovery drive from another computer. This guide offers a step-by-step process, highlights the advantages of AOMEI Backupper, and ensures you're equipped to master the art of recovery drive creation.
Can You Create a Recovery Drive from Another Computer?
In the ever-evolving digital landscape, the need for a reliable recovery solution is paramount. You may need a Surface recovery drive in the following situations:
- System Corruption: A corrupted operating system can render your Surface device unusable, necessitating a Surface recovery USB for troubleshooting.
- Boot Errors: Persistent boot errors can impede the normal startup process, requiring external intervention via a recovery drive.
- Virus or Malware Attack: Malicious software can compromise your Surface device, making a recovery drive essential for restoring it to a healthy state.
However, if the current computer is unable to boot up, can you create a recovery drive from another PC? The answer is yes! This guide navigates through the intricacies of creating Surface recovery drive from another computer, providing step-by-step solutions to empower users in safeguarding their Surface devices.
Top 3 Ways to Create Surface Recovery Drive from Another Computer
There are three ways to create Surface Pro recovery USB from another PC. Choose the way you prefer.
👉 Way 1. Use the Create a Recovery Drive feature in Windows
👉 Way 2. Use Media Creation Tool
👉 Way 3. Use Free Recovery Drive Creator🔥
👉 Bonus: How to Boot Surface from a USB device
🔔 Warning: Any content on the target USB drive will be deleted. You may use a blank USB drive or backup files on it in advance.
Way 1. Use the Create a Recovery Drive feature in Windows
Before you start, please prepare a USB drive with at least 16 GB of storage and connect it to a working computer. Then follow these steps:
1. On the target computer, navigate to Control Panel > Recovery > Create a recovery drive.
2. When the tool opens, make sure Back up system files to the recovery drive is selected and then select Next.
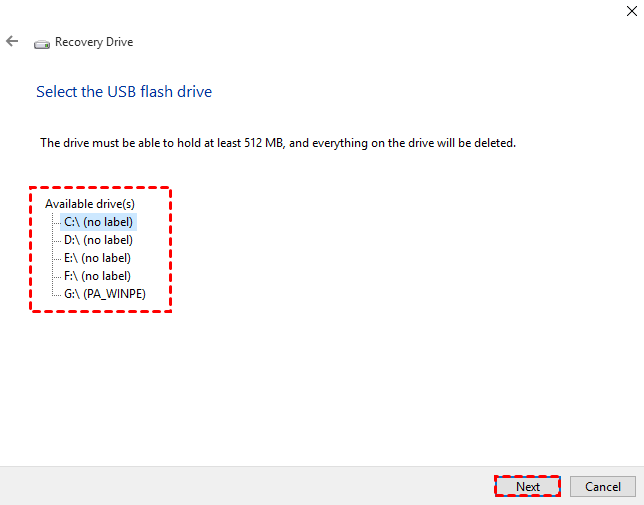
3. Choose the prepared USB drive as the destination for the recovery drive and click Next.
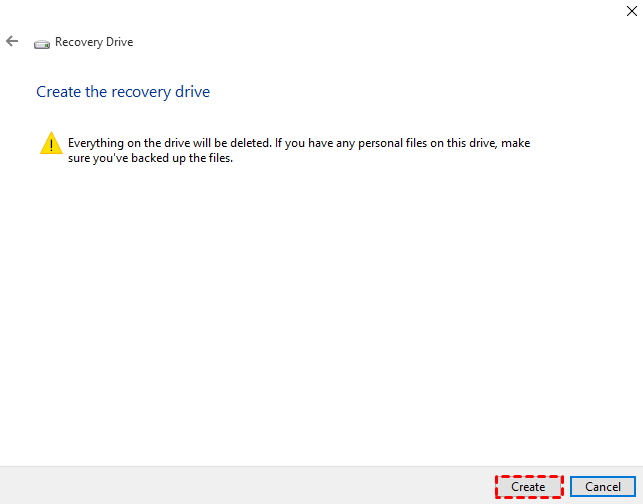
4. Start the creation process by clicking Create. Allow the wizard to complete the process. This may take some time.
5. Once the creation is complete, safely eject the USB drive and store it in a safe place.
Way 2. Use Media Creation Tool
This tool requires a USB drive with at least 8 GB of space. Follow the instructions below to create Surface recovery drive from another computer:
1. On the target computer, download and run Windows 10 media creation tool. You need to be an administrator to run this tool.
Note: If you are running Windows 11, download Windows 11 media creation tool from here.
2. On the License terms page, select Accept.
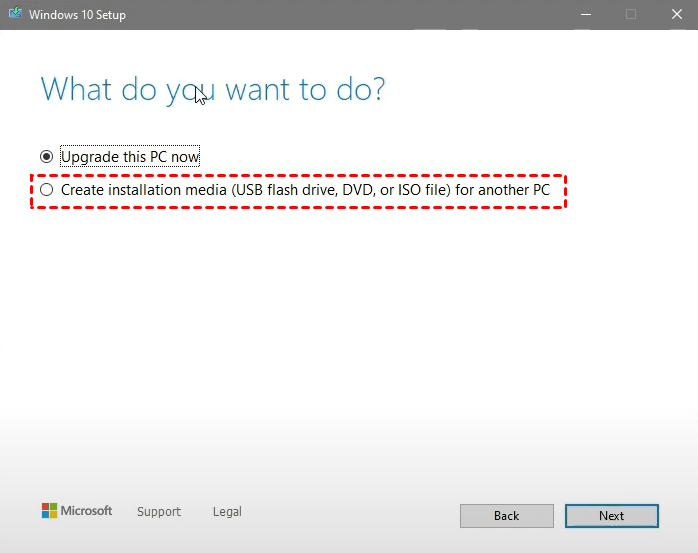
3. On the next page, select Create installation media for another PC, and then click Next.
4. Pick the language, edition, and architecture that matches the Surface device. Click Next to continue.
Note: You need to uncheck Use the recommended options for this PC to change the default options.
5. Choose USB flash drive and click Next.
6. Attach a USB flash drive and click Refresh drive list. Select the USB drive you just connected and click Next to begin Windows 10 installation media creation.
7. Once the process is complete, a prompt will appear. Click on Finish and safely eject the USB drive.
Way 3. Use Free Recovery Drive Creator
In addition to the built-in tools in Windows, there's a free bootable USB creator worth considering—AOMEI Backupper Standard. But it’s much more than just a USB boot disk creator.

-
It allows you to create bootable media in both Windows PE and Linux environments. You can use a USB flash drive, CD, or DVD as your bootable media.
-
It is able to backup all kinds of data on your PC, including the operating system, applications and personal files or folders.
-
It enables you to restore your system to a previous state, recover corrupted disks, and retrieve lost files when problems occur.
Download AOMEI Backupper and follow the guidance below to create Surface recovery USB:
1. Plug a USB drive into the target computer. The USB drive should have at least 2 GB capacity.
2. Install and launch AOMEI Backupper. Then, click Tools and select Create Bootable Media.
3. In the next window, choose Windows PE as the bootable disc type and click Next.
4. Select USB Boot Device. It automatically detects the USB drive just connected. Click Next and confirm data erasing to launch the process.
✍ Helpful Tip:
After you boot from AOMEI bootable media, you’ll enter into AOMEI Backupper directly. Choose a way to recover your Surface device according to your situation:
👉 To repair Windows from Command Prompt, go to Tools > Windows Shell Command.
👉 To restore computer from a system backup image, go to Restore > Select Image File. (You need to create a system image with AOMEI Backupper before.)
Bonus: How to Boot Surface from a USB device
Before you start, make sure you don’t have any other USB devices connected to your Surface, including USB mouse devices, keyboards, or other storage drives. Surface will try to boot from any other connected USB devices. Here's how to boot from a USB.
1. Shut down your Surface.
2. Insert the bootable USB drive into the USB port on your Surface.
3. Press and hold the volume-down button on the Surface. While you're doing this, press and release the power button.
4. The Microsoft or Surface logo appears on your screen. Continue to hold the volume-down button. Release the button when spinning dots appear beneath the logo.
5. Follow the on-screen instructions to boot from your USB drive.
FAQs about Surface Recovery Drive Creation
Q: Can I use any USB drive for the Surface Recovery Drive?
Ideally, it's recommended to use a USB drive with at least 16 GB of storage to ensure compatibility and sufficient space for recovery files.
Q: How often should I update my Surface Recovery Drive?
It's advisable to update your Surface Recovery Drive whenever there are significant system changes, such as updates or new installations.
Q: Can I use an external hard drive instead of a USB drive for the recovery drive?
It’s recommended to use a USB flash drive because external hard drives may not always be recognized as recovery media, depending on the system. However, you can use an external drive if necessary, but it's less common for recovery purposes.
Conclusion
You are now equipped with the knowledge to create Surface recovery drive from another computer. Whether utilizing native Windows options or optimizing the process with AOMEI Backupper, the creation of a Surface Recovery Drive is a proactive step toward ensuring the resilience and longevity of your Surface device. Store this drive securely, update it regularly, and face any unforeseen challenges with confidence.


