How to Install New Operating System on New Hard Drive
Upgrading to a new hard drive? This page walks you through how to install new hard drive and operating system. Read it now.
By Lily Updated on March 20, 2025
Installing a new operating system on a new hard drive might sound like a daunting task, but with the right steps, it’s a straightforward process. Whether you're upgrading to a larger or faster drive, replacing a failed disk, or setting up a brand-new system, follow this guide to complete your task smoothly.
For users who want to move existing OS to the new hard drive without reinstalling everything, try the best OS migration tool.
Preparation: Create installation media
Before installing Windows on a new hard drive, you need to create a bootable installation media. This allows your system to load the Windows installer from a USB drive or DVD. Follow these steps to create a Windows installation USB. Take Windows 11 as an example:
Note: You'll need a USB flash drive with at least 8GB of storage. Ensure it's empty or backup important files, as the process will erase all data.
1. Plug your USB drive into a USB port on your computer.
2. Visit the Microsoft Windows Download page. Click Download now under the "Create Windows 11 Installation Media" section.
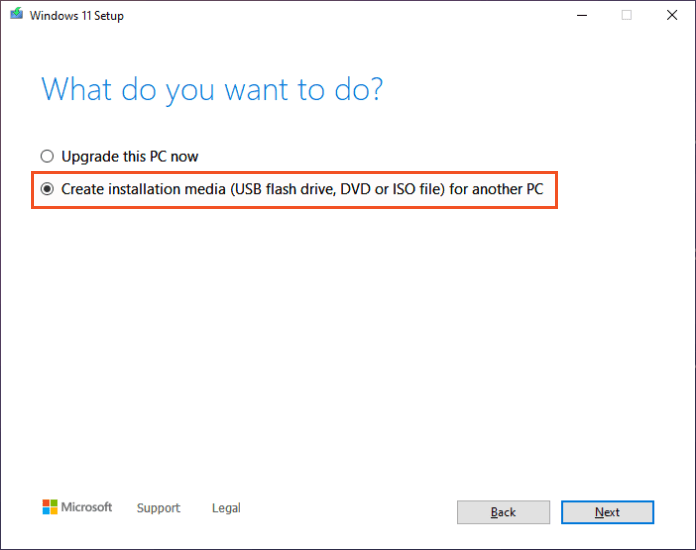
3. Run the Media Creation Tool you downloaded. Accept the license terms and choose Create installation media (USB flash drive, DVD, or ISO file) for another PC.
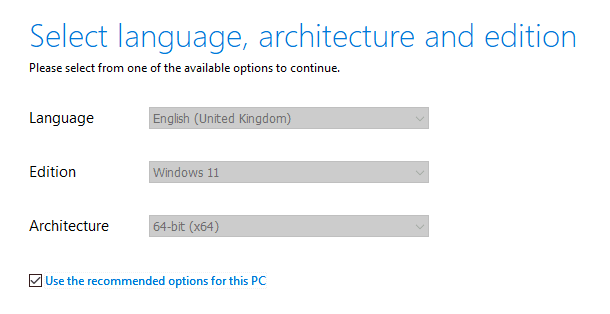
4. Select language, edition, and architecture (default settings usually work).
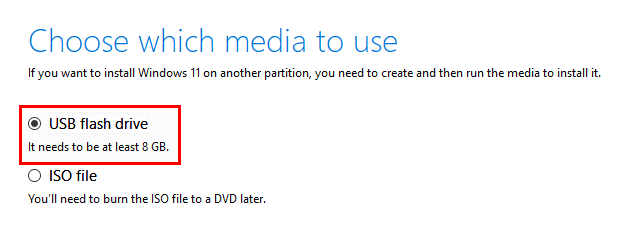
5. Choose USB flash drive as the media type and select your drive from the list.
6. Click Next and wait for the tool to download Windows and create the bootable USB.
How do I install Windows on a new hard drive?
In this section, I’ll show you how to install an OS on a new hard drive. Two parts are included:
Part 1: Install new hard drive
👉If you are using a desktop, follow these steps:
1. Shut down your computer completely and disconnect all cables.
2. Remove the side panel of your PC case (typically secured with screws).
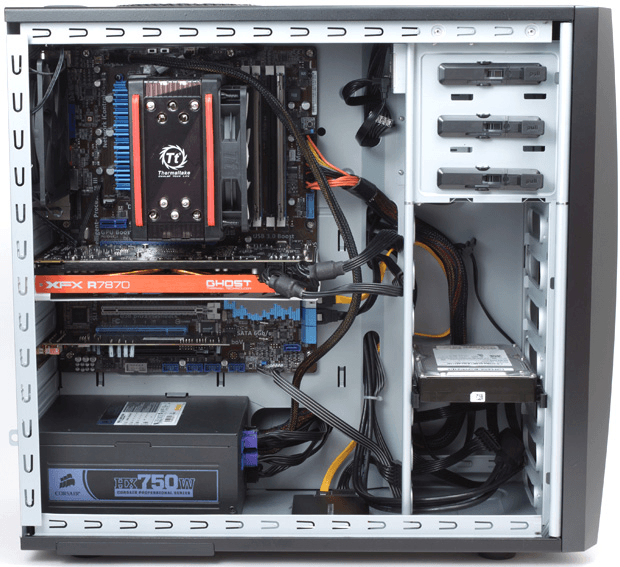
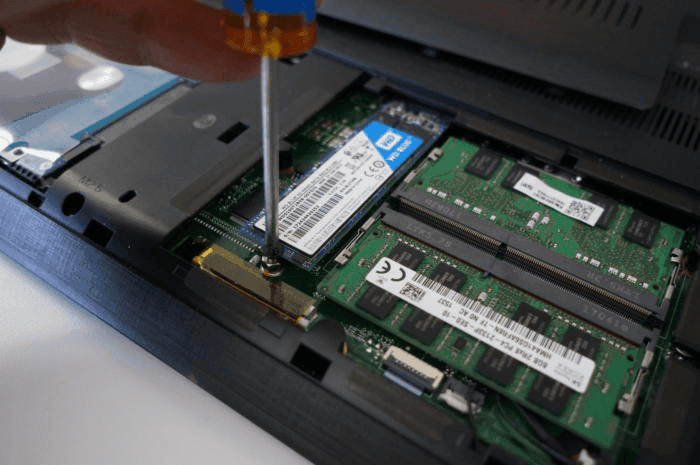
3. Find the 2.5" or 3.5" bay for HDDs or SSDs, or the M.2 slot if installing an NVMe SSD.
4. Mount the drive:
- For SATA HDDs/SSDs: Secure the drive into the bay using screws or mounting brackets.
- For M.2 SSDs: Insert the drive into the M.2 slot at a 30-degree angle and gently secure it with a screw.
5. Connect cables:
- For SATA drives: Attach a SATA data cable from the drive to the motherboard and a SATA power cable from the power supply.
- For M.2 SSDs: No additional cables are needed.
6. Secure the side panel and reconnect power and peripherals.
👉If you are using a laptop, follow these steps:
1. Power down and remove the battery (if applicable).
2. Unscrew and open the bottom panel. Locate the hard drive bay.
3. Remove the old drive (if replacing). Unscrew the drive and gently disconnect it from the SATA or M.2 slot.
4. Insert the new drive:
- For SATA HDDs/SSDs: Slide the drive into the SATA connector and secure it with screws.
- For M.2 SSDs: Insert at an angle and secure with a small screw.
5. Close the panel, screw it back in place, and reconnect the battery.
Part 2: Install operating system
With your new hard drive installed, it's time to install the operating system using the bootable installation media you created earlier:
1. Insert the bootable USB drive into a USB port on your computer.
2. Turn on your computer and enter BIOS/UEFI. Set the USB drive as the primary boot device to boot from it.
3. When the Windows Setup screen appears, choose language to install, time and currency format, keyboard or input method and click Next. Then select Install Now.

4. Enter the product key (if required).
- If you have a valid Windows license key, enter it when prompted.
- If reinstalling Windows on a device with a digital license, select I don’t have a product key and activate it later.
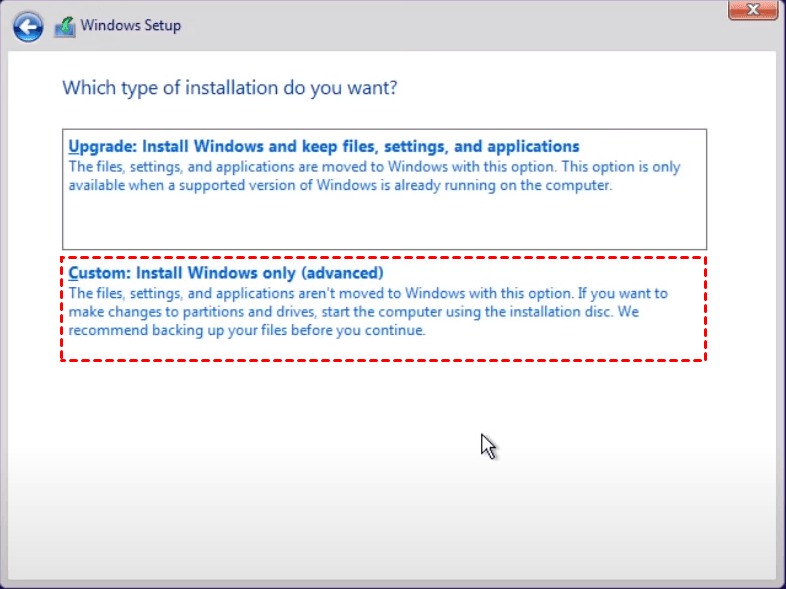
5. Select Custom: Install Windows only (advanced). This allows you to install Windows on the new hard drive rather than upgrading an existing OS.
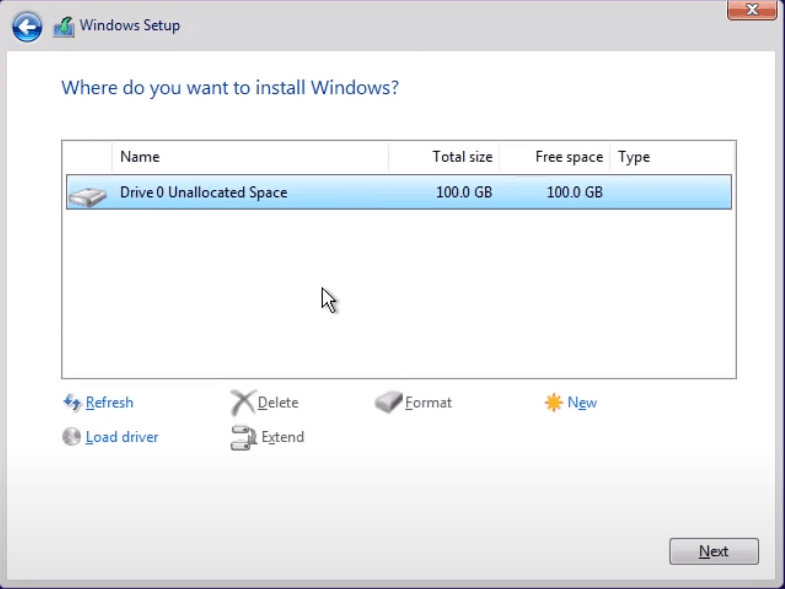
6. Select the new hard drive (generally shown as unallocated space) to install Windows 11 and click Next.
7. Windows will copy files, install features, and configure settings automatically. Your PC will restart several times during the process.
8. After installation, follow the on-screen instructions to set your region and keyboard layout, sign in with a Microsoft account or create a local account, and customize privacy settings. Windows will finalize the setup and boot into the desktop.

Notes:
★If you keep the old hard drive and old OS after installing new OS, you'll need to set your computer to boot from the new operating system by entering BIOS and choosing the new hard drive as the first boot device.
★If your new OS works fine and you only want to keep one operating system on your computer, you can wipe the old hard drive for reuse.
Bonus: Transfer old OS to new hard drive
If you are used to using the old system, you can move your existing operating system, settings, and files to the new hard drive without reinstalling everything. AOMEI Backupper Professional is an excellent tool for this, offering an easy and reliable way to migrate your OS.

-
Seamless OS Migration: Clones your entire system, including boot files.
-
Supports SSD & HDD: Works with SATA, NVMe, and M.2 drives.
-
Intelligent Clone: Clones larger HDD to smaller SSD by copying only used sectors.
-
SSD Alignment: Auto-aligns SSD to ensure optimal performance and lifespan.
Download AOMEI Backuppernow to have a try! Learn how to move existing OS to a new hard drive below:
1. Use a SATA-to-USB adapter to connect the new drive externally. If your PC has an extra drive bay or M.2 slot, install the drive directly.
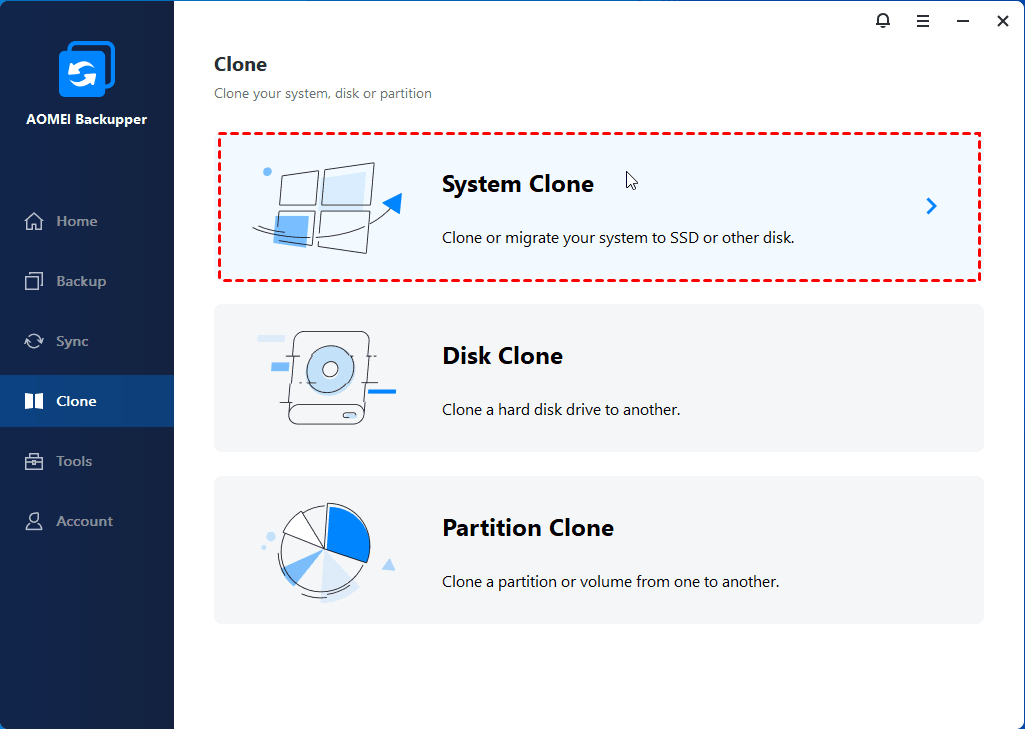
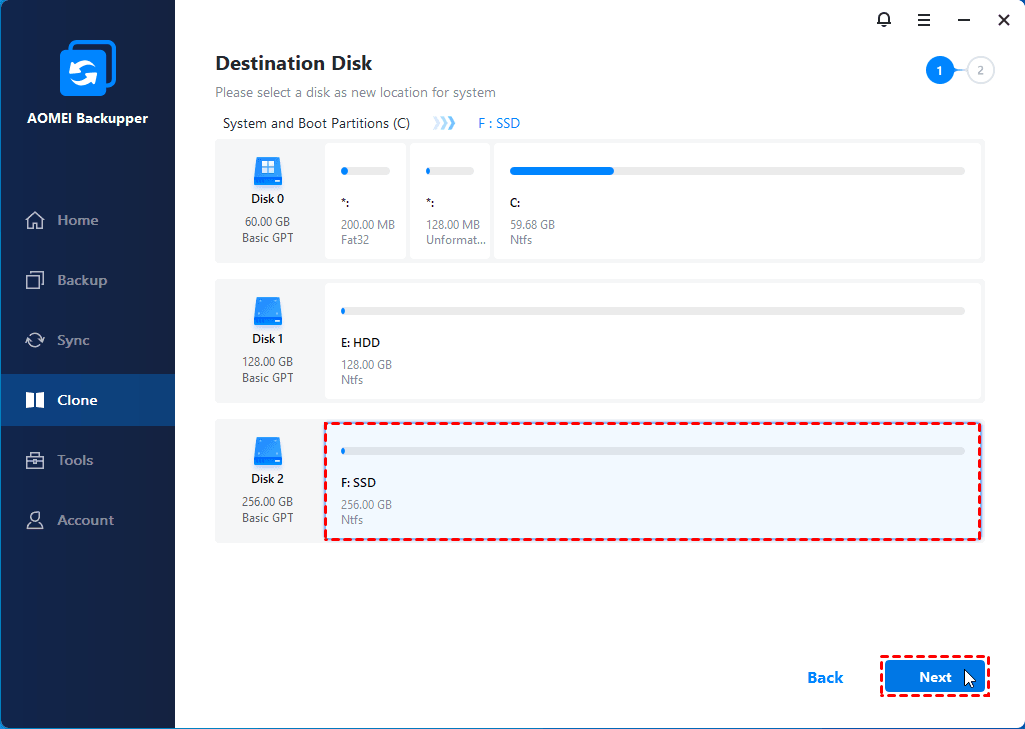
2. Install and launch AOMEI Backupper Professional. Then navigate to Clone > System Clone.
3. The software will automatically detect the necessary system partitions. Choose your new hard drive as the destination.
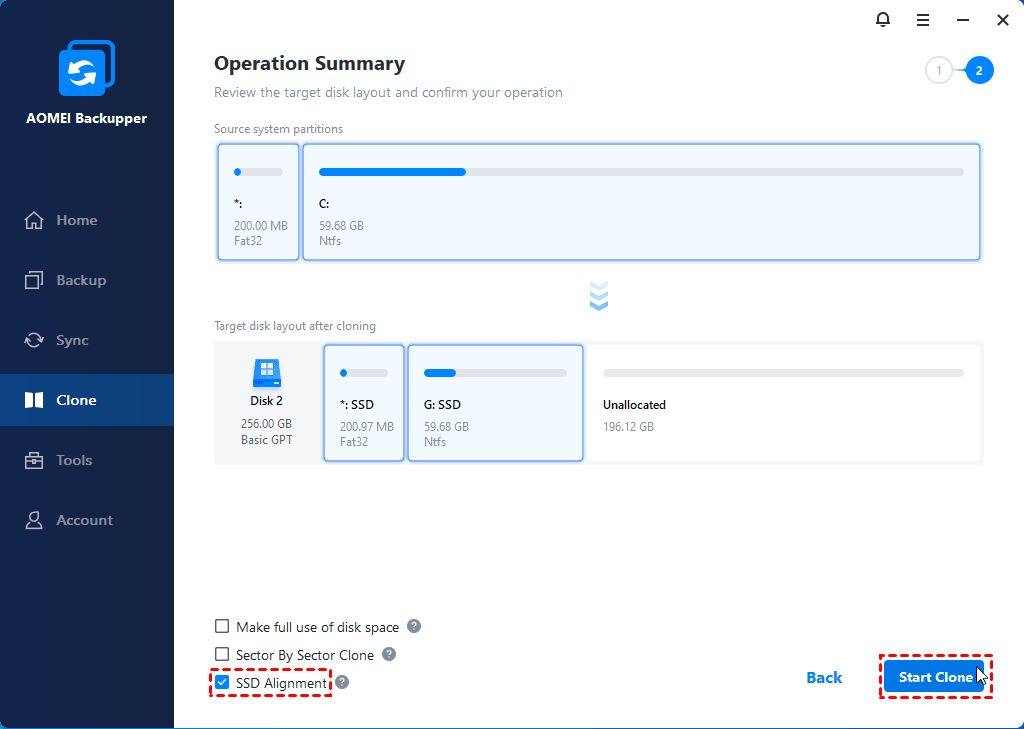
4. Enable SSD Alignment or Sector-by-sector clone based on your need. Click Start Clone to begin the process.
5. Restart your PC, enter BIOS/UEFI, and set the new drive as the primary boot drive. Your system should now boot from the cloned drive successfully.
Conclusion
That’s all for how to install new operating system on new hard drive. It is a straightforward process when you follow the right steps. Besides performing a clean install using installation media, you can choose to clone your existing OS with AOMEI Backupper. Both methods ensure a smooth transition to a fresh drive.
Moreover, AOMEI Backupper is professional Windows backup software. You can use it to backup installed programs in Windows. Why not give it a shot?