How to Create Lenovo Recovery Disk in Windows 10 (3 Ways)
You can learn 3 easy ways to create a Lenovo recovery disk in Windows 10. When your computer encounters any problems, you can use this recovery disk to restore your PC.
What Is the Recovery Media?
Recovery Media is DVD or USB media containing a backup of the original factory condition of a computer as configured by Lenovo, or a PC system user. Recovery Media allows you to reformat the hard drive, reinstall the operating system and reset the system to the original Lenovo factory condition.
Why Create Lenovo Recovery Disk in Windows 10?
This article summarizes for you the common situations when you need to use a recovery disk.
- Hardware failure: When your hard disk drive has encountered a failure or needs to be replaced, you need to use the recovery disk.
- Operating system or software program corruption: When your Windows won't boot, Windows blue screen or black screen, you can use the recovery disk to help you reinstall the system and get it back to factory settings.
How to Create Lenovo Recovery Disk in Windows 10
Next, this article will introduce 3 methods in turn for creating a Lenovo recovery disk in Windows 10, the built-in tool and professional third-party software can help you achieve the goal. You can choose any one of them according to your own needs.
Create Lenovo Recovery Disk in Windows 10 via Windows Built-in Tool
The first method is to create a recovery disk using Windows built-in tool. To create Lenovo recovery USB in Windows 10, you need to prepare a USB flash drive with at least 16GB of storage. Then insert it into your desktop or laptop computer and make sure it is detected. You can follow the steps below.
Step 1. Type recovery drive in the search box and select Create a recovery drive.
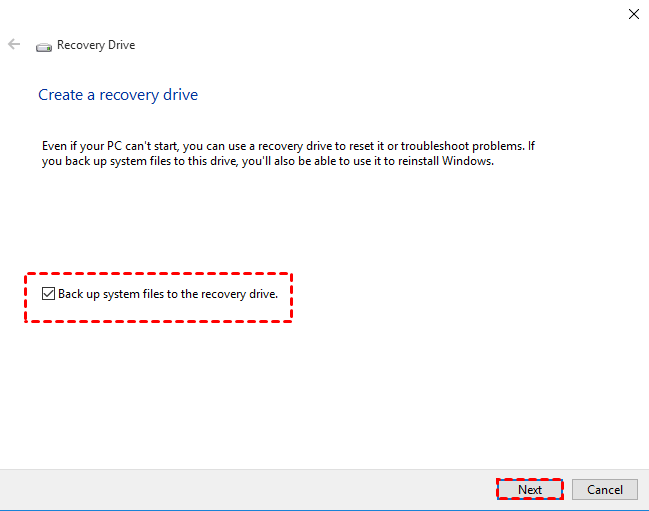
Step 2. Tick Back up system files to the recovery drive option and click Next. This option can help you reinstall the system using the system file in a pinch.
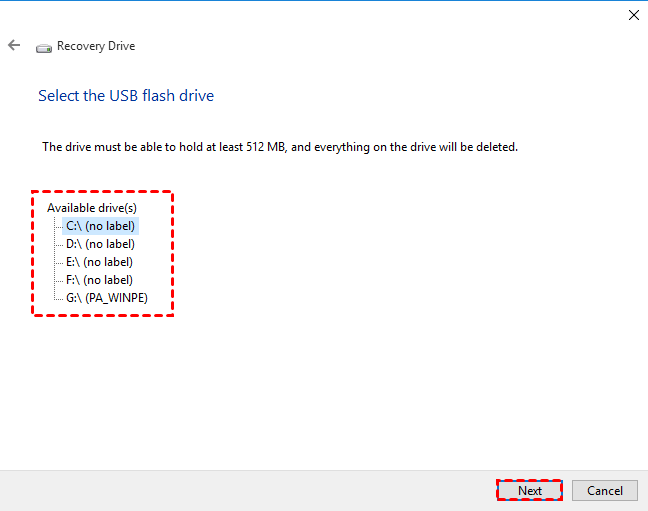
Step 3. Select the USB drive and click Next.
Step 4. Click Create for creating the recovery drive.
Create Lenovo Recovery Disk in Windows 10 via Lenovo USB Recovery Creator tool
You can also use Lenovo USB Recovery Tool to create Lenovo Windows 10 recovery key that can be used to reinstall Windows on your computer. To run the Lenovo USB Recovery Creator tool and create the USB Recovery key, you need to satisfy the System Hardware Prerequisites below.
- 16GB or larger USB key, USB 2.0 or 3.0 key (Note: all data on the USB key will be deleted)
- A computer to download the recovery files and create the USB recovery key
- At least 20GB of free space for downloading recovery files
- Microsoft Windows® 7 or later
- 20 Mbps Internet connection (recommended)
If you meet these conditions, please follow the steps below.
Step 1. Submit recovery media order, download Lenovo Recovery Media Creator tool.
Step 2. Run the Lenovo USB Recovery Creator tool and select the Download Recovery files and Create a Recovery USB key option.
Step 3. Type your Lenovo ID and password that was used when the digital download order was placed. Click the Sign-in button.
Step 4. Select your Digital Download order.
Step 5. Select the download location and continue to the downloading process. The download location should be on your computer. Please remember the location you selected in case you need to find the downloaded files.
Notes:
- Recovery files are several gigabytes in size. Depending on your network connection, this process may take several hours. The Lenovo Digital Download Tool shows the time remaining to complete the process.
- You can pause the download process by clicking the Pause button and resume later where you left off.
Step 6. After all recovery files have been downloaded, insert the USB key (preformat the USB flash drive to NTFS or FAT32, and make sure it is 16GB or above) that you want to use as a USB Recovery key into one of the USB connectors.
Step 7. Click Yes to create partitions and wait patiently while the USB recovery key is created. Don’t remove it before completing the process.
Tip:
If you click Yes, all data currently on the selected USB key will be deleted as part of the process. Please backup files you want to keep onto other media before you continue.
Step 8. When the USB recovery key is ready, you can remove the key from the computer. Click Yes to delete the recovery files or No, Exit to keep them and close the tool.
Note:
If you keep the recovery files, you can create another USB Recovery key in the future by running the Lenovo USB Recovery Creator tool again. If you delete the files, you will not be able to re-create this USB Recovery key.
Create Lenovo Recovery Disk in Windows 10 via Third-party Software (Easiest)
Besides the above two methods, you can also choose a simpler way to create a Lenovo recovery disk in Windows 10. That is to use the free third-party software AOMEI Backupper Standard to help you. It not only helps you achieve the goal easily, but also easy to operate and understand. The created recovery disk can be used for other computers if you need. It also has the advantages below.
- 3 bootable media: It offers 3 bootable media, namely CD/DVD, USB and ISO files. Even if you don't have a DVD/CD or USB drive, you can create an ISO image file so that you can burn it to any removable device.
- 2 boot modes: The recovery disk created with this software supports both UEFI and Legacy BIOS boot modes.
- Different types of computers: The recovery disk can boot computers with Windows systems, whether 32-bit or 64-bit.
- Multiple computer brands: It supports different computer brands such as Lenovo, Samsung, Asus, etc. So you can use it not only to create a Lenovo recovery disk, but also to create a recovery disk for other computers.
- Different systems: It supports multiple Windows operating systems, such as Windows 11/10/8/8.1/7/XP/Vista, etc.
Then you can follow the graphic tutorial to create a Lenovo recovery disk in Windows 10 with just a few clicks.
Step 1. Download AOMEI Backupper Standard, install and open it. Then click Tools > Create Bootable Media.
Step 2. Select Windows PE - Create bootable disc based on Windows PE. Then click Next.
Tip:
You can only create a Windows 10 Legacy boot USB on the older version of a computer. Tick the Download WinPE creating environment from internet box and then the bootable USB can be used on both UEFI and Legacy BIOS computers.
Step 3. Select USB Boot Device and click Next.
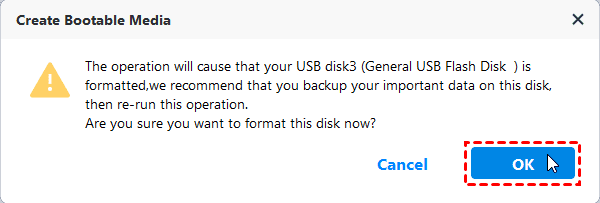
Step 4. Then a pop-up window will prompt you to format the USB drive, click Yes to begin to create a Lenovo recovery disk in Windows 10.
Note:
- Since the USB drive must be formatted, you can do a disk backup in advance if your USB drive has many important files.
- If your computer can boot normally and you want to use this created recovery disk to restore your system to its previous state. Then you need to create a system backup in advance with AOMEI Backupper Standard.
Summary
Recovery disk plays a very important role when your computer encounters problems, which can help you reinstall your system and bring your computer back to its factory settings. This article shows you 3 different ways to create a Lenovo recovery disk in Windows 10. You can use Windows built-in tool or Lenovo USB Recovery Creator tool to help you.
If you are looking for the easiest way, then you can choose the free third-party software AOMEI Backupper Standard that allows you to create bootable USB/CD/DVD or ISO files. It supports both UEFI and Legacy BIOS boot modes. You can also freely choose different computer brands and Windows operating systems.
In addition, you can use this software to create a system backup in advance, so that if your computer has any problems, you can use this backup to restore. You can download this software to explore more useful features.


