How to Restore Bootable USB to Normal: Easy Fixes
This article provides solutions for restoring your bootable USB to a fully functional, normal state. We explore different approaches, including the use of native OS tools and third-party software. We also answer some faqs and provide tips for preventing future issues with USB drives.
By Sebastian Updated on September 10, 2024
How to Convert Bootable USB Back to Normal with Full Capacity?
“I didn't pay attention to the disclaimer telling me that my USB data would be deleted when installing the Windows install media tool. so all my data got deleted and my USB was converted into a bootable USB. I immediately downloaded a file recovery program. but how do I return the USB to a normal USB with its full capacity?”
– Microsoft Community
USB drives are versatile and often used to create bootable media for operating system installations, diagnostics, and recovery. Once these tasks are complete, users may want to restore the bootable USB to normal to reclaim its full storage capacity. However, the residual boot files and altered partitions can pose challenges. This guide will walk you through multiple methods to restore a bootable USB drive to its original state, ensuring it's back to functioning as a regular storage device.
Possible Reasons for Restoring Bootable USB to Normal
There are several reasons why someone might want to restore a bootable USB to its normal state. Here are the most common ones:
📌Reclaim Full Storage Capacity: Bootable USB drives often have hidden partitions or files related to the boot process that take up space. Restoring the USB to a normal state helps users regain its full storage capacity for everyday use.
📌Repurpose the USB for Regular Use: After serving its purpose as a bootable drive (for OS installation or troubleshooting), users may want to repurpose it for regular file storage or data transfer.
📌Remove Boot Files: Bootable drives may contain system files that are no longer needed. Restoring the USB to its normal state deletes these files, simplifying the drive’s structure.
📌Fix Partition Issues: Bootable USB drives can have complex partition structures that confuse the operating system, leading to errors when accessing the drive. Restoring it to a single, usable partition can resolve these issues.
Method 1: Format Bootable USB in File Explorer
Formatting a bootable USB in File Explorer is a common and straightforward way to return it to its original state. Here’s how to do it:
1. Press Windows + E to open File Explorer. Locate your bootable USB flash drive under the "This PC" section.
2. Right-click the USB drive and select Format from the menu.
3. Choose the file system (NTFS or FAT32) and allocate unit size based on your needs. To revert to the original settings, you can click Restore device defaults.
4. Click Start to begin formatting the USB drive.

Method 2: Remove Bootable Status from USB Using Disk Management
You can also use Disk Management to format a bootable USB and return it to regular use for storage. Here's how:

-
Press Windows + R to open the Run dialog. Type diskmgmt.msc and press Enter to launch Disk Management.
-
Find your bootable USB drive in the list. Right-click on it and select Format.
-
Choose the appropriate file system and set the allocation unit size to Default. Then, click OK to start the formatting process.
Method 3: Convert Bootable USB to Normal via Diskpart CMD
If Disk Management doesn't work, you can use the Diskpart command to fully reset your bootable USB. Follow these steps:
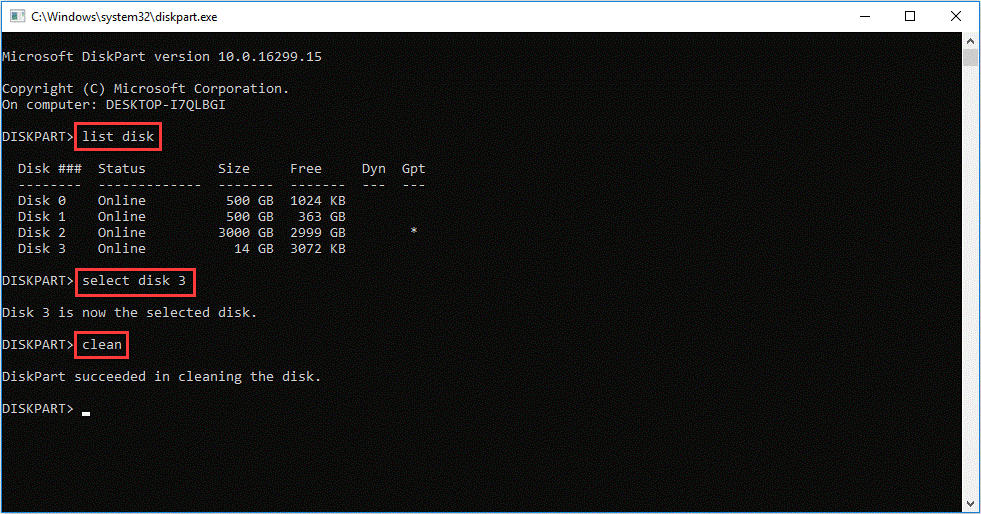
1. Press Windows + R to open the Run dialog, type Diskpart, and hit Enter.
2. In the command window, type list disk, and press Enter to view all connected drives.
3. Type select disk X (replace X with your USB drive’s number) and hit Enter.
4. Next, type clean and press Enter to erase all data and boot files from the USB.
5. Type create partition primary to set up a new partition, then press Enter.
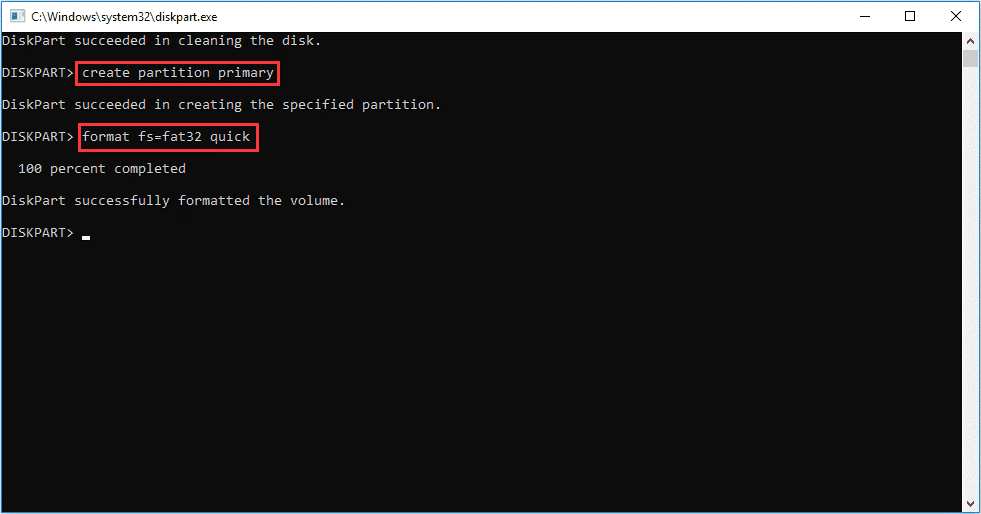
6. Now, format the drive by typing format fs=fat32 quick or format fs=ntfs quick depending on your needs. Press Enter.
7. Once done, type exit and hit Enter to close Diskpart.
Better protect Your USB drive after restoring the USB
After restoring your USB drive to full capacity, you might want to use it for transferring files, creating bootable media, or recovering a USB disk. For that, AOMEI Backupper Standard is a great, free tool to consider.
With AOMEI Backupper Standard, you can back up all files on your USB drive and even clone the entire drive to another one. It allows you to sync files or back flash drives automatically whenever the USB is connected, saving time and effort.
This tool can also make a bootable USB drive, which comes in handy if your operating system fails to boot. You can use the USB to enter WinPE mode to back up important files or restore your system image—perfect for disaster recovery.
AOMEI Backupper is designed specifically for Windows and is compatible with the latest version, Windows 11. Its simple and intuitive interface has earned praise from users worldwide. Download it and give it a try!
Frequently Asked Questions
Q 1: Why does my USB show less storage after creating a bootable drive?
A 1: Bootable USB drives often have partitions or files that reduce visible storage. Restoring the USB by formatting and deleting these partitions will recover the full capacity.
Q 2: Can I use the same USB for booting and regular file storage?
A 2: Yes, but partitioning is required. You’ll need to divide the USB into separate sections: one for booting and one for regular file storage. However, for simplicity, it’s better to keep them separate.
Q 3: What file system should I choose when formatting a bootable USB?
A 3: For compatibility across platforms, choose FAT32 or exFAT. NTFS is ideal for Windows users but may not work with some devices.
Key Technical Terms
- FAT32 File System: A widely compatible file system used for external drives, like USBs, allowing easy data transfer between different operating systems.
- Partition: A logical division of a storage device that separates data for different purposes, such as booting and storage.
- Boot Sector: The area of a storage device that contains information about how to boot a computer’s operating system.
Expert Tips
-
Back-Up Before Formatting: Always back up any essential data from your bootable USB before starting the restoration process. Once formatted, previous data is unrecoverable.
-
Use Reliable Tools: When restoring a bootable USB, choose reliable software like AOMEI Backupper to avoid incomplete formatting or partition errors that can render the USB unusable.
-
Test the USB Post-Restoration: After restoring your USB, test it by transferring files and checking storage space to ensure it’s fully functional and back to normal.
Conclusion
Restoring a bootable USB to its original state doesn’t have to be complex. Whether you use built-in tools like Disk Management and Disk Utility, or turn to third-party software such as AOMEI Backupper, the process is straightforward and restores your USB to full functionality. By following the solutions and tips laid out in this guide, you can ensure your USBs remain versatile and ready for both bootable tasks and regular storage.